 Windows 10 Anniversary Update, otherwise known as Windows 10 Version 1607, was released earlier this month.
Recent updates from Microsoft seem to indicate that only about 16% of machines running Windows 10 have actually been updated.
If you’ve got Windows 10, you’re going to get this latest update sooner or later. When you do, you’ll want to – once again – review your system’s settings to improve your privacy.
Fortunately, not much has changed…
It’s not so bad, really.
If you went through the settings in my earlier post, Protect your Privacy in Windows 10, then you only have a few things left to do.
In short, updating with the Win 10 Anniversary Update seems to pseudo-randomly turn on 2 or 3 settings that you previously turned off.
So, just click the link above and go through the settings again!
There is also a new item in Settings -> Privacy: Notifications
You can decide whether to turn this item off, or leave it on (default). I turned it off.
Done! Well, sort of…
Cortana
Cortana is kind of sort of more evil now, but not really.
Even when you’re not using Cortana itself, the default “search my puter” is still called Cortana – just to confuse you.
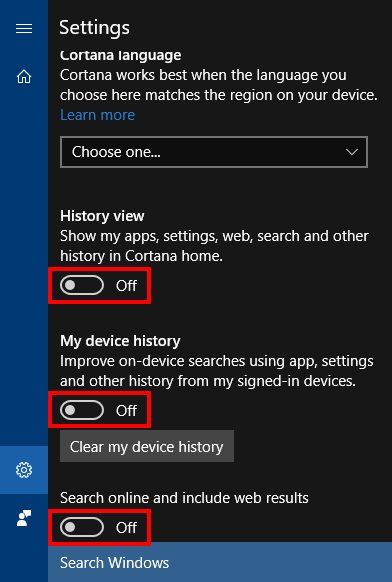
The settings have also changed a bit, but you can of course change them:
- Click the Search/Cortana icon on the taskbar
- Click the Gear icon
- Turn everything off, like so:
You can still search for files on your puter!
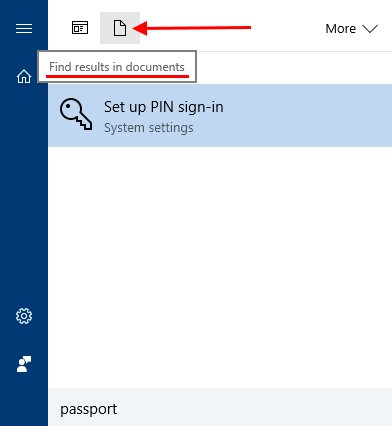
Note that you’ll have to click one extra time now in Windows 10… You click Start or hit the Windows key on your keyboard, type your search term, and then… nothing happens!
The trick is to click the Documents icon after entering your search term, like so:
Why do they make you click one extra time? I have no idea.
This worked perfectly well in Windows 7 – without any extra clicking. Apparently, if you don’t want to use Cortana, you get to click one more time as a sort of penalty.
For those who are used to Windows 7’s search “just working”, this is probably the most annoying new “feature” of Windows 10.
Network Settings
If you’re sharing files on your local network with others, you’ll need to redo your sharing settings.
- Open Network and Sharing Center
- Click Advanced Sharing Settings
- Review all your sharing settings
Note that this is only for old-fashioned shared folders… If you’re using a HomeGroup, you should be good to go with no changes after the Anniversary Update.
Turn off Superfetch again
If your puter has an SSD (a solid state hard drive), you don’t need the Windows feature Superfetch. Superfetch is a service where Windows basically preloads into RAM any software that you commonly use.
The idea is that if you use Thunderbird and Chrome a lot, Windows will preload this software in memory when your puter boots. Then, when you click the programs’ icons to run them, poof! They start up very quickly.
Well, if you have an SSD, this is pretty useless. In fact, many SSD manufacturers like Samsung recommend that you turn off Superfetch.
Every time one of these big Windows updates rolls in, for some reason Microsoft automatically re-enables Superfetch, regardless of the previous setting. If you have an SSD, here’s how you turn it off:
- Click Start
- Type: services
- Click the Services (Desktop App) item
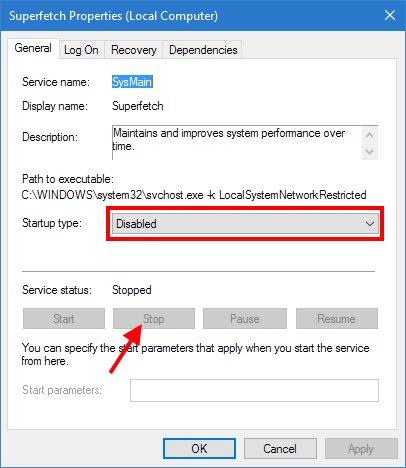
- The Services window displays. Scroll down and find Superfetch in the list
- Right-click Superfetch, then select Properties
- Click the Stop button
- In the Startup type dropdown menu, choose Disabled
- Click OK to save your settings
- Close the Services window
Free up space on your hard drive
The last thing you might want to do is tell Windows 10 to delete your backed-up previous versions of Windows.
Every time you perform a major upgrade of Windows, it keeps a copy of your old C:\Windows directory. In the past, this was to allow you to revert back to Windows 7 if you so desired.
After the Win 10 Anniversary Update, you would be rolling back to the older build of Windows 10 – and you only have 10 days now to do the rollback.
So, if you’d like to free up potentially 20GB or more of space on your C:, just the follow the directions here:
Free up disk space after a Windows 10 upgrade
All done!


Thanks for the article! Very useful. I also have a question regarding Services in general. Some sites have lists of Services that can be deactivated. Is there any point in doing it, and if it is indeed going to improve performance? Or better not to tweak things? Thanks, Scottie!
You can turn a lot of Services off if you want, but I usually don’t. Generally, turning off certain services will seem to work fine, but then suddenly something stops working and you have to re-enable services, try again, etc. So, unless it’s something like Superfetch (if you have an SSD) or the data-sending one in Win 7, I usually don’t bother. The only exception is certain drivers like Intel’s Management Engine Interface, which is kind of pointless. So, I guess it kind of depends…
All right, better leave things as they are. Thanks!
Revisiting the topic of Services. Just now my computer’s cpu is working super hard, with 30% assigned to either “Service host: Local System” (14) or “Service host: Local Service”(6). I read somewhere else, that the only way to find the responsible service is to click on all of them one by one. But, hey, that’s crazy! So the question is, is there another way to find what service tasks my computer and disable it if it is evil or not needed. Thank you!
You can open Task Manager (Ctrl-Alt-Del, click Task Manager) and then check the Startup tab. Disable anything that doesn’t need to be running at startup. That might help, but as for what the “Service host: Local Thingy” thingy actually is, that’s always fun to figure out. Usually, it’s something like a background malware scan (Windows Defender or sometimes whatever other stuff you’ve got installed), and/or the Indexing service (which you can’t do much about). You might also check MalwareBytes if you have that installed… Open it up, then do Settings, Advanced Settings, and make sure you check the box “Reduce priority of scans to improve multitasking”. Other than that, usually when you kill one of those “Service host” thingies, it comes right back in a minute or so. It’s a pain to figure out sometimes…
Yeah, I tried to close it, or at least one of the services, and it came back shortly after. Well, it is doing “something” for 3 hours already. Thank you for your advice!