
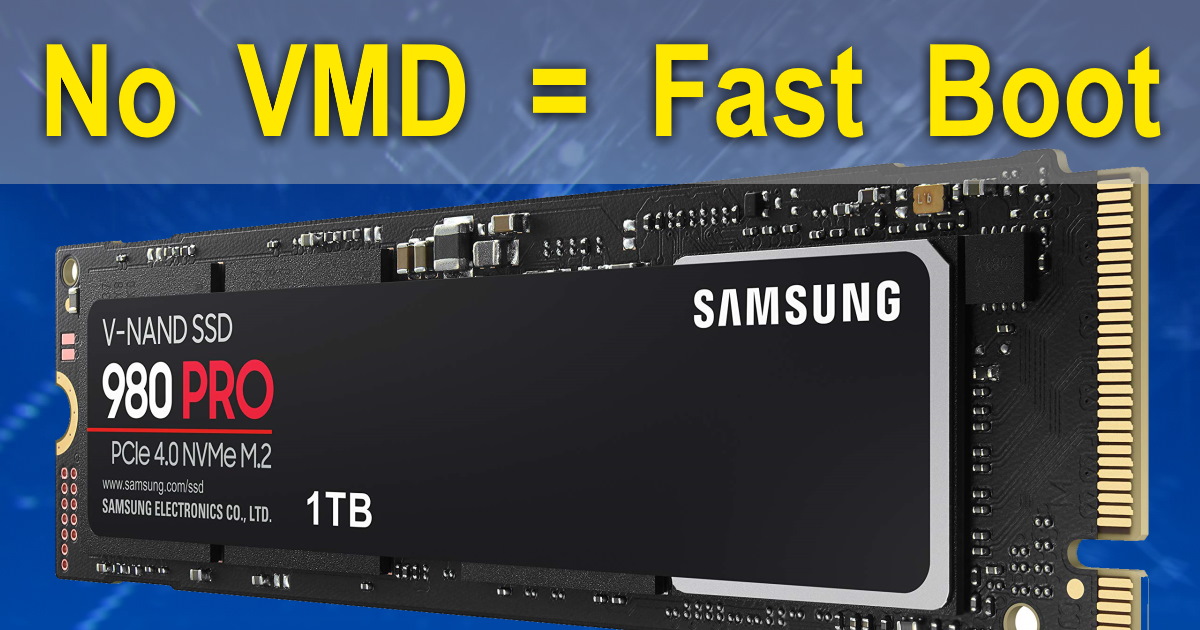
 If you have an 11th generation or newer Intel processor, your system might be using Intel VMD.
VMD, or Volume Management Device, is a server-ish bit of technology where your processor more or less “hijacks” the management of NVMe disk drives in your puter.
When VMD is enabled, you MUST use Intel’s RST drivers – even just to do a clean install of Windows 11.
Well, what happens if you got your puter and it’s using VMD, but you want to remove it?
Easy!
If you’re like me…
I was an early adopter of Intel’s 12th-gen processors. I got my shiny new motherboard, fired everything up, and I enabled Intel VMD because… well, why not?
I couldn’t find much about it, and it looked harmless enough.
Then, a few months later while building some new PCs, I wrote this article:
NVMe drive missing or not booting? There’s a simple fix!
Much to my dismay, I noted that on my own puter, VMD was enabled! EEK!
Wait, why do I care?!
Well, first of all, if you have a Samsung NVMe M.2 drive, sometimes you won’t be able to use Samsung Magician to update your drive’s firmware.
But more importantly, there is this idea floating around that using VMD makes your drive faster. That’s simply not true in my case.
In fact, with my Samsung 980 Pro, the drive is just as fast as before. What’s more, the time spent watching the “spinny loader” as Windows fires up went from 6 seconds with VMD to 3 seconds without VMD!
In other words, my Windows startup actually became 2X faster simply by disabling VMD!!!
How to turn off VMD
It’s pretty straightforward.
First, create a System Restore point just to be safe in case anything goes wrong. To do that:
- Click the Start button
- Type: system restore
- Click: Create a restore point
When that’s done, carry on.
Next you’re going to remove the Intel VMD devices listed in Device Manager. You are NOT going to delete the drivers! If something goes wrong, you’ll need to revert your BIOS/UEFI back to VMD, so you may need them.
So, first, click Start and type: Device Manager
Open Device Manager, and scroll down to find Storage controllers:
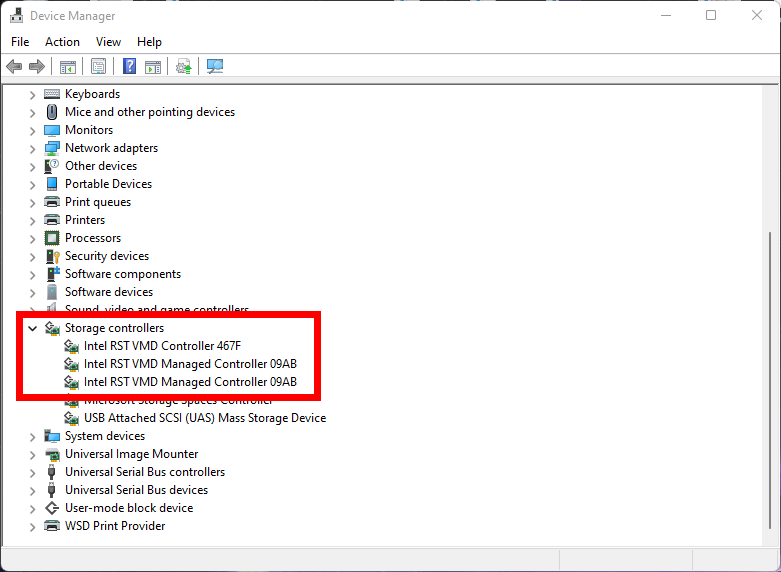
If VMD is enabled, you should see several Intel RST VMD… entries.
For each VMD entry, you must:
- Right-click it and choose Uninstall device
- In the popup window, make sure Attempt to remove drivers… is NOT checked!
- Click Uninstall button
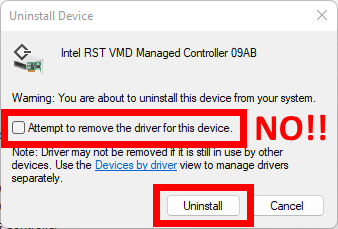
Repeat for any other RST VMD entries…
It will tell you to reboot, but DO NOT REBOOT yet!
Now the fun part: Enable Safe Mode
- Click Start
- Type: startup options
- Click: Change advanced startup options
- Under Advanced Startup, click the Restart now button
Your puter will reboot.
At this point, you need to go into your BIOS/UEFI and disable VMD.
How exactly to get into the BIOS depends on your motherboard, but usually (before Windows boots) you tap either the Del or the F2 key.
Then, once in the UEFI config, you’ll need to find and turn off VMD. That also depends on the motherboard maker, but the following is how to find the setting on most Asus motherboards from the Advanced menu:
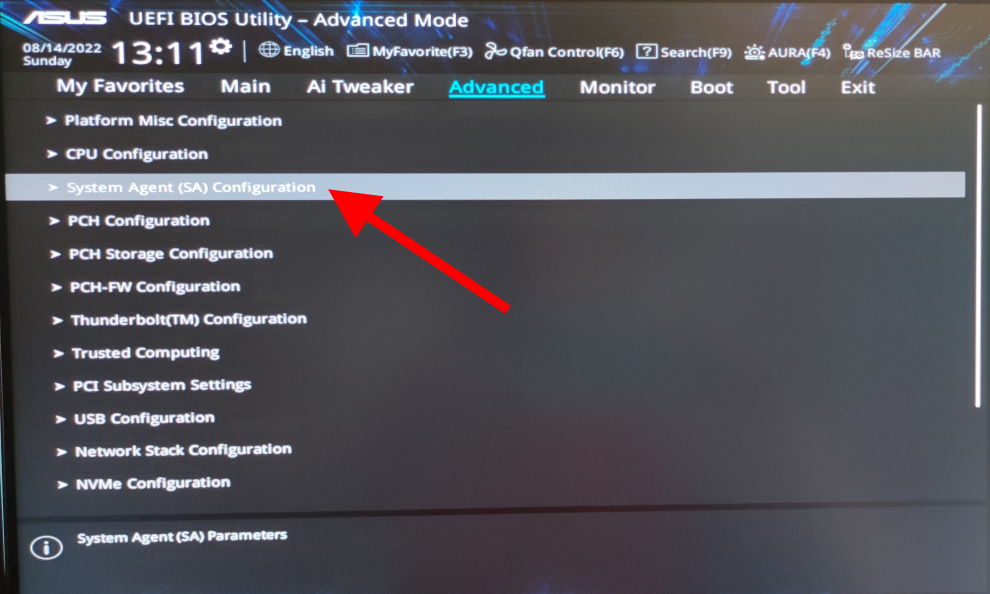
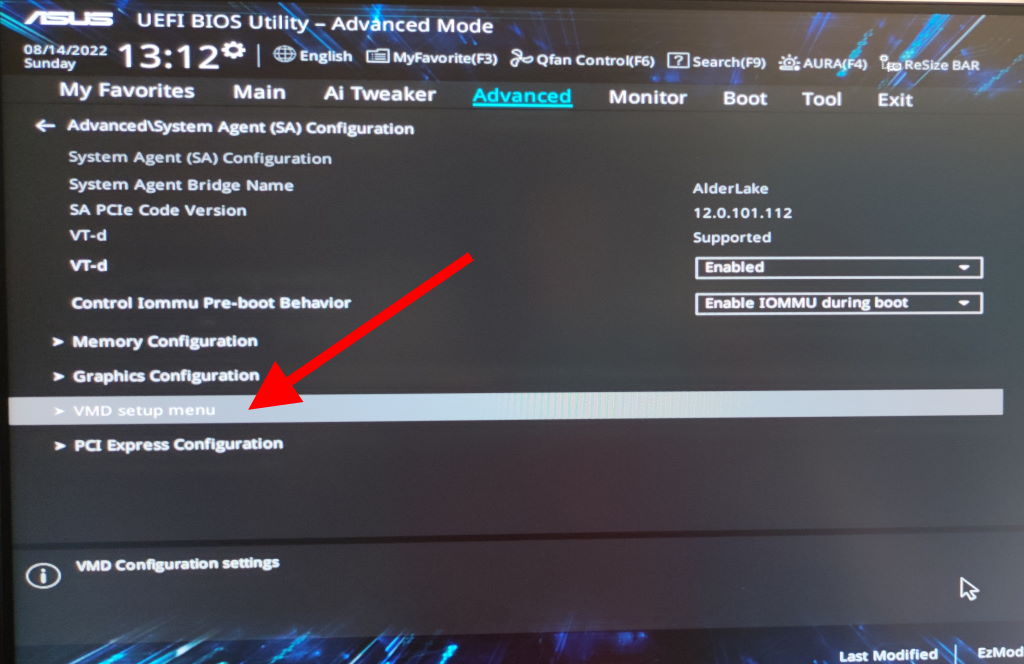
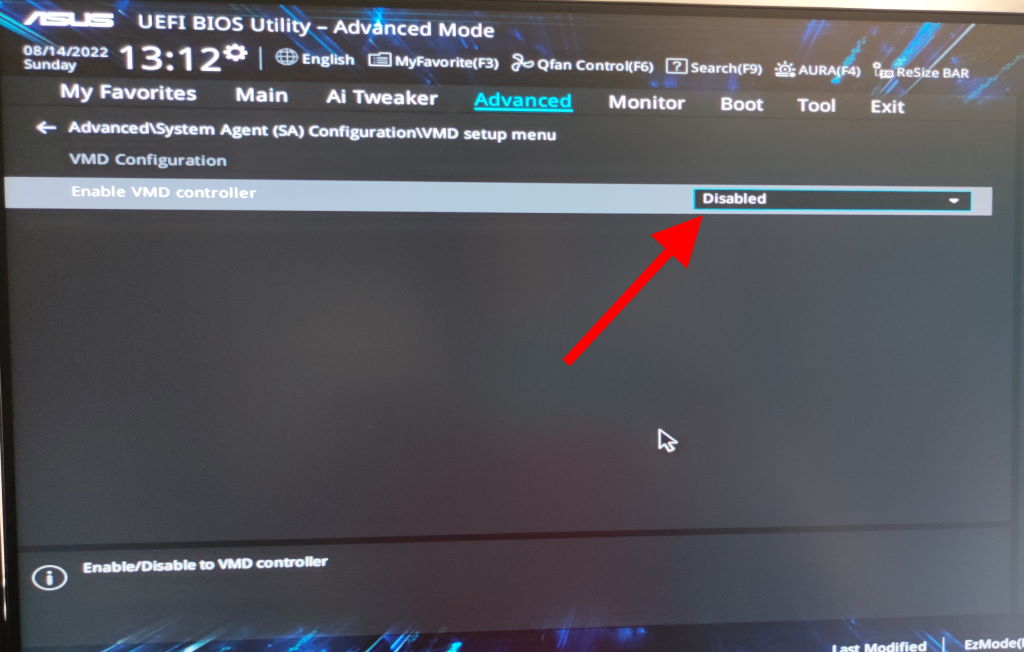
Right. Now, save and exit so that your puter boots again…
Once the puter boots, you’ll see the Choose an option screen:
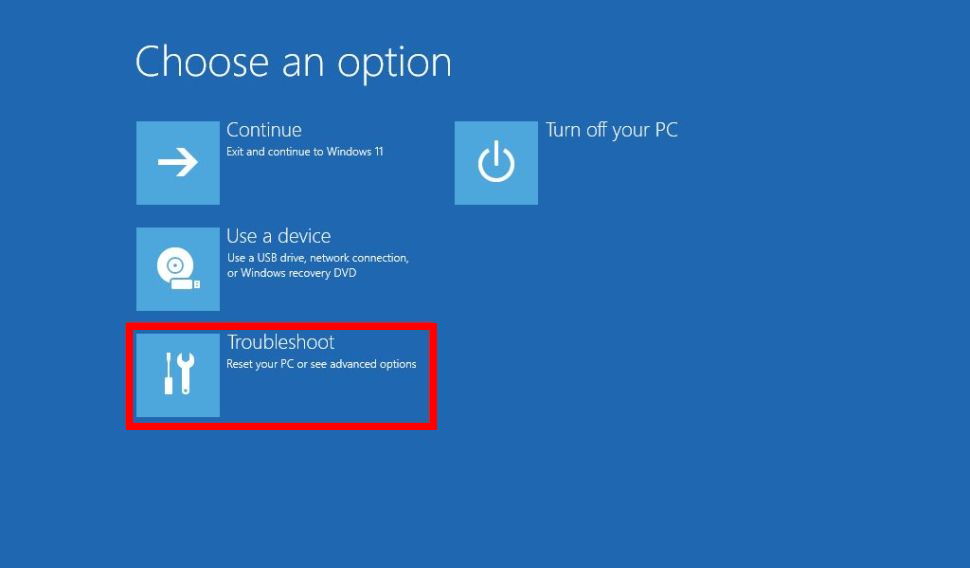
Click Troubleshoot, which will show you more options:

Choose Startup Settings, and then you’ll see this screen:
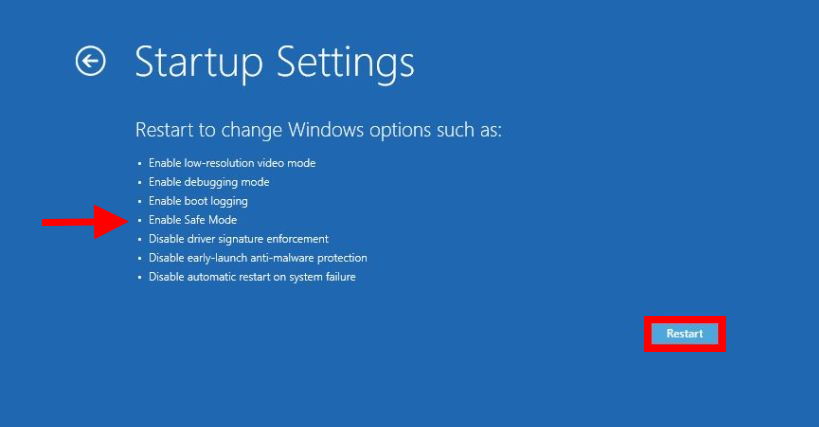
Yes, you’ll now click the Restart button during this needlessly complex series of operations just to boot into Safe Mode!
Your computer will reboot AGAIN, and this time you’ll see this screen:
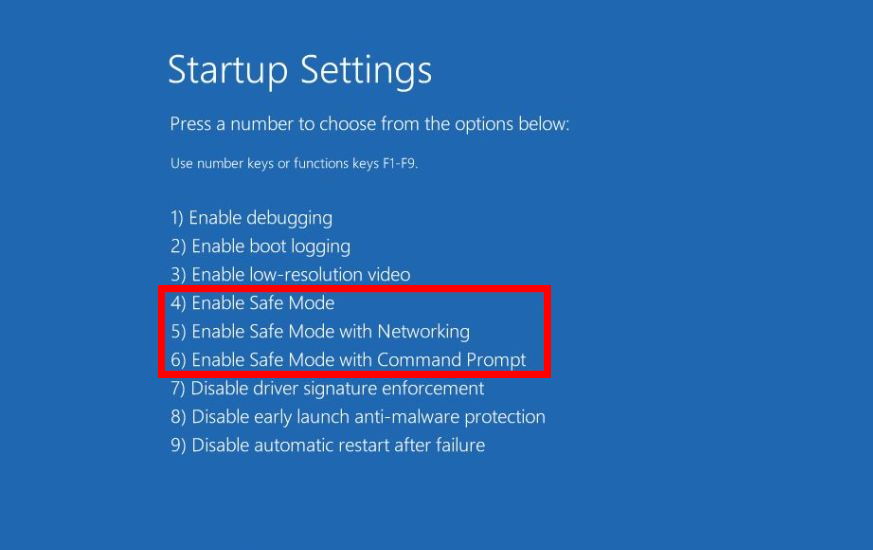
You’ll need to pick a Safe Mode option. Just tap the 4 key on your keyboard.
Windows will – finally – boot into Safe Mode!
Once you’ve safely booted up, just restart the puter again. Windows should boot normally.
If you look in Device Manager again, you should see:

Ta-DA! You are now using the Standard NVM Express Controller.
Exciting Conclusion
So, yeah… Do yourself a favor and turn off VMD. And then the next time you upgrade your boot drive or move it to a new system, you won’t have any “drive not found” errors to deal with.
And if you need a fast NVMe drive, check out the Samsung 980 Pro 1TB on Amazon (affiliate links):
That’s my C:, and I LOVE it! Plus, prices have dropped A LOT in recent years, so ultra-performant boot drives are no longer just for the rich and famous. 😉


I’ll keep this in mind for my new PC build. At this moment my intention is to use AMD Ryzen, rather than Intel.
What are your thoughts?
The Ryzen processors are quite good! But you won’t have to worry about VMD since that’s an Intel thing.
I panicked for a second when I wanted to disable intel rapid storage. I hate this program now. Thank you so much!
I have a HP Laptop 15-dw3024nia, The problem is that to boot other software like Acronis to backup the drives, there is no option to reload the SSD driver file for detection. (IRST)
If possible, guide me how to inject the internal hard drive of such devices for all bootable programs.
The only case I can think of where that should matter is if your software (like Acronis) creates a bootable USB stick for you, for example. In that case, re-running the ‘make bootable recovery’ process should do the trick. Otherwise, turning OFF VMD should make everything more compatible, not less.
Well, I suppose the other thing I can think of is if your lappy manufacturer included some kind of custom bootloader for Windows/recovery. In that case, you’d have to do battle with that bootloader… which is why I never get computers where they do silly things like that. I had one like that years ago, and it was a PITA to remove it! I had to replace the HDD with a fresh one, turn off their nonsense in the BIOS, and do a clean install of Windows. That was fun.
My laptop is model (HP 15-dw3024nia) and it does not have the ability to disable VMD Controller in the Bios!
The only way is to make it bootable with Acronis software and add the drivers to the bootable USB. (Of course, not all bootable programs have this capability)
OH… 🙁 Well, in that case, I guess you’re kinda stuck with it.
THANK YOU!!! This has eliminated 30+ second freezes at boot for me on my otherwise very fast new ASUS laptop.
Hello, I followed your guide and it is working marvelous!
Do you how do I re-enable VMD back?
You just reverse the procedure. Since the Intel RST drivers are still there, your puter should boot up and use them again.
Hello.
On my Acer A-515-56G it’s not possible to revert to VMD back, even though I didn’t erase the drivers. If I change the configuration in BIOS, the system doesn’t boot up, even in safe mode.
Any hint on how to push the laptop to use the RST VMD during the boot?
Hmm… Well, isn’t that a daisy? I haven’t actually tried to re-enable VMD on my puter. I did read that one guy had to re-install the RST drivers from within safe mode. You could also try manually selecting the RST drivers in Device Manager (instead of the Standard NVMe ones).
Thanks Scottie, it worked as you discribed, exactly. I don’t know why it has to be such a convoluted process in order to uninstall the (bleh and under performing) Intel RST drivers but this stuff worked.
Thx for doing this great job. Eventually I was able to update the crapy firmware on my 980 pro with Samsung magician
Thank you for this! I was about to completely install Windows just to remove VMD but this was so much easier.
Excellent guide, thank you so much! This saved me from having to wipe the manufacturer’s image on my HP Z2 Mini G9 workstation.
Thanks man. Could not update Samsung 990 PRO firmware because of VMD and this guide helped me get rid of it! Can confirm that boot is lot faster now too.
Thank you! You rock! I could not update tyhe firmware on my Samsung 990 Pro until I found and did this. Worked like a charm.
Thank you for this, been trying to figure out how to dual boot my windows laptop for a week and this was the last bit I needed to get that working
WoW!!! I spent coutless hours on this issue with a new Asus MB, several RMAs, and it was an Intel/Asus, look at our ummm, cool new features, bs!!???? Engineers will ruin us all!!!! My 25th build and my son was like wow dad, lost your touch?? I spent 40-50 hrs trolling countless websites, you rock!!!
Thank You very much indeed Sir!
I was sticking my head (I’m a noob at computers & tech) into an absolute nightmare of a rabbit-hole trying to figure out how to make my brand new 2 Terabytes SSD M.2 mini 2230 work after a clean Windows 11 Pro install.
At first everything seemed okay each time I tested it and after I managed to install the drivers, but suddenly out of the blue random freezing began occurring etc. Very random to say the least and sometimes even after several hours, the PC was gone for a few minutes and then getting back again, that is NOT acceptable. I didn’t see any BSODs but just very annoying hangs were the mouse died and the PC was just not accessible etc.
I don’t remember the exact “Google search” I did (I did so many) but your article showed up! Your article is well written and even a noob like myself finally understands what is the fundamental issue.
I had never checked that setting before in my Asus laptop BIOS which was up to date with the most recent BIOS. So I went in to the BIOS and found out that the Intel VMD was enabled???!!!
Then I pressed F9 to load optimal settings and went in there again to find out that this time it was disabled. So Asus actually themselves thinks that this should be disabled by optimal default settings. Only God knows how on earth it had been enabled. Maybe after a BIOS update…? Who knows.
I checked once more to make sure it is finally disabled.
After all this I gladly reinstalled everything and all the problems were gone.
Thank You!
I’m very greatful to you, sir. Secure boot and VMD have been my hindrances to happy computing. Disabling secure boot is straightfoward. All my previous attempt to disable VMD in BIOS first were always followed by failure to succesfully boot to windows afterwards.
For years my ASUS notebooks were torturing me with those VMD drivers. I had to learn how to inject those drivers into wim images, in Acronis/Macrium bootable solutions to be able to image my system or boot/control it from outside the OS. Apparently, there was that simple and elegant way to disable that bugger.
Once again thank you very much, Scottiestech.
Thanks for the article, Scottie! I could never figure out why my 6th gen i7 booted faster than my 14th gen. This was the reason. Easy fix with good directions; even more so since I’m also running an Asus motherboard.
SIMPLIFIED PROCEDURE
Shouldn’t be enough to uninstall VMD device(s), on reboot modify the BIOS, and then boot normally?
Windows 11 shouldn’t automatically install the appropriate generic driver…. ?
That might work, but Win 11 gets a bit stupid sometimes with auto driver installs. The Safe Mode step seems to stop that in most cases.
Hello Scottie, you are a very clever guy. With your hints I saved a lot of time to remove this suspycious peace of … Then for my dual boot I put the Linux boot loader on a second EFI SATA drive leaving Windows untouched. By BIOS this loader starts first and I was editing it by the program “Grub Customizer”. So my PC is in the corner I wanted it to be. Your work was fantastic but afterwards it was just plainly logic. So your solution falls in the category, on which our famous Berthold Brecht was saying: “The simple (is the) hard to make” (“Das einfache, das schwer zu machende”). Let the puter roll.
Greetings from Hamburg
Bernd
Thank you very much. Finally i got away with uninstalling and disabling the RST VMD without reinstalling Windows, thanks to your tutorial.
Hi, I recently bought the crucial T500 gen4 ssd, I can’t get good write speeds with it, I have updated to P8CR004 firmware, Just have 362gb inside the 1 tb ssd, and I am getting only around 2000MB/s at best. I can see that my drive is not detected as crucial by crucial storage exective, so I get to understand the disabling vmd can help me. and it did(for a moment I could see 6000+ right speed in crystal disk, but then I got the bluescreen, so finally i had to revert to back to using and storage executive stopped recognizing my drive. So how to solve this? how to get good speeds? how to disable VMD without bluescreen? Any help is appreciated
Have you tried using the Micron NVMe Driver along with disabling VMD? Their support page says the driver is for Storage Executive functions, but I’m thinking it may help. Worth a try!
Yes , It is alrelady installed even before all these steps where followd
Hmm… I suppose it could be the drive itself, but it’s hard to know. When it blue screens, is any interesting crash info recorded in Event Viewer? Sometimes that gives a clue.
It says couldn’t access boot drives, then what I do is some sfc scannow and I will boot to my linux and restart(then I can access bios), then turn on vmd, and then boot to safe and then restart , and do some of this in some order, after some effort, it will boot back, but now I will get 2000 around only write speed 🙁
Okay, that’s weird… either a problem with the SSD, or the motherboard? Don’t think it’s the motherboard, so…
my linux on different ssd(I have two internal ssd in my laptop)
Thank you! I’ve been having a bunch of issues moving from windows 10 to dual booting windows 11 and ubuntu – one less problem now!
Thank you – I followed your recommendations and it worked perfectly. Can I now fully uninstall the VMD drivers in Device Manager?
The VMD device(s) should no longer appear in Device Manager. You can uninstall Intel RST if you want, which should remove the drivers. I just left them there unused on my machine – just in case chaos ever ensues and I need them again.
Hello and thank you for your article. I will try your procedure very soon. I am in a special case where I need to disable VMD on my NVMe SSD running on the PCIe bus, but I need to keep VMD on the SATA ports because I have a RAID-1 volume. I have found that my BIOS allows me to map VMD separately on the PCIe and SATA buses. In my case, I will therefore disable VMD only on the PCIe bus, and I sincerely hope that your procedure will work. I also hope that after restarting, Windows will restore the VMD drivers for my RAID volume. Any advice?
Oh… that’s a new one to me! Never tried that. But I think it should work. You might have to check each VMD driver properties in Device Manager to see if you can narrow down which is for the NVMe drive, and which is for SATA. If that doesn’t work, then… I dunno! I’m not sure if it would be better to nuke all the NVMe drivers (without deleting drivers!) and then make the change in the BIOS, or leave the drivers there and then make the BIOS change. Normally, I would go with the first option and let Windows fix it (which often works surprisingly well). BUT, RAID is often a total nightmare, so I think I would err on the side of caution and try the 2nd option (no deletion of any drivers, and just do the BIOS change, which is easily reversible).
In any case, I’d rather rebuild and restore my RAID volume than reinstall my entire Windows system, which has a lot of software and settings. I’ll let you know how it goes.
That’s probably the best option. Fewer headaches!
You rock, man ! It works perfectly !
Here is the procedure I followed:
– create a System Restore point + data backup
– no need to disable any driver in Storage Controllers
– ask for advanced startup restart
– Enter the BIOS during reboot
– Change “Map PCIe controller under VMD” to Disabled (system SSD)
– Let “Map SATA controller under VMD” to Enabled (data HDD RAID-1)
– Save changes and restart
– Enable Safe Mode in Windows Startup Settings
– Let windows start and clean up the drivers
– Restart in normal mode and note that Samsung Magician is happy, Windows starts quickly and my SATA RAID-1 volume is in place.
Thanks for sharing your experience.
WOOHOO!! That’s great news! 😁
Verification of the VMD → AHCI procedure on an MSI Vector-17HX laptop (and conclusion for Samsung 990 Pro users)
Congratulations to the author for clearly describing the procedure for switching from VMD to AHCI mode using msconfig and Device Manager. This article is an excellent resource for users who want to regain full control over their disk controller.
However, I would like to share my experience, as my case is a critical test of this procedure on modern hardware, which may be useful to other readers.
1. Goal Validation (Firmware Update)
As a user with two Samsung 990 Pro drives (2 TB and 4 TB) with problematic firmware, I can confirm:
• True: The Intel VMD driver blocks Samsung Magician software and other diagnostic tools, preventing firmware updates in Windows.
• Important distinction: Performing the msconfig procedure described in the article is NOT NECESSARY just to update the drive’s firmware.
KEY INFORMATION: Disabling VMD in BIOS/UEFI is not necessary for the firmware update itself. Just skip the steps in Windows and simply boot your computer from a bootable Linux USB stick (Samsung firmware ISO). The Linux environment bypasses VMD and allows you to safely update your drive.
2. Critical Verification of the VMD → AHCI Procedure (BSoD)
Although the theory presented in the article is correct, in practice I encountered problems on my MSI Vector-17HX-A13VHG hardware:
• Access to VMD: The manufacturer has hidden the option to disable VMD in BIOS/UEFI, which is only accessible after pressing a key combination (e.g. Right Ctrl + F2).
• Failure to transition: After correctly performing all the steps (uninstalling VMD drivers in Device Manager, setting Safe Boot in msconfig, and disabling VMD in BIOS/UEFI), Windows ended its attempt to return to Normal Mode with a Blue Screen of Death (BSoD) with the error INACCESSIBLE BOOT DEVICE.
• Conclusion: This procedure is unstable and carries a high risk of BSoD on some OEM/laptop configurations where Windows was originally installed in VMD mode.
3. Performance Impact
To my knowledge, there are no significant performance benefits from switching from VMD to AHCI for a single NVMe drive. The main motivation is compatibility (e.g., with Samsung Magician) and eliminating the Intel layer.
Final Tip for Readers:
If your only goal is to update the firmware, skip the steps with msconfig ( safe mode restart) and use a bootable USB stick. If your goal is to permanently switch to AHCI, be sure to make a full backup of your system (not just a restore point), as there is a real risk that the system will not boot, even after using the Safe Mode method.
Hi! I just need a firmware update, and I followed your instructions: I tried installing the update from a USB drive, but when I booted the system, it would freeze on the ASUS ROG logo screen and nothing would happen. If I disabled the VMD controller, I’d get an error saying the USB drive was not compatible or something like that. What should I do?
Well, that’s weird… Have you tried a different USB stick and/or different USB port? I have a SanDisk Extreme Pro USB stick formatted as exFAT, and I’ve used to update many Asus (including ROG) laptops and desktops. Never seen that one before!!
I have an old 2GB flash drive formatted in FAT 32. Perhaps I should try a different flash drive, since using a different USB port didn’t change anything.
Aha! That might be it… I have had problems with older USB sticks not being recognized by newer UEFI/BIOS before. It’s worth a try. Besides, you can never have too many USB sticks. I have about 15 of them. 😂
I bought a new 32GB USB drive, made it bootable using Rufus, and set the BIOS to boot from the USB. The result was the same: everything stuck on the Asus ROG logo. I tried it with and without fast boot, but no change…
Hang on, this is an Asus ROG machine? For BIOS updates, you don’t need to boot from the USB. Just copy the BIOS update ZIP file to a Windows-formatted USB stick. When the puter starts, hit Del to get into the BIOS, and then use EasyFlash to update it. You should be able to access the USB stick as a drive from within EasyFlash, and you’re done.
I can’t understand why I need to copy the BIOS update file to USB if I need to update the SSD firmware?)) Perhaps you misunderstood me. I just wrote earlier that I went into the BIOS and switched the boot priority to the USB drive (which has the firmware for the SSD 990PRO) instead of the SSD with Windows installed. And when I switched the boot priority to the USB flash drive and tried to boot from it, the boot process froze on the Asus ROG logo and no SSD firmware update occurred, although according to your instructions, the update should have started.
I have an ASUS ROG Zephyrus G16 2025 (GU605CR-QR130) laptop with an Intel processor. It has two SSDs, one of which is a Samsung 990 Pro 2 TB (it runs Windows 11 Pro). The BIOS version is 310 (the latest for this laptop). My problem is that the Samsung Magician app doesn’t recognize the latest SSD firmware and can’t update it due to the Intel VMD controller.
Here are the steps I took:
1) Using Rufus, I created a bootable USB flash drive with the ISO-image of the Samsung 990 PRO SSD firmware.
2) I entered the BIOS, disabled fast boot, and set the boot priority to the USB flash drive with the SSD firmware.
3) After making these changes and exiting the BIOS, the system failed to boot and stuck on the Asus ROG logo.
I tried doing this with Intel VMD enabled and disabled, but the boot still freezes on the ASUS logo.
OH! I get it now. Hmm… Honestly, I don’t know the answer to that one. I’ve only ever used Magician to update my drives. As far as I know, turning off VMD should work, but if you can’t boot from the USB then you’re screwed. The only thing I can think to try is to tap F8 during splash screen boot and hoping you’ll be to select the bootable USB stick that way. I had to do that one time, and it worked. But it was a different situation. Worth a shot!
My laptop has two SSD slots (one primary and one secondary). When I bought the laptop, I asked to insert the Samsung 990 PRO SSD into the main slot, and the standard SSD was inserted into the additional slot. Could this somehow affect my problem?
It shouldn’t. I replaced both SSDs in my machine (NVMe drives) and I never had any issues; but I also never tried to flash the firmware that way. Still, it should definitely boot from a USB stick of ANY kind, one way or another.
Thanks a lot, i had to disable and enable vmd anytime when going from windows to linux and othervice.