 With Windows Activation, the fun never ends!
Recently I reset a laptop with OEM Windows 10 Home for a friend. All I did was use the built-in Win 10 “factory reset” that should have wiped everything, reinstalled Win 10, and then reactivated just fine.
Alas, that’s not what happened…
Instead, I got error code 0xc0000022, and the perfectly valid built-in OEM key would not re-activate the same Windows on the same hardware – no matter what I did.
It turns out the culprit was an ‘access denied‘ error in the Software Protection service…
Don’t Ask Me…
Now, don’t ask me WHY a perfectly clean, fresh install of Windows 10 Home would have a failed core Windows service.
The error 0xc0000022 means that the Software Protection Service (SPS) wouldn’t start.
If you’re having a similar activation error – especially with resetting an OEM version of Win 10 on your puter – then the first thing to do is verify that the SPS is the culprit.
Check the SPS
First, click Start (the windows logo button on the taskbar).
Type: services
Click the Services app icon.
Next, scroll down and find Software Protection, and double-click it to view the settings:
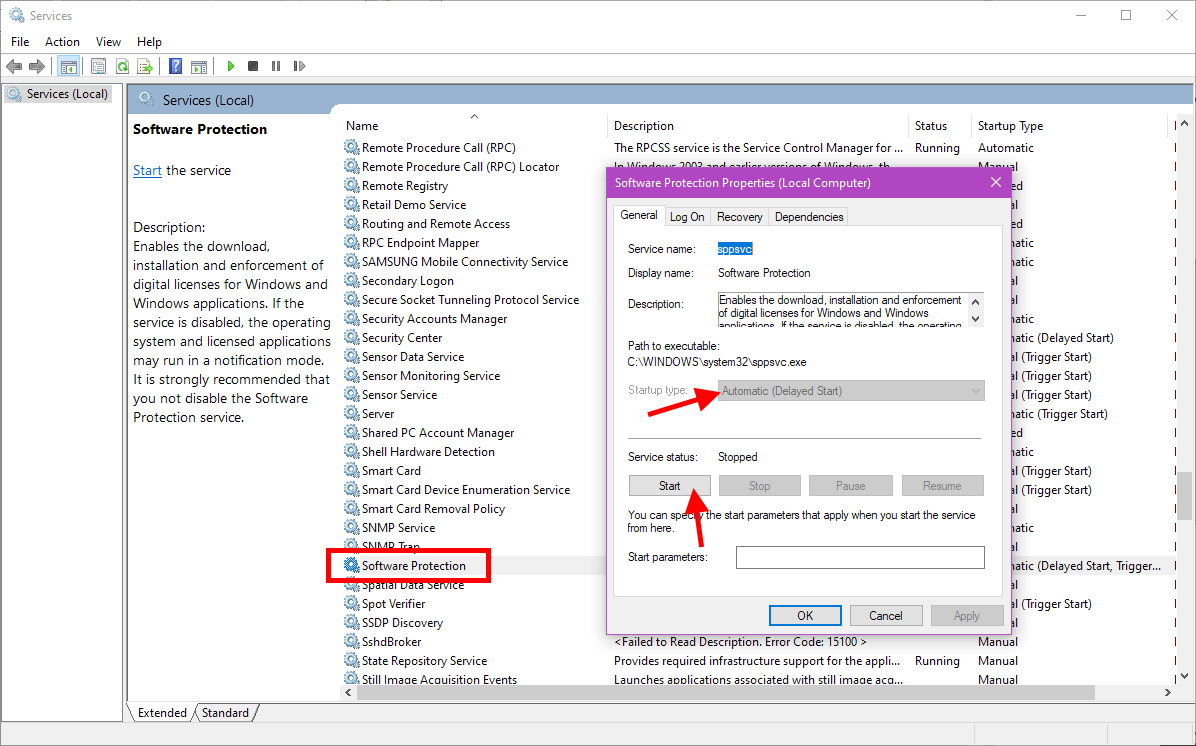
Make sure that Startup type is set to Automatic (Delayed Start). Then, click the Start button…
If you see this:
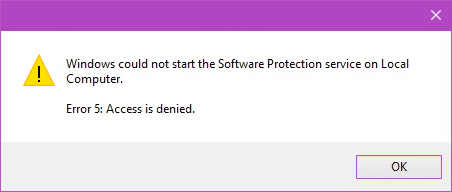
Congratulations! The problem is that the Software Protection service can’t start… which you probably figured out since you just tried to start it.
What is SPS?
The Software Protection service is a Windows component that verifies the authenticity of software you try to install. It also checks and activates your copy of Windows. Aha!
If the SPS can’t run, you will get an error message saying that you can’t activate Windows – but there’s absolutely nothing wrong with your product key!
Before you go calling Microsoft and swearing a lot, try this:
Fix it Good!
First, open (file) Explorer, click the View tab, and check the Hidden items checkbox in order to see all the files/folders on your puter.
Then, navigate to:
C:\Windows\ServiceProfiles\NetworkService\AppData\Roaming\Microsoft
You may have to confirm your admin access to several of these folders. You should then see this:

Right-click in the blank space, choose New -> Folder, and call the new folder: SoftwareProtectionPlatform
Next, click Start, type command, and run Command Prompt as an administrator.
Paste this command in and press the Enter key to run it:
icacls %windir%\ServiceProfiles\NetworkService\AppData\Roaming\Microsoft\SoftwareProtectionPlatform /grant "BUILTIN\Administrators:(OI)(CI)(F)" "NT AUTHORITY\SYSTEM:(OI)(CI)(F)" "NT Service\sppsvc:(OI)(CI)(R,W,D)" "NETWORK SERVICE:(OI)(CI)(F)"
Almost done!
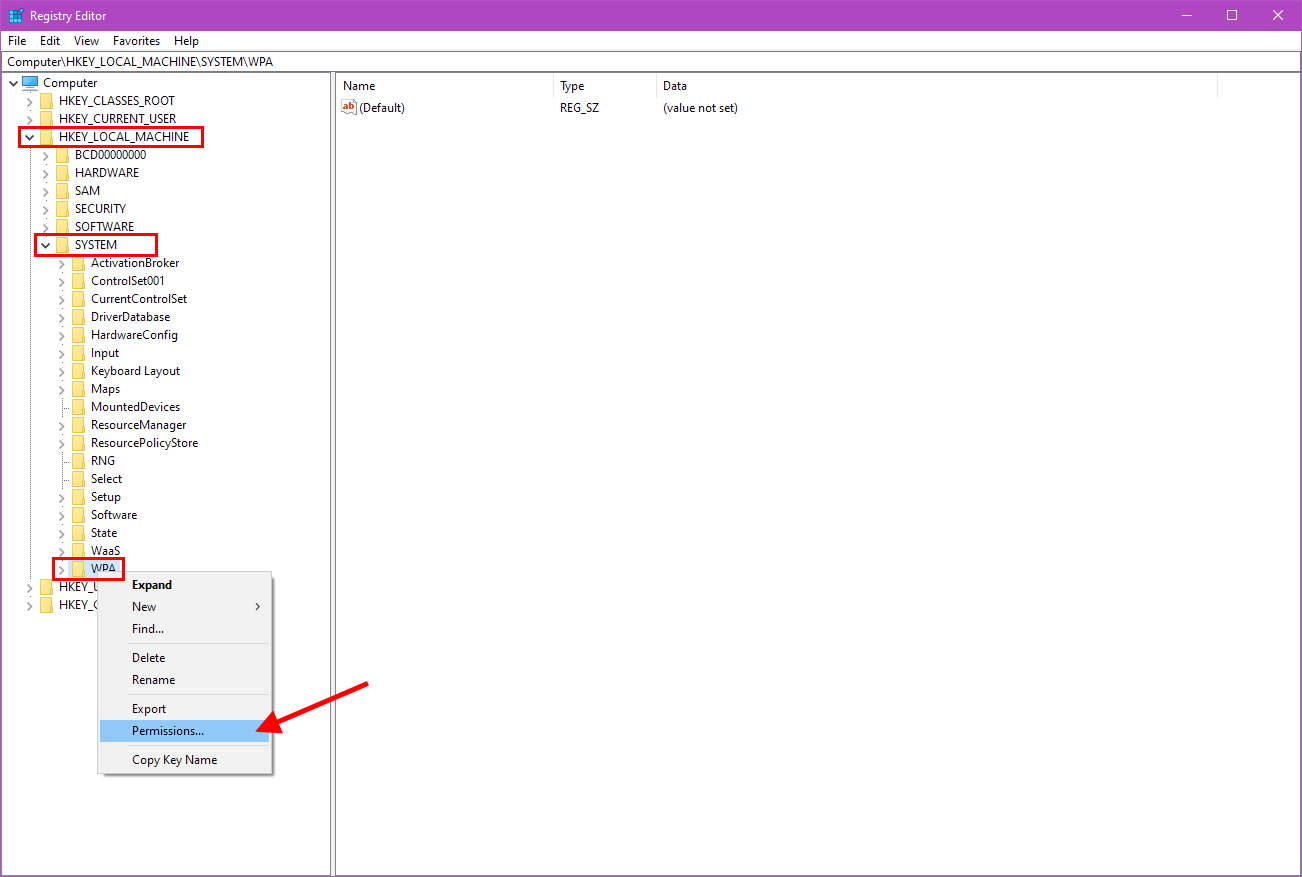
Next, click Start and type: regedit
Run the Registry Editor app.
In the left column, navigate to:
HKEY_LOCAL_MACHINE\SYSTEM\WPA
Right-click on WPA, and choose Permissions…
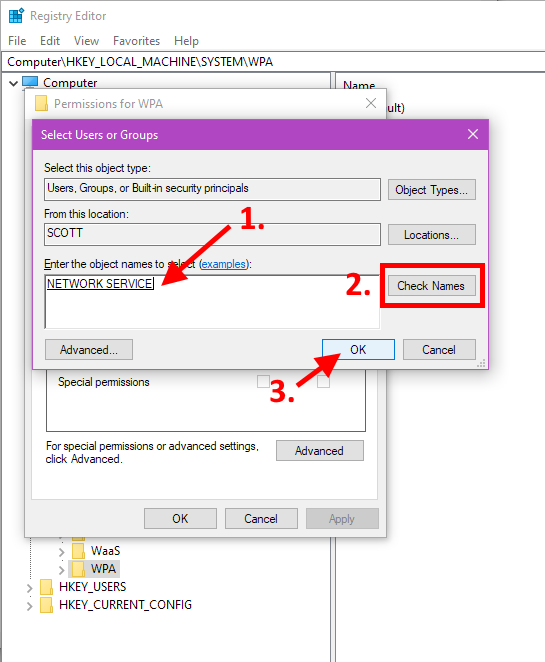
Click the Add… button. Then, type Network Service in the white box, click the Check Names button, and then click OK:
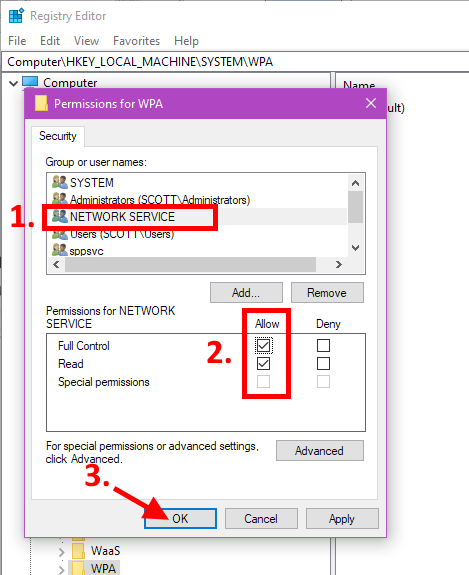
Finally, select NETWORK SERVICE back in the Permissions for WPA window, check all the boxes for Allow, and then click OK:
Okeydokey!
Rinse and Repeat
Now repeat the above procedure, but this time instead of WPA, you’re looking for:
HKEY_LOCAL_MACHINE\SOFTWARE\Microsoft\Windows NT\CurrentVersion\SoftwareProtectionPlatform
Once done assigning new permissions to SoftwareProtectionPlatform this time, close the Registry Editor and Explorer.
Back in Services, try once again to Start the Software Protection Service as described in the beginning of this article…
You should find that it starts now. WOOHOO!
Go back and try to Activate Windows, and it should work just fine!!


Well done Scottie! That looked really tricky to figure out. You must be at about Windows Zen Level 1000000 by now. 😄
This is my first time posting a comment on any tech sort-off website for Windows 10 help, but this actually worked!
The only problem after this that i encountered, was my copy of windows 10 changed to enterprise. This was quickly solved with the help of this:
https://answers.microsoft.com/en-us/windows/forum/all/my-windows-10-edition-changed-all-the-sudden-to/ab605331-d5ed-4653-a068-a9adcceed013?auth=1
you are my savior dude !!!
thanks a lot
Thank you SO MUCH… This is the only solution that worked ! I’ve been working on this problem for 3 days now, and almost did everything you mentioned except for giving NETWORK SERVICE permission for those two registry keys (some solutions suggested giving the permission to sppsvc but it didn’t work)
Thanks again !
You are too awesome to be human… Great! Works!
THANK YOU SO SO MUCH!
I had a situation with some hardware changes. I was booting from an external reader using my SDD from original laptop so I didn’t have to redo all my settings and installs. After a year of this, finally decided to install it to the new laptops motherboard to increase mobility. This caused it not to boot, so in the end I had to backup using a throwaway linux machine and reset Windows.
Lo and Behold it’s not activating.
After troubleshooting for hours and I finally gave into calling tech support to get a new product key after showing proof of purchase. Went through circus of re-doing all the fixes I had already found online that didn’t work and after 2 hours they gave me a new key. Even that didn’t work and they dropped me. Even tried a fresh education key through my alumni university and it wouldn’t work. Realized it was an permissions problem and this is what finally fixed it and could activate with my original key!
THANK YOU!
Thanx man ! I love you !
Check this out, I own a Win 10 Pro license, I’ve did a “Reset this PC” from the troubleshoot console/wizzard after I’ve backed up all my static data… it reinstalled windows but it was Enterprise Edition … WHY ? … you reset a Professional edition to default and it turns in Enterprise edition…. it must be a Microsoft “feature” 😐
I couldn’t change the windows edition from enterprise to professional since the Software Protection service wasn’t starting… but you saved me man !
I use Microsoft since MS-DOS 6.22 and Windows 3.11 for workgroups… but lately I’m getting more and more frustrated by their bugs… I can’t stand this anymore… I’ll choose a Linux distro and use Windows as a VM only when needed by job description…
Thanx again man !
Kind regards & best wishes
I have been looking for this solution for several months! This worked perfectly. Thanks so much for sharing
We seemed to have the same problem. I followed exactly through your guidance but unfortunately ‘Error 5: Access is denied’ is still there and I cannot reactivated my window.
Can you help me with this? Anyway I truly appreciate you as you made me realize what is the root cause.
Did you find a solution? I have the same problem and i tried all the steps but the error still pops up.
Nice job! Thank you very much!!!
Thank you man!!!! You’re the best, I’ve been trying to fix this for days and now finally Windows is activated. Feels good, thanks again!
THANK YOU SO MUCH, I have been looking for a fix for about a month now, had reset my pc due to driver issues and woila, no activation, none of the website’s even suggested a speck of giving NETWORK SERVICE perms, just bs. I just want to say that I am extremely glad I found your website, now finally I would also be able to go get windows 11 when it comes out without having to pay, feels good man 😀
thank you so much!!! A really useful fix for an issue that hasn’t been fixed for months!!!
Thank you so much, I was pretty much malding at home for 3 days till I stumbled upon this godsend of a solution! thank you sooo much. I just got a 3070 rig and it was super expensive and I just had to have this problem on a fresh build.
This information saved my butt. working on a clients computer with this exact issue and i almost called it quits and was going to just wipe and reinstall, but thankfully your diligence into fixing it helped tremendously and i came out looking like the hero. TYVM.
dude you are a life saver, tried so many options and finally this worked. Thank You very much!!!
What happens when the service stops again?
I had to “reset this PC” on my windows 10 device two days ago because it was failing to load windows and I have been having the 0xc0000022 windows activation error ever since. Windows would not accept my valid product key. I have been scouring the web for 2 days to figure out the solution to this and I was on the verge of buying another product key just to see if it worked. Your solution here finally worked, phew! It was easy to follow and nothing on my end reacted any differently than you explained it here. I normally don’t bother leaving comments – but this walk through solution is so excellent I felt it necessary to comment and say thank you very much.
Most useful thing I’ve found on the internet… Ever!
What a great solution! I was looking for methods on several websites. None of them are working. Yours is working fine! I will use this method if I found the same error message on some devices. Thanks!
Thank you so much dude, I have been looking for this for 2 months.
thank you man you save me , i reinstal WIN10 on my INtel NUC and suddenly it say not activated. Just one thing in line %windir% i replace with real path and then it work.
Thanks so much, It worked perfectly for me !
Worked great on Win 2016, did have to reboot before the service would start thou.
Thanks Scottie.
Bro you are the absolute best! I spent all morning trying to figure it out on other articles before I found this one. Thank you!
I have just done this but : IT DIDN’T WORK!! Obviously it is the solution I am looking for since it works for so many, but what can I have done wrong??
These steps didn’t quite fix it for me. I found my particular solution by running Process Monitor, which tracked down a missing folder. Once I copied this folder from another working server, the service started up with no issues, and then I was able to activate Windows.
c:\windows\system32\spp\store
Omg Thank you very much!! I have been looking for the solutions several days but they are all similarly useless for me. Now with those services, I can move on now.
OH MY GOD, YOU ROCK! Thank you so much! I had a BSOD and had to reset my PC, but after the reinstall finished, I couldn’t activate Windows 10 anymore even though it was activated before the crash. I even went through Microsoft support and they suggested reinstalling it yet again, but this worked perfectly! I cannot thank you enough! 😭
amazing! thank you very much! That’s really worked.
Hello, I’m having the same exact issue, but when I’m trying to do the command step, I have en error message saying ‘no mapping between account names and security id was done’, by any chance do you have an idea about what I can do to avoid this error, I’m blocked on this…
After network service appdata folder didn’t found, what i should do now
And you have Hidden Files enabled? Otherwise it won’t show up. If so, you might try the old admin command prompt tricks:
1. sfc /scannow
2. dism /Online /Cleanup-Image /ScanHealth
3. If #2 detects any problems, run: dism /Online /Cleanup-Image /RestoreHealth
And if THAT all doesn’t work, repair install.
I have been looking for a solution since the beginning of August and this helped perfectly!
For me this process stopped in part where I enter command in admin powershell and it says it cannot find the path to SoftwareProtectionPlatform even if the path is perfectly correct and I created the folder. Windows is really stupid that there are these access problems even if I’m supposed to be admin with full control and everything should be fine but it just isn’t.
Thank you, this solved my issue
I can’t imagine how you even had the knowledge to fix this but thank you so much! It totally worked! Thank you so much!
This did not work in my instances on Server2019 but lef me in the right direction. My issue was permissions on c:\windows\system32\spp. Adding Network Services (FC) to that folder did the trick for me.
Running slmgr /ato then connected to my network kms server and activated
Thanks a lot for sharing. The solution didn’t work for me either. But your suggestion finally fixed the problem. I’m glad I have read the article to the bottom of the comments lol
Adding Network Service to c:\windows\system32\spp with full Control with above guide solve the issue for me
Hi Scottie,
I have this exact problem. Unfortunately, after following these steps exactly, as of 2024-03-21, on Windows 10, they made no difference. All the permissions were confirmed to be applied. The Software Protection service still can not be started and as a result windows activation fails, and windows updates fail. Since a windows update is now in the pending state, sfc can not be run.
Is it possible to run a windows repair that preserves my apps?
This is a 9 year old PC, with 32 G ram, and I put in a very fast ssd for the operating system drive. As a result it’s super fast. Unfortunately MS says the hardware (CPU) does not meet Windows 11 requirements.
Best regards, Don
To fix the stuck Windows update first, one of these should work:
https://scottiestech.info/?s=windows+update&et_pb_searchform_submit=et_search_proccess&et_pb_include_posts=yes&et_pb_include_pages=yes
Then, you might want to think about upgrading to Win11 anyway. It’s possible by doing this:
https://scottiestech.info/2023/10/03/how-to-install-windows-11-on-any-computer/
MS says Win10 support will end next year, so… Yeah.
Hi, it didn’t work for me, so I looked at “ACCESS DENIED” result with sysinternals Process Monitor on sppsvc.exe process, and saw that there was a problem on “C:\Windows\System32\spp\store\2.0\data.dat”. So in addition to proposed solution, I did
icacls %windir%\System32\spp\store\2.0 /grant “BUILTIN\Administrators:(OI)(CI)(F)” “NT AUTHORITY\SYSTEM:(OI)(CI)(F)” “NT Service\sppsvc:(OI)(CI)(R,W,D)” “NETWORK SERVICE:(OI)(CI)(F)”
or in french
icacls %windir%\ServiceProfiles\NetworkService\AppData\Roaming\Microsoft\SoftwareProtectionPlatform /grant “BUILTIN\Administrateurs:(OI)(CI)(F)” “AUTORITE NT\Système:(OI)(CI)(F)” “NT Service\sppsvc:(OI)(CI)(R,W,D)” “Service réseau:(OI)(CI)(F)”
icacls %windir%\System32\spp\store\2.0 /grant “BUILTIN\Administrateurs:(OI)(CI)(F)” “AUTORITE NT\Système:(OI)(CI)(F)” “NT Service\sppsvc:(OI)(CI)(R,W,D)” “Service réseau:(OI)(CI)(F)”
And now it works!
There is another, simpler solution, but I don’t know if it will work in the future: with registry editor, change HKEY_LOCAL_MACHINE\SYSTEM\CurrentControlSet\Services\sppsvc\ObjectName from NT AUTHORITY\NetworkService to LocalSystem
06/2024 Update- Had the issue, followed 15 guides, the bottom comment also ended up fixing it for me. Changing the permissions for the folder
C:\Windows\System32\spp
This let the app start right away and then windows went back to the “active” state.
07/06/2024 – Fix is still working.
Did not even need to Activate.
RCA – late June 2024 windows update crashed, or I crashed it after waiting a several minutes for the updating spin to stop, so I bounced power, never saw the “Do Not Turn Off” message.
Anyway. Scottie’s original post worked outstanding.
Tip: I have multiple activation keys from retailer, MSDN, current registry.
If like me, you may have also have multiple keys, please run the VBS script section of this article to retrieve your current Product Key for your OS.
https://answers.microsoft.com/en-us/windows/forum/all/how-to-recover-your-windows-product-key/8687ef5d-4d32-41fc-9310-158f8e5f02e3