 Oh, boy.
It seems that everybody is up in arms about the diabolical new Windows 10 features that – by default – share quite a bit of private data with Microsoft.
This revelation was coupled with a new Privacy Policy released by Microsoft on 1 August 2015.
I’ve read the policy, and frankly, it isn’t much different than anybody else’s policy these days. Privacy is out; spying is in!
Fortunately, it appears that in a few easy steps, you can easily turn off most of these “features” and thereby make Windows 10 far more privacy-friendly.
How bad is it?
All things considered, it’s not that bad.
I know, I know… That’s not what you wanted to hear. You wanted to freak out! Well, carry on. I’ll wait…
Done?
Okay. First, you should be aware that some of the Evil Privacy-Destroying Settings in Windows 10 also existed in Windows 8. Other settings are new to Win 10.
And yes, they are turned on by default – except for one.
Cortana is the one exception, and it is a data vacuum, but you specifically have to turn it on. Cortana is opt-in.
The other thing in Windows 10 that is the same as Windows 8 is the use of a Microsoft Account vs. Local Account to log in to Windows.
When you log in to Windows with your online Microsoft Account, you are basically linking your puter to Microsoft’s online services. So, the obvious first order of business is to ditch the MS Account in favor of a Local Account. Then, there are several other settings to tweak.
So, let’s get started!
How to Switch from a Microsoft Account to a Local Account
 As I outlined in my earlier post 10+ Fixes for Common Problems in Windows 10, you can switch to a Local Account like so:
- Click Start
- Type: account
- Click Change your account picture or profile settings
- Click the link: Sign in with a local account instead
You’ll be asked to enter your Microsoft Account password, create a new Local Account password, and then you’ll have to log out and log in again.
This one simple step will increase your privacy quite a bit.
Note that with Windows 10, your copy was activated automatically online. This activation process does NOT involve your online Microsoft Account in any way. A “secret code” based on your particular puter hardware is used to uniquely identify your device for purposes of Windows Activation.
This is really no different than how things worked in Windows 7.
How to turn off OneDrive file syncing
This one’s easy:
- Right-click the cloud icon in the System Tray (bottom right corner of taskbar, next to time and date)
- Click Settings
- UNcheck all the options in the Settings tab, especially Start OneDrive automatically when I sign in to Windows
- Click OK
- Right-click the cloud icon again
- Click Exit
Ta-da! No more OneDrive.
How to turn off all the other Evil Privacy-Destroying Settings
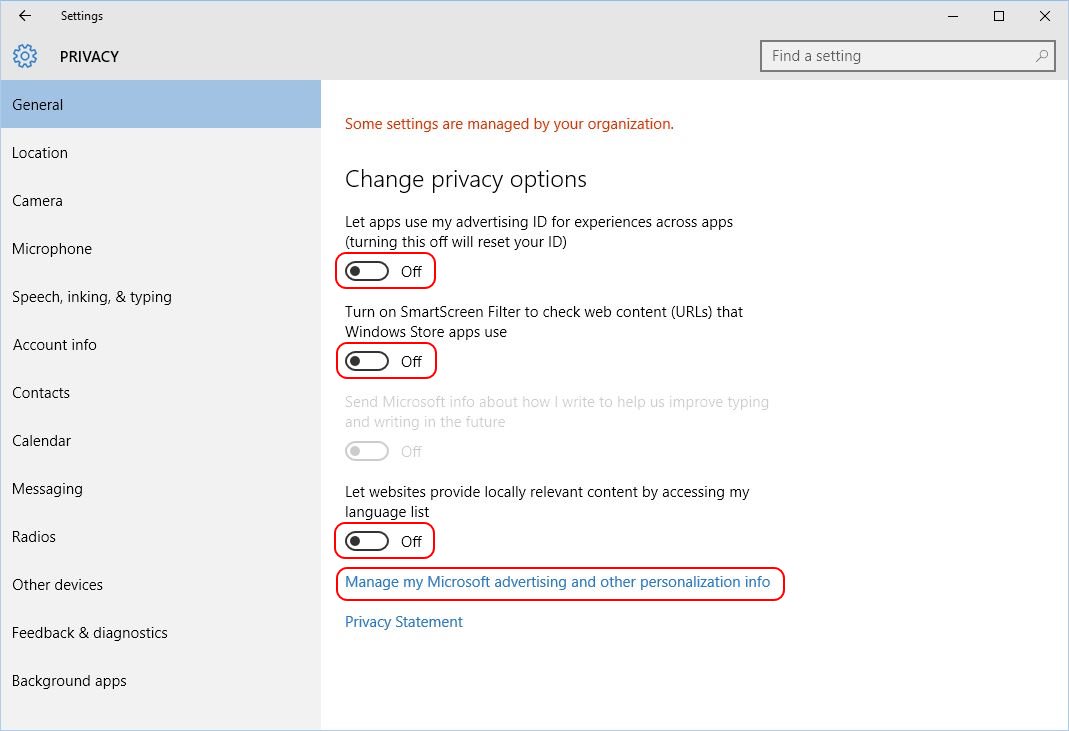
The next step is to go into Settings, and turn off all the garbage that is – by default – sharing info with MS servers.
As far as I can tell, turning these things off actually works. At the very least, you will be relatively safe… or at least as safe and private as you can be “out of the box” in this day and age.
Without further ado:
- Click Start
- Click Settings
- Click Privacy (the lock icon)
- Make sure the settings are as follows:
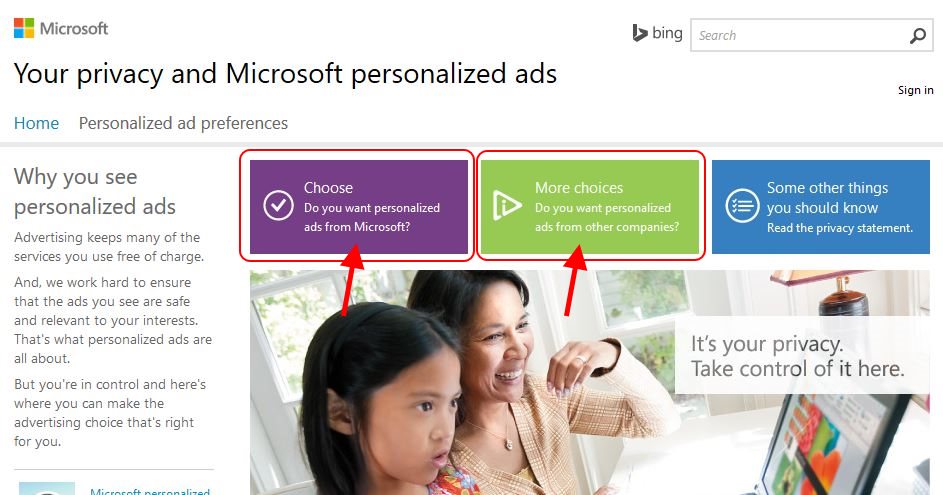
When you click the link at the end (Manage my Microsoft advertising and other personalization info), you will be taken to a Microsoft page online. Click each of the two boxes, sign in with your Microsoft account if necessary, and opt out of anything you don’t want:
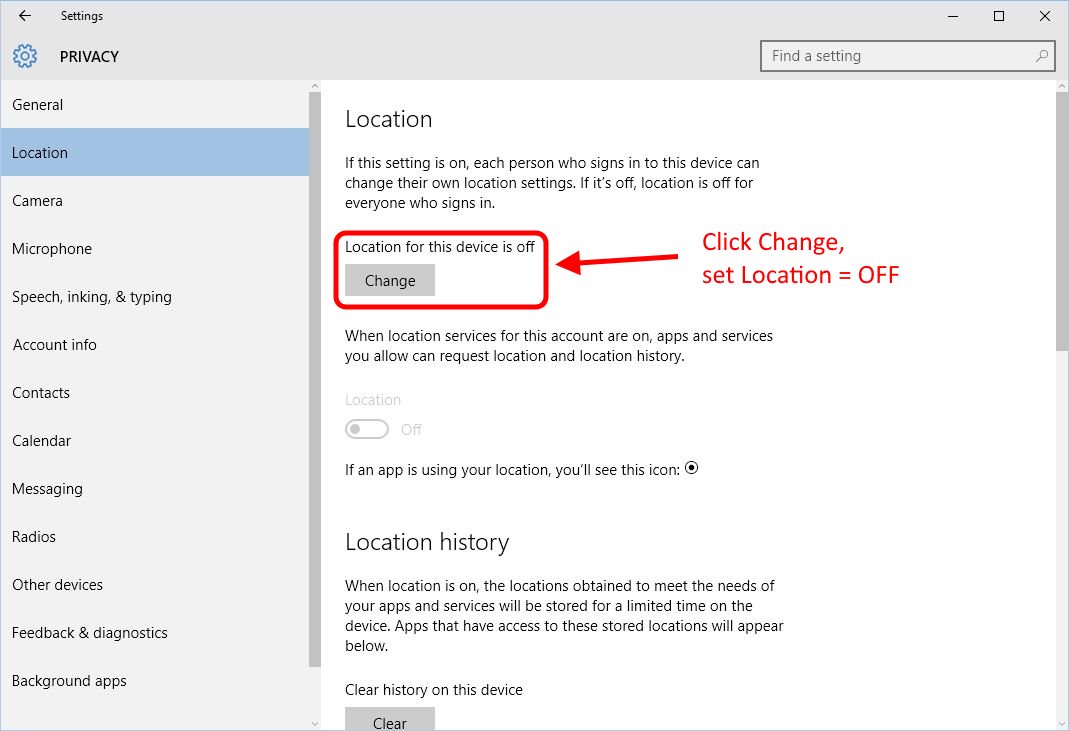
With that done, go back to the Settings window, and choose Location. Make your settings look like this:
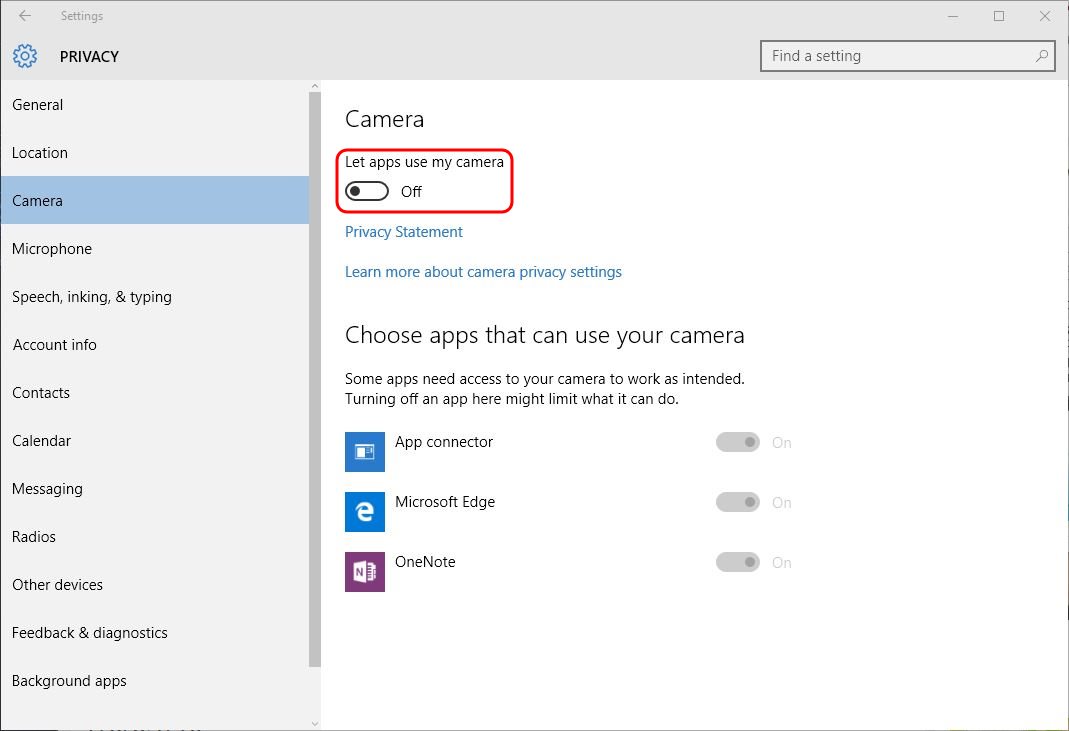
Next, click Camera in the left column of the Settings window, and turn your Camera off:
Next up: Microphone

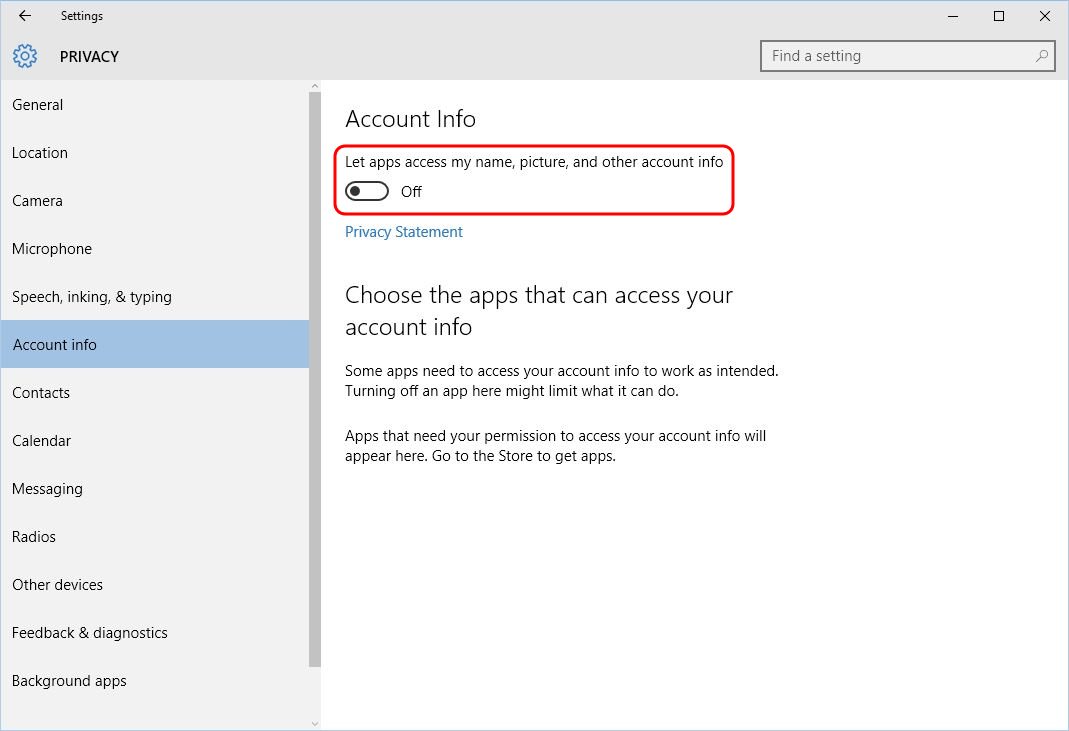
Next: Account Info
Onwards to Contacts (turn OFF access for each app listed):

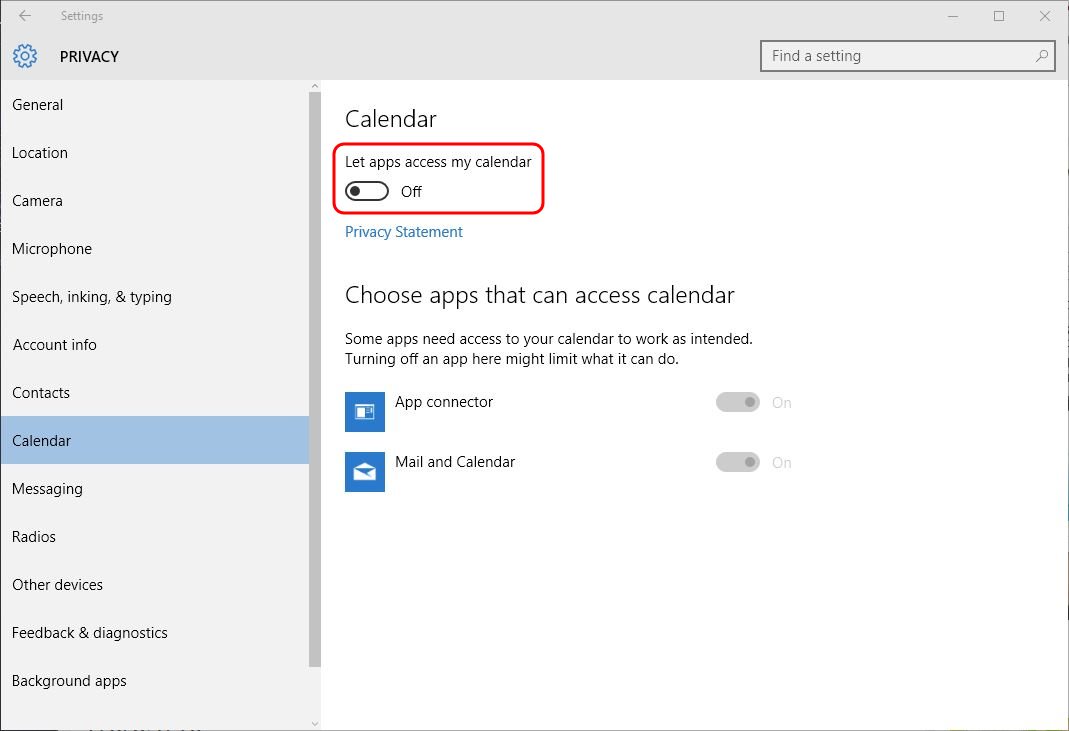
Calendar settings:
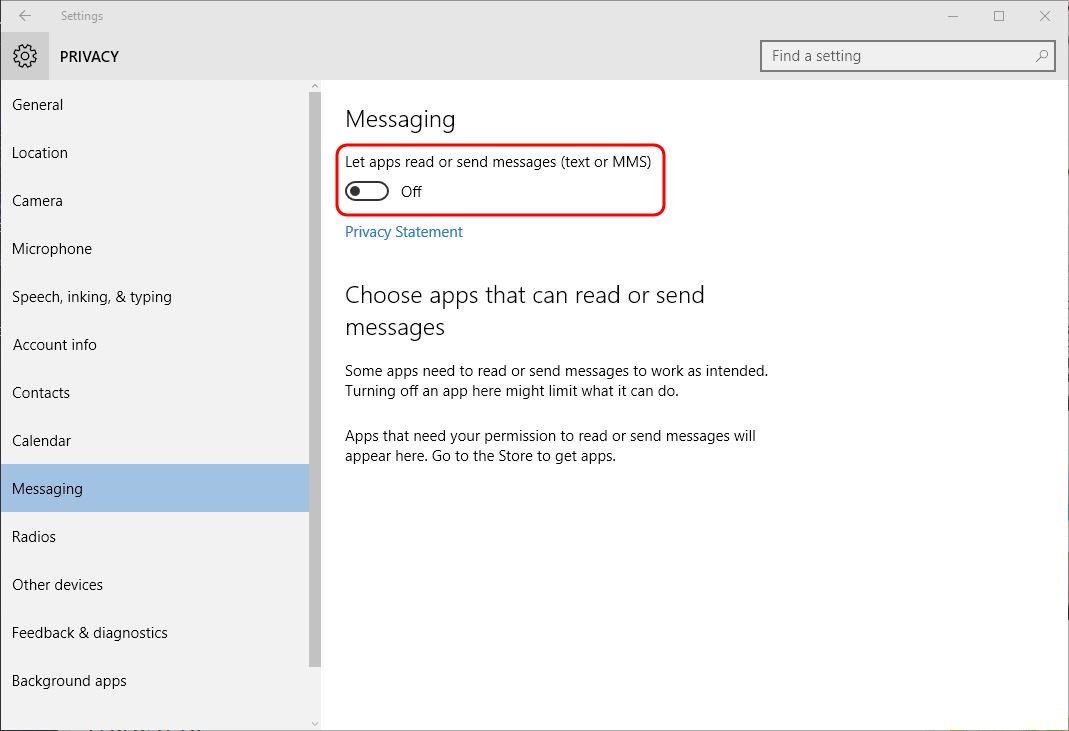
Messaging settings:
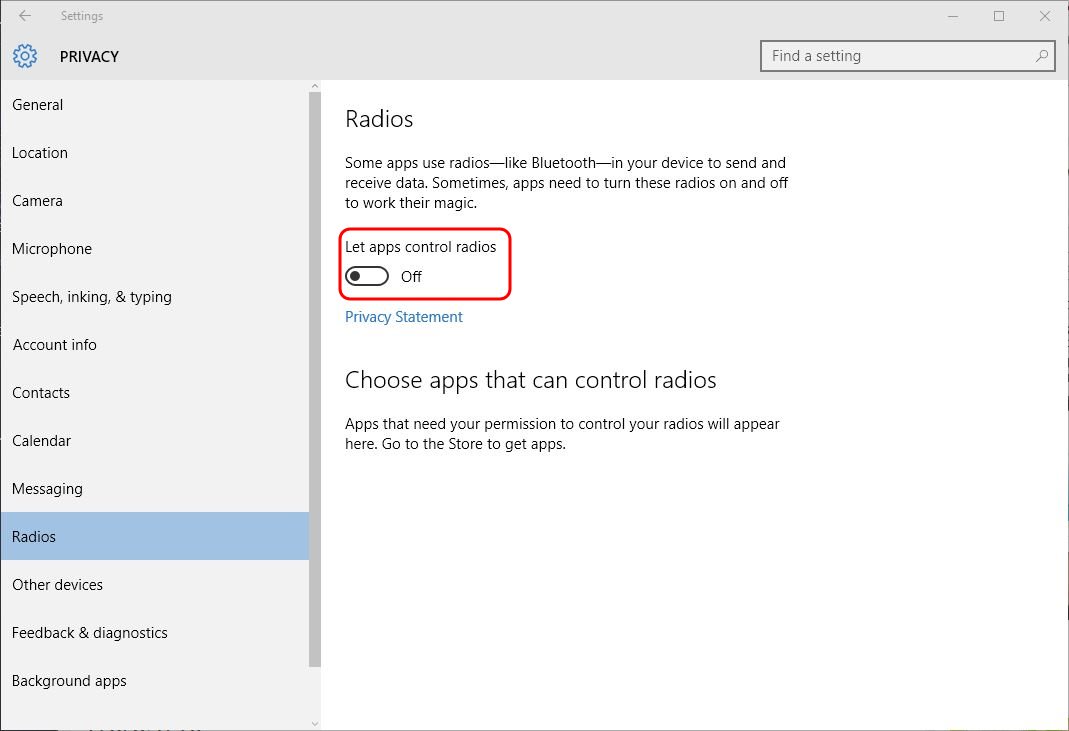
Radios settings:
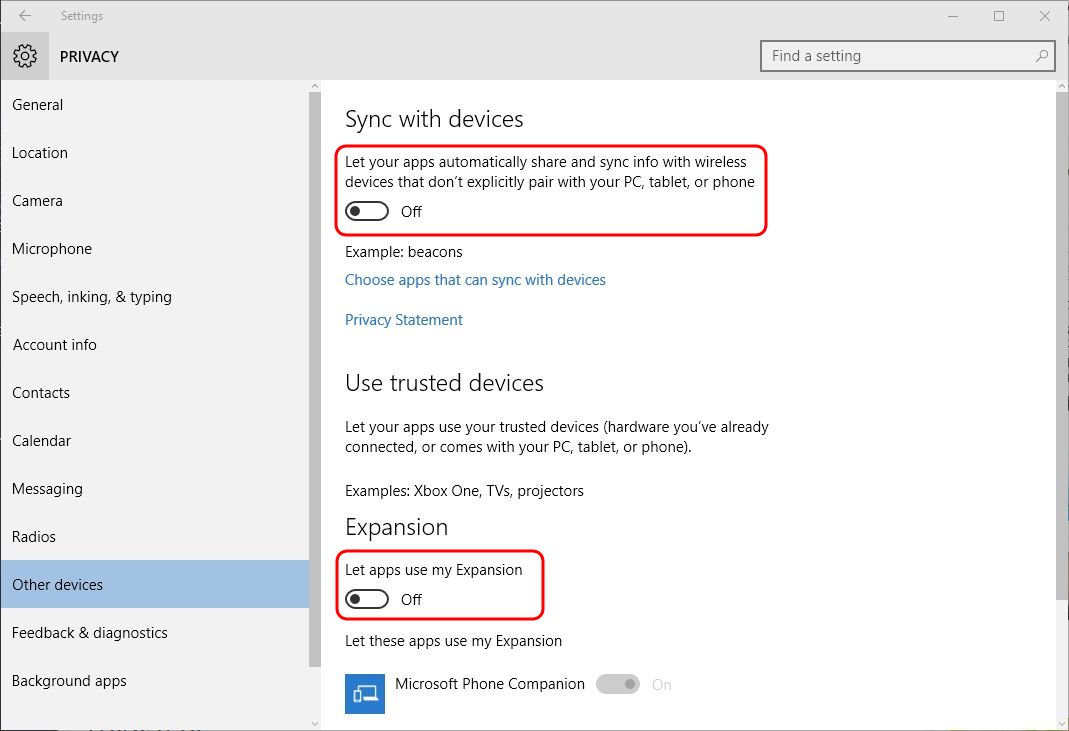
Other devices settings:
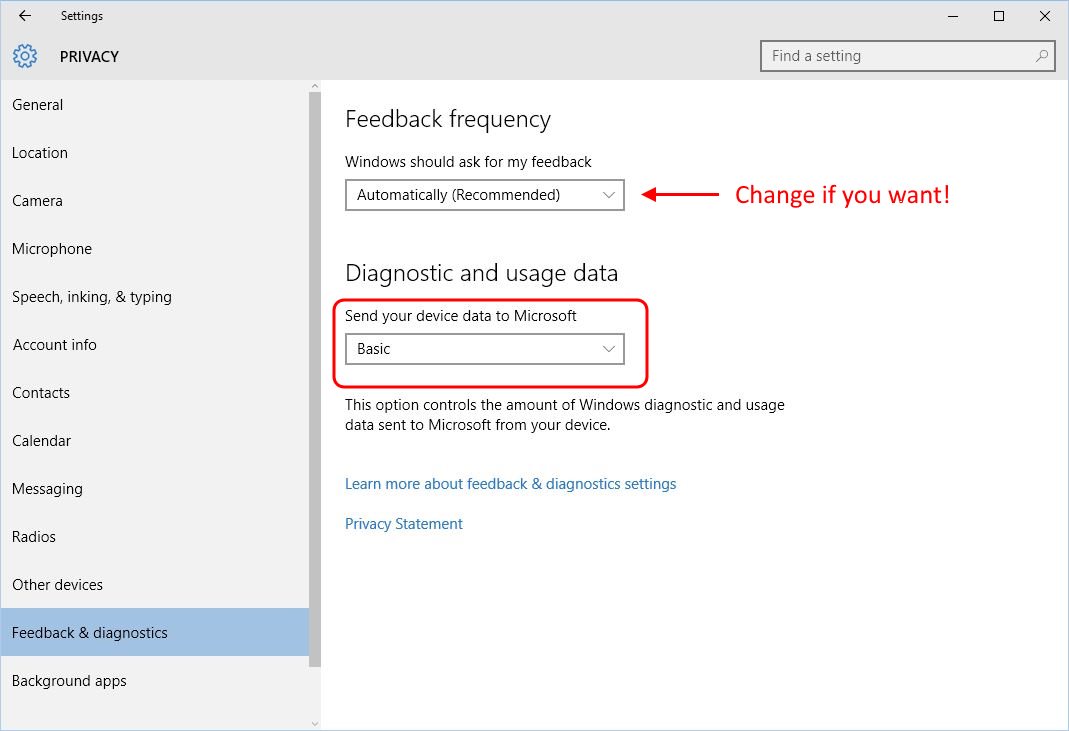
Feedback & diagnostics settings:
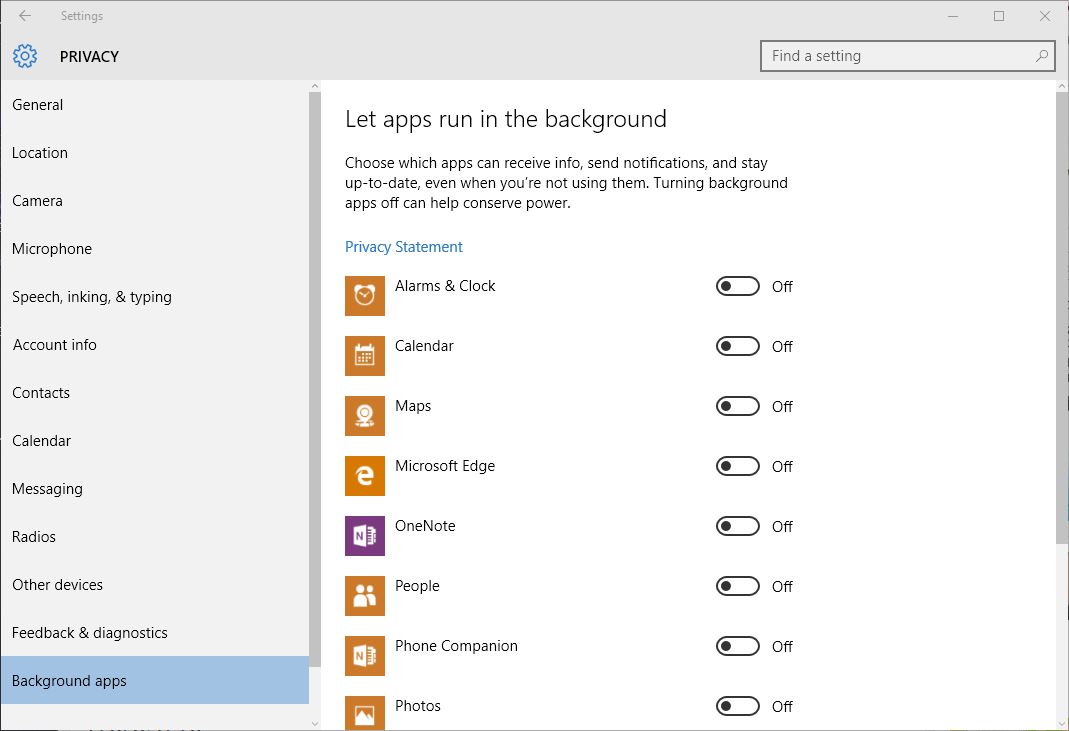
Background apps: For this one, turn off any apps that you don’t want doing stuff in the background. For me, that’s all of them!
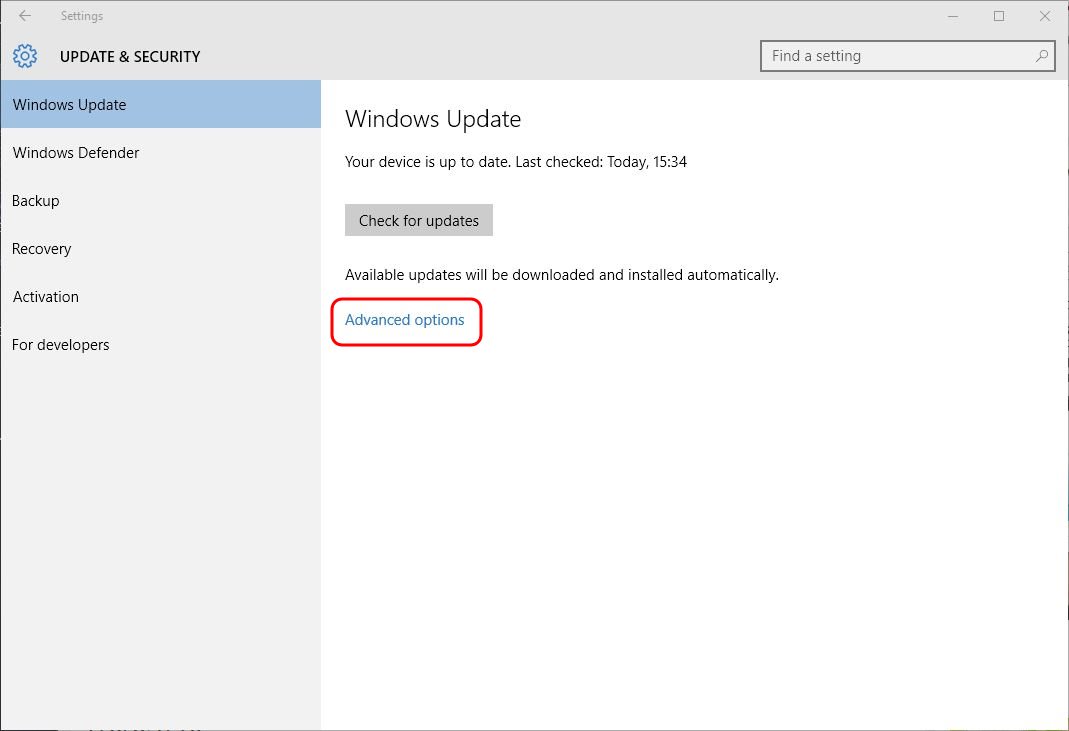
PHEW! You might think you’re done now, but not so fast. Go back to the main Settings screen by clicking the back arrow in the upper-left corner of the Settings window.
In the main Settings window, click Updates & Security (the looping arrow icon). Then click Advanced Options:
Click Choose how updates are delivered:

On the Updates from more than one place screen, you’ll want to either turn the feature off, or set it to PCs on my local network:
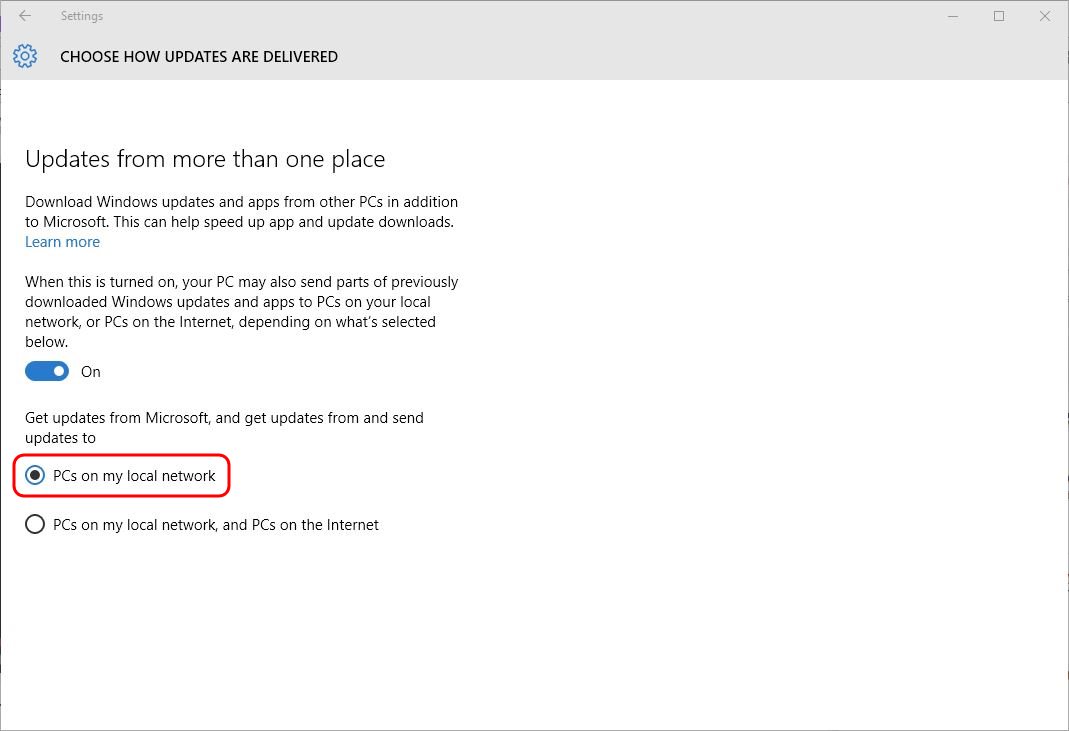
What this does is allow the downloading of updates only from either Microsoft servers, or from PCs on your local network. That way, if another puter on your LAN has already downloaded some updates, your puter can grab them locally from that puter instead of having to download them all a second time from Windows Update.
Otherwise, by default Windows 10 will also download updates from “PCs on the internet”, which sounds about as safe as… well, nothing. It sounds like a disaster in the making!
Next, click the back arrow and choose Windows Defender. You can turn off Cloud-based Protection and Sample submission if you want:

What about Wi-Fi Sharing, aka Wi-Fi Sense?
If your puter has Wi-Fi, you should also make sure the “Wi-Fi Sense” feature is turned off. Go back to the Settings screen, and this time click Network & Internet (the globe icon). On the Wi-Fi screen, click the Manage Wi-Fi settings link:

On the Manage Wi-Fi Settings screen, turn off the two highlighted options, just in case:
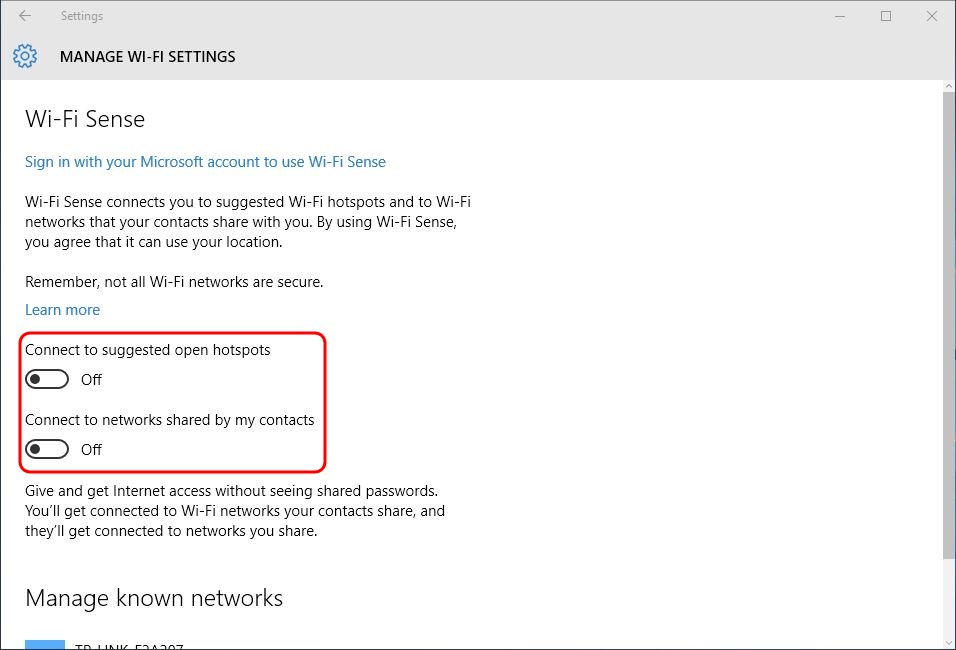
The Wi-Fi Sense feature would normally share Wi-Fi network settings between contacts/friends, which just seems like a bad idea. It’s supposedly disabled if you’re signed in with a Local Account, but nevertheless the Connect to suggested open hotspots option stays enabled instead of being greyed out. So, disable everything as indicated above.
What about Biometrics and Bitlocker in Windows 10?
I wouldn’t use them. That’s the long and the short of it.
The fingerprint, iris scan, or face recognition login features should only work with specialized hardware, which you probably don’t have anyway.
If you have Windows 10 Pro and you use Bitlocker, apparently your “secret key” gets uploaded to Microsoft’s servers, which is totally stupid.
What about Windows 10 sending my browsing history to Microsoft?
As far as I can tell, this is only true if you are using the new Internet Explorer browser, now known as “Edge”.
Cortana is also integrated with Edge, so obviously the idea here is that you’ll be using all MS toys together, sending them all your data, and they’ll use that to make lots of money.
Well, don’t use Edge. Use Chrome, Firefox, Opera, or whatever… Problem solved!
Wasn’t that fun?

Guess who?!
So, there you have it. That will disable all the evil stuff that I could find, and make your puter work more like Windows 7.
Some of that stuff nearly made me fall off my chair. Other stuff – like apps being allowed to access radios – is obviously geared towards mobile devices.
And that brings up an interesting tidbit: There’s no point in securing Windows or freaking out about MS spying on you if the next thing you do is fire up your Android or Apple smartphone and let them hoover up all your data! So, use your brain.
And of course it’s always a good idea to have some security software on ANY computer to protect against viruses and 0-day malware.
Finally, if you ever turned on Cortana, you’ll have to turn if off (from the settings option in the search box, which is accessible from the taskbar). You can also delete any saved Evil Cortana Data. I never even turned it on in the first place, because, well, sheesh! What a nightmare…
Happy (more private) computing!
UPDATE: You should also disable the Diagnostics Tracking Service. See my post Another privacy fix, this time for Windows 7, 8, and 10.


Thanks Scottie, this post was easy and simple to follow, I made all the changes with no issues 🙂
Or download OOSU10:
https://www.oo-software.com/en/shutup10
and do it in a few clicks ;-).