 There you are, minding your own business…
Maybe you just installed a Windows 10 update. Maybe you just had to run a disk check that asked you to reboot. Maybe you didn’t really do anything out of the ordinary at all.
Whatever the case, things go kaflooey. All of a sudden, you can’t save or create new files on a certain drive – be it a hard drive, partition on a drive, external disk, USB stick, etc.
Instead of working, you get an error message that your, “drive is read-only“.
At this point, you begin to panic. But fear not: It’s super-easy to unlock your drive and remove its “Read-Only” mode!
What the heck is a “read-only” drive?
When something goes wonky, a drive can be marked as read-only.
As the name implies, it just means that Windows can only read files from the drive, but not write anything.
Therefore, you can’t edit or create any files on that drive.
Also, keep in mind that if the drive has multiple partitions (i.e. D:, E:, and F:) then all of those partitions will be read-only if the drive itself is marked as read-only.
How to fix it
The first thing you need to do is find the Disk # of the drive that is read only.
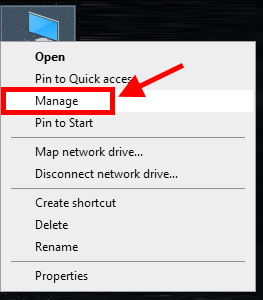
First, right-click the This PC icon on your desktop, and choose Manage:
After the Computer Management window pops up, click Disk Management in the left pane. Then, notice which drive says “Read Only”, like so:
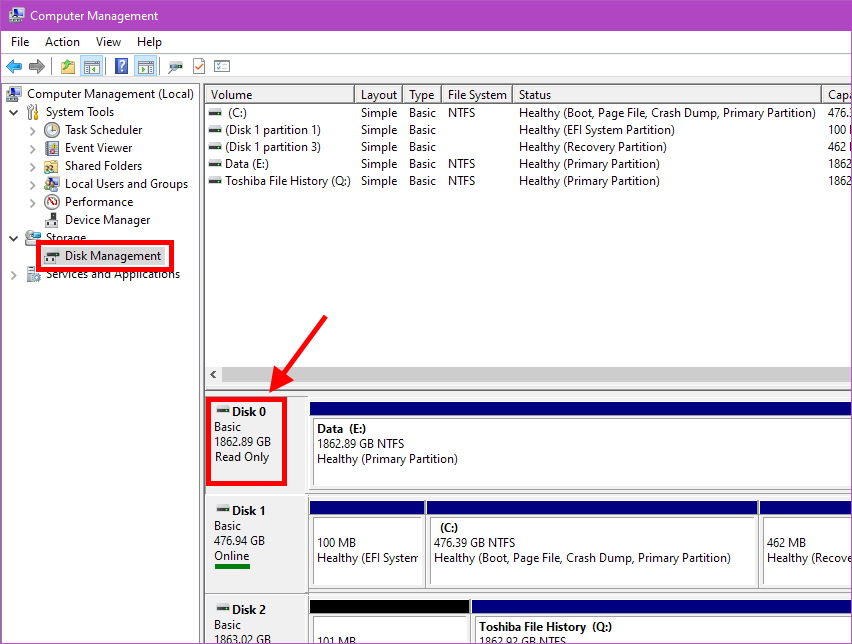
Here we can see that Disk 1 is Online, so it’s okay. But Disk 0 is marked Read Only. So, now we know that we want to fix Disk 0.
You can close the Computer Management window now.
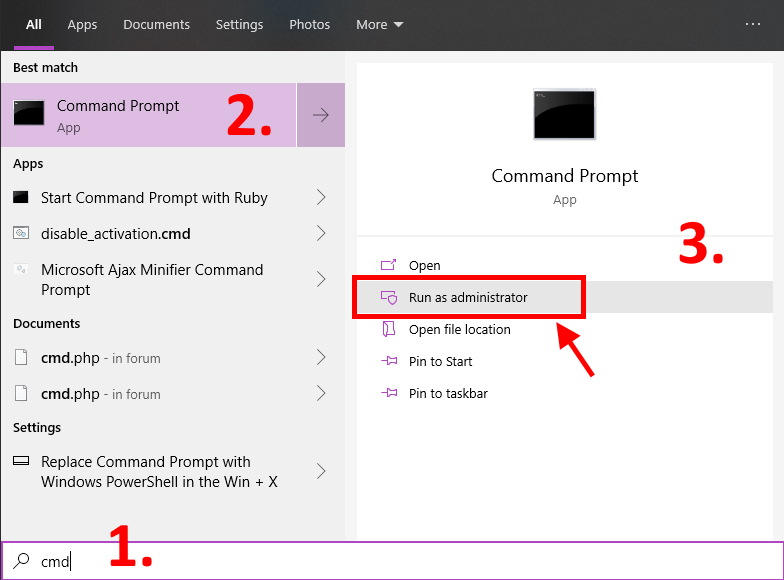
Next, click the Start button (windows logo on the task bar).
Type: cmd
Click the arrow next to Command Prompt (if necessary) and then click Run as administrator on the right side:
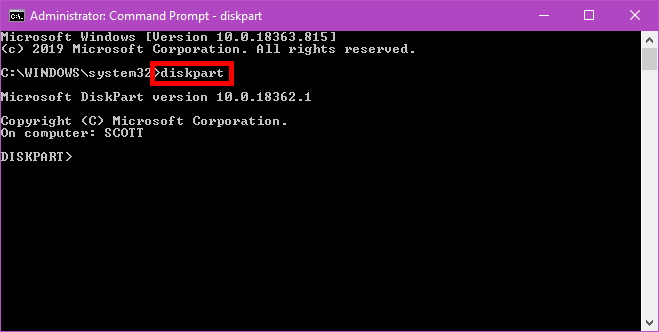
Next, in the Command Prompt, type: diskpart (and then press the enter key):
Then, type: list disk
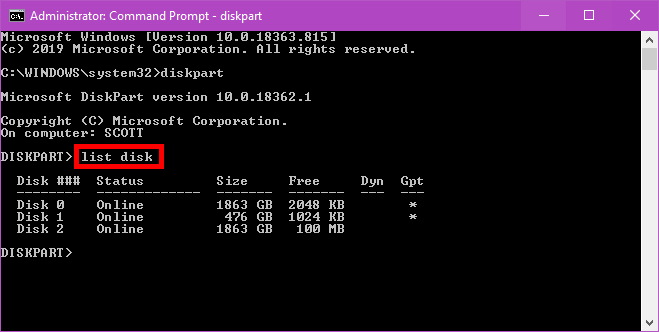
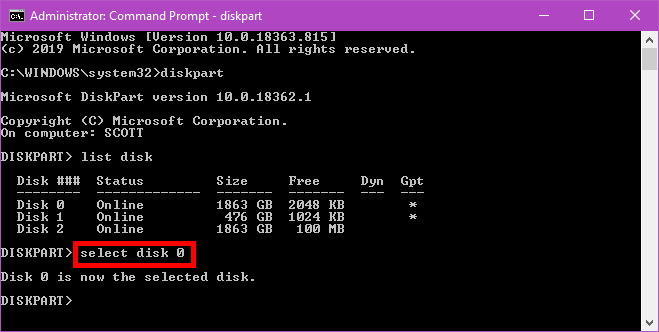
Don’t worry about the “Status” column. Just remember the Disk # from Computer Management (Disk 0 in our example here). Then type: select disk 0 (or whatever your Disk # is instead of 0)
Next, type: attributes disk

Note that Current Read-Only State and Read-only are marked as Yes.
To unlock the drive, type: attributes disk clear readonly
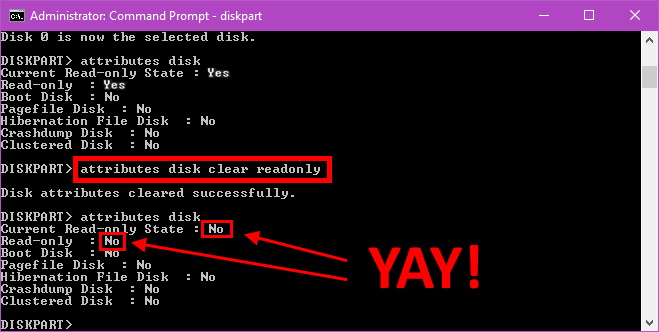
Once the process is done, you can type attributes disk again. You’ll see that the read-only state has changed to No as in the screenshot above.
That should be it. Your drive is now unlocked. Treat yourself to a refreshing beverage.
PS – You may want to reboot just in case!


It came on suddenly, but my newish WD My Book external drive became read-only. Thanks to this well-explained and -illustrated solution, that situation has been fixed!
Absolutely brilliant! Many thanks matey.
When I type: list disk into the command prompt as admin, it doesn’t show the affected drive. It’s my C drive that is read only but only Disk 0 is displayed.
What drives/partitions are listed in the Disk Management window?
Hi Scottie,
Thanks for getting back to me. Under Volume, it lists:
(Disk 0 partition 1)
(Disk 0 partition 4)
Windows (C:)
If Disk 0 shows 1 small partition and the other is WAY bigger, than that should mean that Disk 0 is your C:
Thanks, Scottie
After selecting Disk 0 while running command prompt, I type in:
attributes disk
and it says:
Current Read-only State : No
Read-only : No
The C drive is read-only so Disk 0 doesn’t appear to be the right disk.
Well, that’s odd…
Can you take a screenshot (https://www.youtube.com/watch?v=Y1VsmjKbskc) of the Disk Management window and also of the ‘list disks’ command and e-mail them to me at [email protected]?
That should give me a clue as to what’s going on!
I did all the steps but it show read only no but I still can’t write to any external drives.
What is the fix?
USB memory. CLEAR ATTRIBUTES method not working. Cmd window displays success, test shows it failed.
Chkdsk can not handle protected drive.
I do not know what caused the WRITE PROTECTION.
For that, you may need to right-click the USB stick and/or files/folders on it, choose Properties, and make sure the Read Only attribute checkbox is cleared. It might be read-only at the file system level instead of at the drive level. Either that, or the USB stick has failed…
It work – thanks
Brilliant I must say, pls I have issue with my C drive unable to read or write even unable to access the properties, because it’s not displaying the volume of task on it. So sick right now,pls I will be glad if you able wisdom can help resolve this, thanks
Your C: may be dying… But first, do:
1. Start
2. Type: Command prompt
3. click Command prompt to run it
4. Type: chkdsk /f /r C:
That should tell you that the drive is locked, do you want to scan on restart? Tell it YES.
Reboot and see if chkdsk finds any bad sectors. If it does, it should mark them as bad and this MIGHT fix your problem.
Brilliant I must say, pls I have issue with my C drive unable to read or write even unable to access the properties, because it’s not displaying the volume of task on it. So sick right now,pls I will be glad if you able wisdom can help resolve this, thanks
Hi, I have a micro sd card that had a read-only folder, but I couldn’t clear the read-only property in diskpart – it still showed as read only after I selected the disk and ran the attributes disk clear readonly command.
However I’ve now created a bigger problem by somehow deleting the primary partition. I’m getting “The request could not be performed because of an I/O device error.” when I try to create the primary partition again. I’ve tried in both diskpart and Computer Management.
Any suggestions would be much appreciated, as I’ve tried everything I can find online and have now run out of options. (The really annoying thing is this micro sd card came with my new dashcam. Everything got written to the ‘Protected’ folder, which I only discovered when the dashcam stopped recording today once the card filled up. So now my dashcam is no use till I either get this sorted or get a new micro sd card.)
Many thanks!
You should be able to delete the partitions and recreate them however you want. For example, Rufus will wipe the partitions and create a whole new structure with 2 partitions when burning the RaspberryPi OS to an SD card. AFAIK, if you can’t create new partitions and reformat it, you’re out of luck.
Thanks very much for your reply Scottie! I have no idea what happened, but when I put it into the PC again it showed up properly, with the primary partition, and all files present. Very strange.
So that still leaves me with the original problem of the micro-sd card being read only. There is one folder called DCIM, and within that is a folder called Protected. This is where all the dashcam footage has been stored, and there seems to be no way to delete it. The card is full, and is showing up as Read Only, so nothing more can be recorded. And no matter what I do I can’t seem to clear that.
Maybe the dashcam did something weird to the card… Okay, this might seem like, “DUH!” but is the write-protect tab on the card in the ‘locked’ position? I did that once removing an SD card from my DSLR. Perplexed me for awhile.
Barring that, can you reformat now? Even if it’s read-only, you still should be able to wipe it and start over.
Hi Scottie,
Thanks very much for your reply.
I formatted the card in the dashcam when I got it, just a standard format, but maybe the dashcam did something weird to it.
There’s no lock tab on the card, and I can’t reformat it. In disk part, I run the command the remove the read only attribute and it says it has done so, but hasn’t. Disk part won’t let me reformat it – says the card it write protected.
The card came with the dashcam so I’ll probably return it some day next week, but I hate to give in – tech doesn’t usually get the better of me, so this is really killing me!
Jennie.
Hmm… I’m not sure what the deal is.
I would probably just get a new SD card. I usually don’t use the (generally cheaper) cards that come with devices. If it isn’t a SanDisk or Kingston or Transcend or something, I get one of those to use.
Thanks Scottie. I got a new Samsung card at the weekend, and it’s working perfectly in it – all video clips are being saved to the Videos folder, not the Protected folder.
I’ll keep the other one and see if I / anyone can figure out how to sort it out… because I can’t just give in and let it get the better of me 😀
I’ll let you know if I ever do get it sorted, but in the meantime thanks very much for your help.
Cool! I have a shelf filled with, “I’ll figure it out later” stuff… LOL!
Hey Scottie,
I am still having issues with my Samsung NVMe. I am getting “Yes” on the Current Read-only State and a No on Read-only.
Nothing I do changes the current read-only State.
Any advice?
What happens if you run: chkdsk /f X:
(where X: is the actual drive letter)?
Hi. Could you please help me on this?
After doing the “attributes disk clear readonly” trick, the line Current Read-only State: Yes remains YES. It’s not changed.
What can I do please?
Hey Scottie thanks for this video man it has helped a lot of people including me… how ever after I have went through your instructions when I try to download something to be saved on my hard dive it somewhat goes back to read only… what am I missing bro, because at some point it does go online then switches up again. Please help
New mobo made one of my disks read only. Gone through various sites showing weird and wonderful methods to fix, with no joy. Came to yours, simple to follow and done with great ease (annoyingly easy in view of other people’s complicated instructions)
Thank you very much, you have restored my sanity.