 Windows 11 has been here for awhile, but it’s not available to everyone.
There is a list of requirements that are quite confusing – and changing.
What’s worse, certain Win 11 requirements seem like they’re too much trouble to fix. I mean, who wants to risk converting their MBR drive to GPT and borking everything?!
Well, it turns out it’s not that hard – if you have Scottie’s Guide To Making your PC work with Windows 11!!
The Official Requirements
Don’t bother looking them up.
Unless your puter is totally ancient, if it runs Windows 10 it should be able to run Windows 11. The most show-stopping issue is that your processor might not be supported – yet.
So, don’t worry about it. Do it the easy way…
MSinfo32
Right, so just do this:
- Hold down the Windows key and type the R key
- In the Run dialog, enter: msinfo32 and press enter
- Observe the lovely window that pops up!
You’ll see something like this:
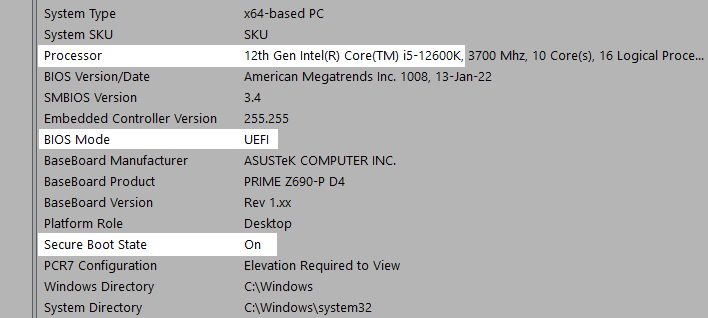
There are three main things to check:
- Processor
- BIOS Mode
- Secure Boot State
If you see the settings above, congratulations! You’re almost all set for Windows 11. Skip to the TPM section.
The Processor displayed must be an Intel 8000 series or higher (8th generation or newer).
Now, there was a rumor that Microsoft would soon support older 7th-gen processors, but who knows.
At the moment (Feb 2022), if your processor is a 7th gen or lower, no dice. You can’t get Windows 11, period. So don’t bother with the rest of this article!
For AMD processors, see the Windows 11 AMD Processor support list.
The BIOS Mode must be UEFI. If it’s Legacy, don’t worry – we’ll fix it.
The Secure Boot State must be On. If it’s anything else, don’t worry – we’ll fix that, too.
Now, you’ll also need at least 4GB of RAM, 64GB of storage space. Most much older PCs have both, so no worries on that front.
Check for TPM 2.0
Next up, you need to make sure you have TPM (Trusted Platform Module) 2.0 support, and that it’s enabled.
Do this:
- Hold down the Windows key and type the R key
- In the Run dialog, enter: tpm.msc and press enter
- Observe the lovely window that pops up!
You’ll see something like this:
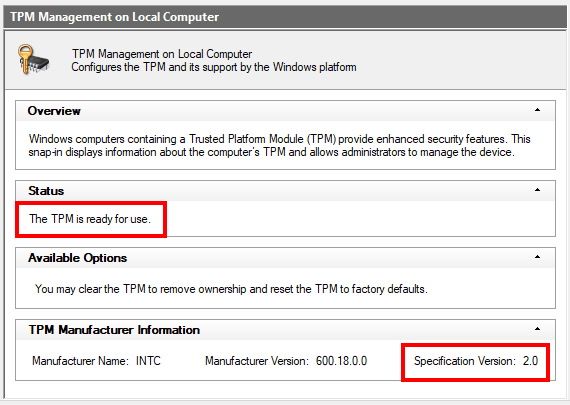
If you see the above, congratulations! You’re TPM-ready for Windows 11.
If not, you’ll need to enable TPM in the BIOS/UEFI. Note that most motherboard manufacturers released BIOS updates that enable and configure TPM 2.0 by default.
So, you might just want to do a BIOS update if one is available for your motherboard. How you do that will depend on the motherboard you have. Check the manufacturer’s support site!
For most of us, most likely you just need to turn on TPM in the BIOS. We’ll do that below.
Fix BIOS Mode and Secure Boot!
 Alright already – let’s get rollin’!
If your MSinfo32 settings are NOT as pictured above, you need to fix them.There are two usual problematic scenarios you might see:
- Legacy + No Secure Boot
- UEFI + No Secure Boot
The first possibility is the most difficult, but don’t worry – I made it easy for you.
For the 2nd possibility, UEFI + No Secure Boot, skip to the next section: Change your BIOS settings!
If you have Legacy + No Secure Boot, then that most likely means that your hard drive is set up to use the old MBR way of doing things. You’ll need to convert it to GPT before you can switch to UEFI + Secure Boot.
For more info on what MBR and GPT are and why it matters, see my article: Convert your Windows 10 boot drive from MBR to GPT
But for simplicity’s sake, I’ve included the relevant steps here.
First, download the following file (I did the hard work for you): Windows 10 PE 21H2 ISO file
It’s a ZIP file containing the Windows Preinstallation Environment. This is what you’ll use to safely convert your Windows drive from MBR to GPT. Don’t worry, it’s really easy…
Just extract the ISO, burn it to a CD, DVD, or create a bootable USB stick using Rufus (use default options it gives you when you load the ISO file in Rufus).
Note that this version of the WinPE for Windows 10 also works for versions 2004, 20H2, and 21H1 of Windows 10!
Stick it in your puter, and reboot. When rebooting, press the Del, F2, or F8 key to boot from the USB stick / CD / DVD (the key depends on your motherboard – if you’re unsure, Google will help).
When WinPE boots, you’ll see a command prompt window. In the command prompt, do this:
- Type: diskpart
- Type: list disk
- Note the Disk # for your C:, which should NOT show an * in the GPT column. If it does, you’re done!
- Type: exit
- Type: mbr2gpt /validate /disk:X, where X is the # of the disk you got from diskpart for your C:
- If it validates okay, carry on to Step 7. If not, stop and reboot into Windows because there is some problem!
- Type: mbr2gpt /convert /disk:X to do the actual conversion
That’s it! Now it’s time to futz with your puter’s BIOS settings…
Change your BIOS Settings
Alrighty… By now, you should have a GPT disc, but you still need to enable UEFI boot, Secure Boot, and make sure TPM is enabled.
So, reboot and go into your BIOS settings. Upon reboot, tap the F2 or Del key (usually) to get into the BIOS/UEFI configuration. If your puter boots into Windows, reboot again and tap the F2 or Del key repeatedly – and earlier – than before.
You’ll need to find the following 3 settings and set them like so:
- CSM (Compatibility Support Module) = Auto (preferably) or UEFI
- Secure Boot = Windows UEFI mode or Enabled (NOT Other OS)
- TPM = Firmware TPM or Enabled (any further settings that appear can usually be left alone)
The settings for CSM and Secure Boot are usually found in the Boot section. TPM is usually found in something like Platform Options, Advanced, etc. Check your motherboard manual if you can’t find them! They’re there somewhere, and it depends on the motherboard manufacturer.
When you’re done, Save and Exit from the BIOS.
Don’t bite your nails!
Your puter will reboot.
Don’t worry if it takes a bit longer than normal. You may have just changed the “boot method” of your puter, so it’s just doing it’s usual first-time detection of hardware and stuff.
Windows should fire up…
Go back and run msinfo32 and tpm.msc again as described above. You should see that everything is now set properly.
To confirm that you’re Windows 11 ready, you can run the PC Health Check app from Microsoft. Or you can wait about 24 hours, and then check Settings -> Windows Update. You should see this:
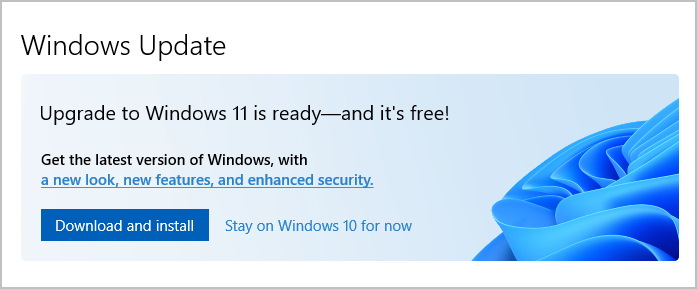
Ta-DA! Your puter now supports Windows 11!!
Instead of the above message, you may also see a notification that your puter DOES support Windows 11, but it’s not available for you just yet. Just wait a few weeks and it should become available. Microsoft is delaying the rollout of Win 11 to certain puters while kinks and bugs are ironed out.
So there you have it.
Plus, even if your puter doesn’t support Windows 11 in the end, it’s a good idea to convert to GPT + UEFI + Secure Boot.
It’ll make your machine boot faster, gives you added security, and allows booting from ginormous hard drives. Not too shabby!
Party on, dudes.

I admire your persistance in fighting Windows hurdles, Scottie! Have you heard the rumors that W11 will require a Microsoft account just to be installed? To me it looks like a final straw and call to ditch Windows for good. The only exclusive thing Windows can offer today is online multiplayer games and you are probably not into this.
They already make you do this with Windows 11 Home. Not with Pro yet, tho. But it’s easy to get around it: install with MS account, then remove MS account and switch to Local account.
That’s the spirit! 😀