 You know the drill: You get a new motherboard. You upgrade. And then the fun begins!
Sometimes, one device or another in your system is not detected properly. Other times, you can’t boot into Windows.
You may even find that you can’t even get into the BIOS after the initial setup… Instead, you are met with a blank screen with a blinking white cursor, and pressing Del or F2 does nothing!
In some cases, these problems can indicate a defective motherboard or other component. But before you go RMA-ing anything, try changing the following settings in your UEFI BIOS…
So, the first thing you’re gonna need to do is get into the BIOS. If you can’t get in because you see a blank screen instead of a “boot logo” during the BIOS POST (power on self test), you’ll need to:
- Turn off the puter
- Unplug the puter
- Pop out the little battery on the motherboard
- Usually, you’ll want to stick a jumper across the 2 pins on the motherboard labeled CLRTC (or something similar) for a few seconds
- Put everything back together, and boot. Voila! You’re back into the BIOS.
Right. Now that you’re in the BIOS, you’ll need to check a few things. Note that the following screenshots are for the UEFI BIOS in an ASUS Z170-A motherboard. This motherboard uses Intel’s new Z170 chipset, which is only a few months old.
If you find yourself with a similar very new motherboard, the absolute first thing you should do is update the BIOS. Especially with newer chipsets and motherboard, there will be many bugfixes released in the form of a BIOS update. Contrary to what most people will tell you, I’m telling you that in most cases, UPDATE YOUR BIOS.
I do this whole puter-building thing a lot, and I’ve been doing it for a long time. When you get a new motherboard, why wouldn’t you update the BIOS? With each BIOS release, the accompanying note is usually something like, “Improves system stability”, or “Improves compatibility with USB devices”. It’s a no-brainer!
The method of updating your BIOS varies by manufacturer, and you can find instructions in your motherboard manual. But usually, you just have to:
- Download and extract the BIOS update file from your mobo manufacturer’s web site
- Copy the extracted BIOS file to a USB stick
- Reboot
- Use the built-in utility in the BIOS to flash (or update) the BIOS to the newer version. For example, on Asus motherboard, the built-in BIOS update utility is called EZFlash. It’s really easy, as the name implies.
Flashing your BIOS will usually erase all your BIOS configuration settings, so remember what they are!
Moving along to how to fix all your New Motherboard Problems…
Again, the following screenshots and instructions are specifically for an ASUS Z170-A motherboard, so your BIOS may vary. But, it’s pretty much guaranteed that your BIOS settings will be very similar.
First, get into your BIOS. You’ll prolly want to go the Boot settings, like so:
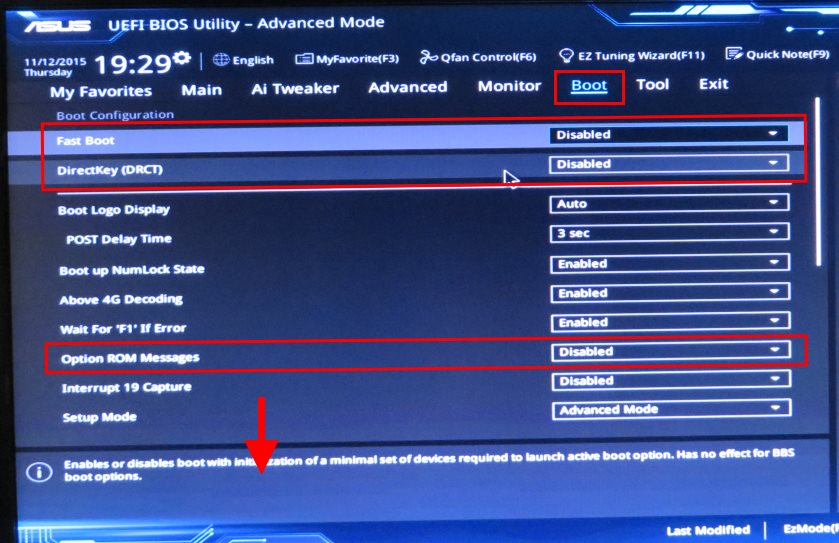
Notice that I have disabled Fast Boot and DirectKey, as well as Option ROM Messages.
On this particular motherboard, Fast Boot does very little to speed up the boot time if you configure everything else correctly. DirectKey is useless since there is no button to use on the case for this particular puter. DirectKey is a feature that lets you have a “reset button” that takes you directly into the BIOS. Option ROM Messages is kind of pointless – and slows down your boot time – unless you have an add-in card that needs to run its own sort of BIOS initialization mojo. You would also turn the Option ROM Messages on if, say, you wanted to enable your ethernet ROM in order to boot over the network… that sort of thing.
Next, on the same screen, scroll down, and you’ll see this:
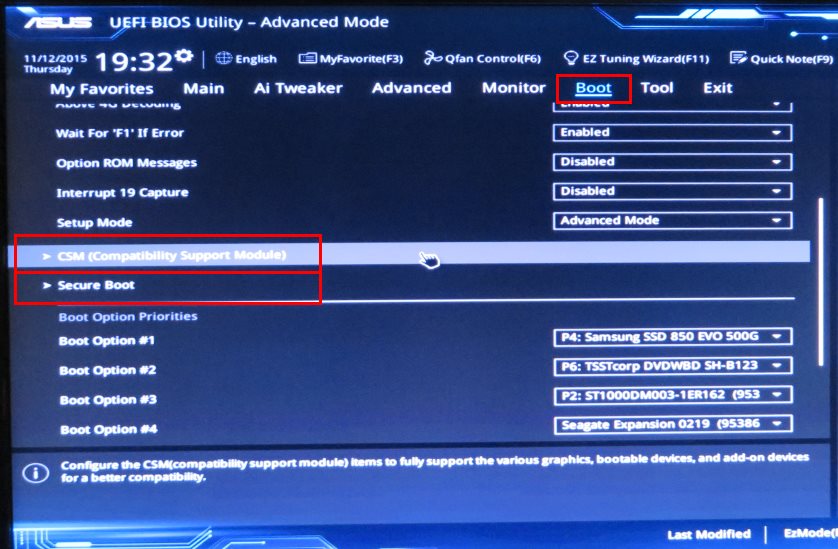
Here we get to the really important part! Click on CSM (Compatibility Support Module). You’ll see something like this:
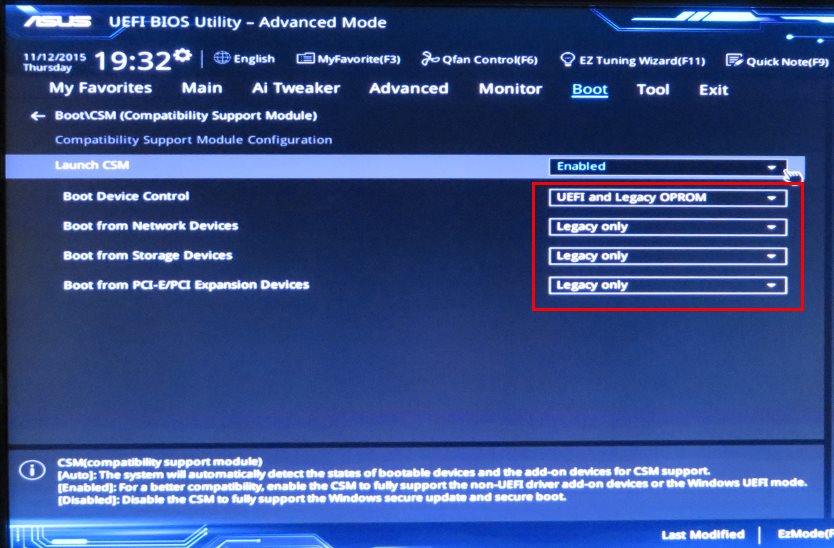
Now, you might think that you can set Launch CSM to Enabled, and then futz with each of the four settings underneath it. On this board, these were the default settings – although I have no idea why. I highly recommend that you do NOT do this – unless you really know what you’re doing. Set Launch CSM to Auto, like so:
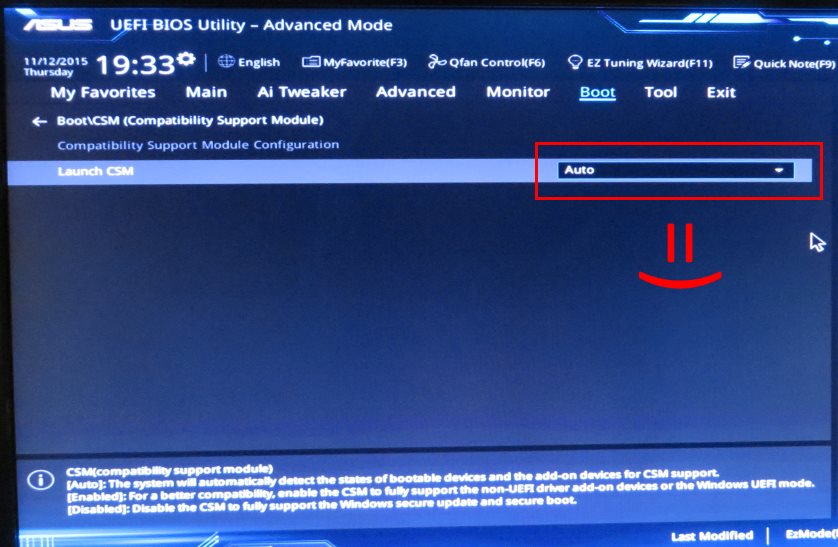
Why? Well, on this particular mobo, I had great difficulty getting Windows to boot. It also wouldn’t let me into the BIOS on reboot (I got the blank screen with a blinking cursor). Furthermore, when I did finally manage to get Windows to boot, I was greeted with this Windows load screen:
WTH?! That’s not the pretty Windows 10 boot screen. It’s like a Vista flashback! EEK!
I concluded from this problem that Windows 10 was having great difficulty with some BIOS setting, and it was pretty easy to conclude that it was the CSM settings. CSM is a feature of UEFI BIOSes where the mobo will (hopefully automatically) detect whether it should use “legacy BIOS” or “new UEFI” features for setting up your puter and launching the OS.
Hence, my recommendation to set Launch CSM = Auto. That fixed darn near all my problems with this particular Z170-based machine!
Finally, back on the main Boot screen, you’ll want to click on Secure Boot (see above image). Doing so will give you something like this:
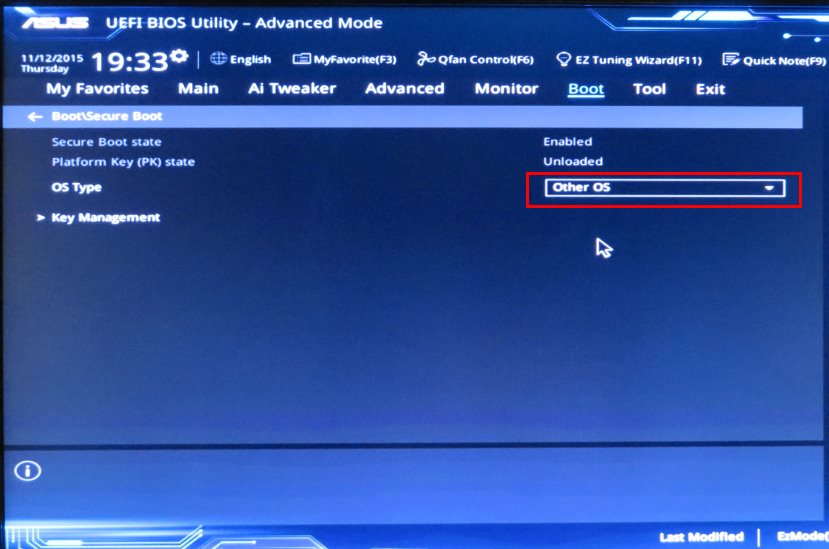
This is all about the whole Microsoft Secure Boot initiative. If you don’t want to use all this new-fangled weirdness, just set the OS Type to Other OS. Boom, done.
Now save your settings and reboot, and you should be all set. Well, don’t forget to set the proper OS drive as your 1st boot device. That’s kind of important…
Finally, note that with newer motherboards, you sometimes have to attach your USB keyboard and mouse to USB 3 ports. Yeah, it’s crazy, but that’s what happens when USB 2 ports start disappearing from the back of new motherboards!
Have fun – and above all, try not to throw your new puter out the window when it won’t boot! 😉


I had another Z170 Asus mobo at hand, and cannot find the ‘Secure boot’ menu, no way! I thought it was crazy, maybe the ‘Launch CSM = Auto’ wasn’t set that day… ? Is it always shown on the ‘Boot’ menu?
Then I’ve flashed the new bios – the mobo restarted like 4 times and that was odd – but no ‘Sucure boot’ anyway. ? That was eventually to reset the Secure Keys from a previous UEFI installation as I was used to do on certain Win8 laptops.
Maybe some of the Z170 mobos don’t have the secure boot stuff? I only worked with a Z170-A so far…
Here it was, a Z170-K. Should be about the same. I’ll keep that screenshot of yours at hand when I’ll get another chance 🙂 Thanks!
Hoping you can help. I received my h170 pro gaming motherboard this week.
I installed windows 10 from my usb drive. When the bios was asking me which to boot (there were two options) UEFI or just the regular flash disk, I chose the one without UEFI. The usb drive booted and I installed windows on my SSD.
Today I installed a new hard drive. Windows would not boot.
I took out all the hard drives in my computer except the SSD and it still won’t boot.
I followed your recommendations above and it still won’t boot.
I see two devices in the computer. Hard Drive and Samsung EVO 850. I had previously selected the generic hard drive and it would boot into Windows. Now, neither option works. I have the most recent bios on this board. Are there any other suggestions you have?
Thanks!
Have an update to this. I booted into my Windows USB Drive and found the option that lets me fix issues when Windows doesn’t boot option.
That seemed to fix the problem.
Any thoughts on what happened?
Thanks!
Hmm, I’m not entirely sure, but I guess maybe Windows went a little bonkers and something got screwed up. That did happen to me once when I was switching between UEFI and Legacy boot modes. But I fixed it exactly as you did! One of the “Windows won’t boot” repair tests is to check the bootloader and repair it if need be.
I suggest you keep it on UEFI and legacy OPROM and change the rest of them to UEFI only. As UEFI incorporates Legacy BIOS also , but in a more refined and efficient manner. I changed mine to my suggested setting and it is working just fine.
For some reason, that didn’t work for me. YMMV!
Thank you, thank you, thank you for CSM Auto.
Omg you solved my problem. Thanks!
It kept giving me a bios bootloop after windows update and/or printer installation.
I have a asus h170 refuses to load any os no matter what I tried. Geek squad says just buy a non asus product.
Was having a similar issue and came across this website. My issue ended up having nothing to do with any of this, however. In the BIOS upgrades, Asus set the actual SATA configuration on my board to SATA Express instead of M2 which is what my drive was. So no matter what settings I tried, it would never EVER be able to boot. Once I finally caught this, I was able to get the most recent Z170-AR to run with bios 1902 and boot back into Windows 10.
For some reason, that setting is actually backwards on some Asus Z170 boards with certain BIOS revisions. If you have an M2, it should be SATA Express. If you have SATA, it should be M2. Confused the heck out of me – and many others based on what I read in their support forum!
i have a aegis ii asus and this doesnt work
This guide is very helpful for Ubuntu as well. Was having trouble with booting. Ubuntu will come up with a “Try Ubuntu” or “Install Ubuntu.” Make sure you try it first! You can install it shortly after.
Hopefully this will relieve headaches for the Ubuntu crowd.
Oh and obviously selected “Other OS” in BIOS.
Scottie,
I’m stumped with this one, maybe you can help…I just built a computer with an Asus Z170-A board and have a strange issue where I need to reset the cmos after every full shutdown. Don’t have to remove the battery, just need to short the CLRTC pins and it will boot, but the next time I shut down all the way, have to repeat the process. Thought it might be related to the power/reset switch pins, but tried those every which way as well as leaving them unplugged, no luck. Nothing overclocked, no GPU installed, tried with no SATA drives connected. Any thoughts?
Ah yes, this happened to me before with a different motherboard… First thing I’d check though is the DirectKey thing. That’s the header to boot directly into the BIOS by pushing a physical button. Even if you have a button connected, disable DirectKey in the BIOS and see if that helps. I tried to use it, and it seemed to screw things up sometimes when booting or using the DirectKey button (which only worked maybe 20% of the time).
Then I’d try flashing the BIOS to the latest version. If you have already done that after you got it, then I’d prolly also replace the battery on the mobo, and then reflash just to be sure. I usually unplug, remove battery, and then jumper the CLRTC pins for 5 seconds just to be uber-sure it’s cleared. Then install new battery. Anyway, I’m pretty sure this is what I did with the other mobo that had the same symptoms… It was awhile ago!
If that doesn’t do it, I would RMA it.
Well…..im not impressed with asus. My asus p97iplus with a i5 processor keeps booting straight to the bios screen. Ive tried everything. Messed with every bios setting, flashed the bios and reset cmos. Nothing works. Ive reseated the cpu…tried reseating the memory dimm. Used different hard drives. It detects my hard drives and external usb dvd drive but wont get to a boot screen. It wont let me get to a boot menu. Looks like a common issue. I thought asus were a quality brand!
It gets to the post screen……goes black with a flashy cursor on the top left corner for a split second. Then 2 green bands flash at the bottom of the screen and it goes to the bios.
Any ideas? Im worried it may be my cpu. Dont want to buy another motherboard to find the same issue.
Well, I’ve never had a bad CPU… I’m starting to think myself that Asus quality is dropping. I’m stumped!
@Scottie
I dont have a direct key setting on my board…..
Concidering these things arnt cheap…..its not good. I would have thought reinstalling the firmware would have solved it but nope. There are far too many settings on these motherboards. Reseting to default should work but it doesnt. Why should i have to mess with keys and stuff just to get it to boot a hard drive? There must be a fault. Guess il have to buy another mb. Not asus this time though.
I usually go for midrange motherboards. Deluxe and Pro and Gamer ones are always so loaded with features, they tend to be a pain to set up. The cheapest models are usually too cheap, if you know what I mean. I really hope this isn’t a new general downwards trend… I’ve sworn by Asus mobos for about 17 years now, and only ever had 1 defective one that I had to exchange out of maybe 100 systems. I did once deal with a P5KC that supported DDR2 and DDR3. That was a pain because even the DDR2 slots were VERY picky about the RAM they would work with. It refused to boot otherwise, or even show the BIOS setup. SIGH. Well, my next motherboard might not be Asus, either!
The Asus Z170M-Plus motherboard just sucks.
It literally blew 2 DVD drives and 2 Sata HDD and I mean fried them when I turned on the comp.
Finally when I did manage to get a DVD drive to not blow out from being fried, it didn’t read anything I put in the drive. The system Read the drive but the drive itself wouldn’t read anything.
The DVD drive works fine when I hook it up to another computer so it’s not the drive.
I then had to format my SSD on another computer and when I put it through this motherboard it gets to the logo screen then blue screens.
There is no setting and or combination of settings that will allow the SSD to boot an OS on this motherboard.
The SSD works perfectly fine in any other computer I put it in, in fact I’m typing this messages from a computer that has it in it. So the problem is the board itself. It just doesn’t do what a board is supposed to be doing.
This board is nothing but trash.
I dunno, but that sounds like a bad board to me. I’d RMA it to the place you bought it, or to Asus directly if necessary. That’s just not normal. The SSD not being recognized can be specific to the mobo (even if it’s not defective). I had that problem with an older Asus 4000-series Intel mobo, coupled with an OCZ SSD. Half the time, the mobo wouldn’t see the SSD. Put a Samsung EVO 840 in, and it’s worked fine ever since. So, it could be a compatibility thing, but the DVD drive explosion thing tells me something else is going on, and it’s not good!
didn’t work for me though 🙁
Zoostorm ready made PC. Asus A68HM plus with AMD A8 7600 cpu. Couldn’t even install Windows 7. These changes worked for me. Many thanks.
It worked! You are awesome! Thank you so much!
Hello Scottie and fellow tech denizens,
Lately I have been tackling with a new build and I swear I have never had as many headaches as I have had with this one. The Z170 chipset has been an utter nightmare. Sigh. Anywho…
I bought an EVGA z170 Classified K (after reading that Asus has dropped a bit in quality since the previous refresh, mistake maybe?) and I believe I have pinned down some funkiness with the UEFI bios settings that Windows and my drives have trouble with. I use a Samsung EVO 850 Pro and older model Intel SSD Elm Crest 510 series drive. With UEFI settings, it continuously boots to safe mode and will not allow me to boot to either drive’s OSes. If I go into SATA settings, I can see them there but I can’t boot to them even by forcing.
Now, if I set bios settings to Legacy, (alas this board doesn’t have a CSM auto setting like your example board) I can boot to those drives. However, about half the time I still need to force it to boot to the Samsung drive to start Windows 10 (Intel is my Windows 7 installation).
I haven’t tried switching to the secondary BIOS by flicking the switch the Classified K has, though. But, I am not certain this would make booting any easier. Is there something I am missing here? I have already RMA’d one board because it came DOA. So yeah, frustrated. Any thoughts are truly appreciated!
Oh man… I feel your pain. 😉 I have seen other boards where futzing with the Legacy/UEFI boot settings helped. But sometimes, motherboards just simply do not work with certain SSDs. Even when the manufacturer tells you that SSD is certified for use with the board, it still might not work. I really don’t know what the deal is at a low level, but it’s pretty annoying. I even had one motherboard that had boot drive problems until I put in a precise combination of RAM modules (sizes and brands), and then it worked fine for 4 years. ??? I wish I had more useful advice than that, but alas…
@Scottie
No worries, Scottie! I got very bothered and looked more into the nature of UEFI (it’s come as new thing to me because I’ve built PCs for sometime on plain old BIOS for many years).
What I have discovered is this, although I am on the verge of testing it out for myself is that:
UEFI does not play nice with drives partiioned/setup to use MBR, because MBR is based off of old LEGACY/BIOS technology. What happens when you have partitions setup with MBR instead of GPT (UEFI)with UEFI settings on is that UEFI will not recognize those drives as valid bootable drives, even if the system does see them hooked up. In my case, both of my drives are using MBR and not set up to GPT.
What I am going to test is just this. Because my motherboard only allows you to use LEGACY or UEFI (one or the other but not both with CSM), I will reformat a drive to GPT, install Windows 10, and then see how it plays out. My guess is that this is the issue and not the board. One can hope, at least!
I will write back once I have tested this because it may be something you may update your guide with, as it would be very useful for people having issues like myself. 🙂
Yeah, that’s the ticket. It’s totally possible the GPT thing will work. It would be kind of surprising though, because that would mean the Legacy mode of the motherboard is not very “legacy-ish”. Well, let me know what happens!
@Scottie
Good news!
So, it turned out that my hypothesis was correct. UEFI may often not play nice with drives that are partitioned with MBR using traditional Bios. As a result, if you have a motherboard that does not have CSM and only allows you one or the other (Legacy Bios or UEFI), you will have a hell of a time trying to boot to a drive, if you can at all.
For motherboards that do not have CSM, (most likely any new EVGA boards like Z170 and the new z270 lines)it is recommended that you reformat them using the “Diskpart” utility in an elevated (Administrator mode) Command Prompt and partitioning/converting to GPT.
A Technet article has those instructions and the important snippet is below:
“To change a master boot record disk into a GUID partition table disk using a command line
Back up or move the data on the basic master boot record (MBR) disk you want to convert into a GUID partition table (GPT) disk.
Open an elevated command prompt (right-click Command Prompt, and then click Run as Administrator) and type diskpart. If the disk does not contain any partitions or volumes, skip to step 6.
At the DISKPART prompt, type list disk. Make note of the disk number you want to convert.
At the DISKPART prompt, type select disk .
At the DISKPART prompt, type clean.
ImportantImportant
Running the clean command will delete all partitions or volumes on the disk.
At the DISKPART prompt, type convert gpt.”
Phew! Anywho, apologies as it too me a few days to have the spare time to test this. I hope this is useful information you can use to update your article on this, Scottie! That said, thank you for providing this resource, Scottie. Even though it didn’t diagnose my specific issue, it helped orient me towards getting this figured out! Much respect and much appreciated! 😀
Awesome!! Thanks for the info, and I’m glad you got it sorted. Good to know about the CSM thing, also. I guess next time I upgrade my motherboard, I may be converting my boot drive to GPT… 😉
@Scottie
Glad to add my findings! At first I was iffy on UEFI but it really did half my boot time. It basically boots straight to the OS from the Bios splash screen, assuming you don’t interrupt it by entering Bios proper. Pretty neat! By the way, installing Win 10 fresh will automatically convert it to GPT when you format it in the setup screen. 😉
Interestingly enough, I just updated my Asus Z170-based motherboard to the latest BIOS revision. Before, I had a brief Win 10 boot screen with the loading indicator. Now with the updated BIOS, I noticed it does the same as you mentioned: BIOS splash -> Win 10 login screen. That’s with an MBR boot drive and CSM thing set to auto. Update BIOS, get faster bootup… So, I guess this UEFI thing is pretty sassy after all!
Hi Scottie,
I have an ASUS Z170-A and it has been working like a dream. I have my OS installed via uefi I believe, as my OS drive is GPT format and has an EFI partition when checked in disk management. But since I wanted to decrease bios boot up time, I disabled CSM to support uefi fully and as a result decrease boot up time. This was successful until some boots will hang in Bios screen or sometimes it will boot into windows with VGA led solid red on the motherboard and sometimes it just boots normally! When it does boot its pretty quick at 7.9sec.
I was wondering why do I have a solid VGA red led on mobo or bios hang sometimes If if I disable CSM.
When operating CSM at default settings such as UEFI and Legacy OPROM everything boots fine at 12.4 sec.
I have set ignore for boot from network and boot from storage device in the CSM settings too.
My guess is that my GTX 1070 Strix isn’t UEFI compatible? or fast-boot is causing UEFI boot issues of the VGA card.
anyhow I look forward to your reply. Thanks.
Yeah, this is why I tend to use the CSM anyway. Sometimes the UEFI/GPT method doesn’t work so well, even though it should.
But, I can tell you that the latest BIOS version for the Z170-A reduces boot time considerably, even with CSM = auto.
Can you confirm which bios update number is that? Thank you.
Lessee… It’s 3007 for the Z170-A.
@Scottie
I see, you are using that BIOS and everything is fine, I always stay away from BIOS updates due to stability issues. I’m currently on 1902 at the moment. Thank you for your replies.
For Asus motherboards, I updated religiously. Especially when the summary of the update is “Improve system stability”! I can’t remember any time when a BIOS update on an Asus mobo caused any problems. Well, your mileage may vary.
Hey Scottie,
I discovered this site after the most frustrating week but thanks for the great support. I have Asus Z170M-Plus and have been running Windows 10 Pro for about a year on legacy boot mode. My system started acting weird last month so I decided to update the Bios to 2002 and wanted to install a new NVMe M.2 Ssd. I currently run 850 Evo w 2 additional large Sata disks. When updating the Bios, it just went black screen and since then, there is no way to boot or get to Bios unless I short cmos with a screw driver.
Then I get error saying Raid should be configured to press F1 to recover and enter Bios. Cool, progress. From here no changes are saved when exit and the only way to boot is force using F8. I was able to clean install Win 10 on new drive NVMe BPX MyDigital with GPT partion, but whenever I reboot, BSOD.
I’ve tried everything and more that others have tried even bought the same mobo and it has the same problem. I feel like Windows locked something because when I tried to upgrade Bios to new beta version, it says “ME Bios is locked, will unlock so reboot and try again”. I can’t because have to short cmos again to get back to this screen.
Anyway, I’m sending the MyDigital back to Amazon and my board back too.
This Uefi shit and NVMe stuff suck! Any thoughts or similar experiences are appreciated. Thanks
For basic users, should we change anything in BIOS apart from making sure the boot order is correct?
I hope I’m not reposting the same comment.
Last comment I made seems to maybe have not gone through… I can’t see it.
I’m running on an ASUS Z170-PRO and I’ve noticed some weird issues I’ve been experiencing.I honestly cannot think of pointing at anything other than the motherboard and some kind of compatibility issue.
Build is about 1 month old and I got it put together at a shop since I didn’t want to mess with it myself.
Few days ago I went and updated BIOS to 3007 to troubleshoot some issues i’d been having. The update notes for ASUS BIOS just said “Improves system stability”. So I went ahead and updated BIOS.
After updating BIOS I just went ahead and checked the boot order to make sure it was right and apart from that I touched nothing and just booted into Windows.
Few days later I enabled XMP for troubleshooting purposes which I turned off after a while.
First thing I noticed after enabling XMP was that it changed some kind of sleep setting within Windows. I noticed my computer went to sleep after a while when I left it on, before it was set to just have the screen turn off.
I ended up just going into power settings and turn it off.
Last night I shut down my computer twice to unplug and plug my second monitor.
Was looking in Reliability history and event viewer. Every time I shut down the computer properly it showed “Windows was not properly shut down”
I looked in Event viewer and it showed a Kernel-Boot 29 error and Kernel-Power 41 error.
With the Kernel Boot 29 error it showed an error message of:
Windows failed fast startup with error status 0xC00000D4.
I also noticed that on the 29th which was the day I enabled XMP there was the same error messages logged.
I hadn’t noticed anything abnormal about the system. I likely would not have noticed unless I looked in reliability history or event viewer.
I went ahead and reset BIOS by reinstalling the latest BIOS version of 3007. Afterwards I shut down my computer a few times and I turned it on, didn’t seem to be showing the error. Even went and left it on overnight and turned it off and on, no issue. I went to class but in the morning I went ahead and shut it off, I want to see if the same issue happens after being off for a few hours.
I’ve been looking online and I’m noticing that others with the same issue of Kernel-Boot 29 and Kernel-Power 41 are mainly running on Windows 8/8.1 and most of the posts are from 2013, 2015, few years ago. I’ve been noticing that in those forum posts a majority of those people were using ASUS Motherboards in decent gaming setups. (ASUS Maxiumus, X99, etc)
Do you have any idea what may have happened? Right now I’m suspecting something with XMP messing something up, but it doesn’t make much sense as XMP just changes the Ram timings, speed and voltage.
Even if it did, turning it off should revert any issues.
I understand that Fast startup is more like a hybrid shutdown state where a system image is stored in the ram? And the various components are turned off.
I’m quite confused right now, this computers just been giving me the weirdest errors and issues.
Any help is appreciated! Thank you! 🙂
Specs:
i7 6700k
EVGA 1070 FTW (Driver 376.33)
ASUS Z170-PRO (BIOS 3007)
16GB Gskill TridentZ 3200
Samsung EVO 250GB SSD
Usually, updating the BIOS wipes all previous settings. Generally, I always change quite a few settings besides the boot order. Unfortunately, each one is different, and it’s just one of those things where you gotta read the manual’s description of BIOS settings, and Google everything you don’t recognize. And then, experiment.
@Scottie
Thanks Scotty, I’ll look into a bit in Google then. It seems my Z170-PRO isn’t as common of a motherboard as other ASUS Motherboards, So it’s been a bit difficult at times finding other users of the same board.
Although looking at your post (You’re running a Z170-A?) The BIOS looks to be the same as my Z170-PRO.
Do some similar motherboards just use the same BIOS layout?
My problem with the Fastboot issue. Since I reinstalled BIOS, whatever incorrect setting change that was made before (Assuming turning on XMP is what did it), should’ve been reset and reverted back to factory default settings and shouldn’t give me a problem again right?
Thank you! 🙂
Well, in Asus boards, Fastboot is just a thing where the BIOS doesn’t run all it’s normal bootup tests, and instead uses some cached settings. It’s supposed to improve boot time, but I found it doesn’t make much different (I still leave it on, though). The sleep mode thing would be because of low-power settings, like S1, S3, and might be related to the “EuP” settings, I think it’s called. There might be something else I’m forgetting on that one, because they keep cramming more and more low-power stuff in there.
But anyway, yeah, if you reflashed, your XMP setting should be back to default, with is off I think, and all the RAM timings will be set to Auto. I never touch XMP, and I stopped using “gaming RAM” awhile ago because the problems that stuff caused were NUTS. I wouldn’t be surprised if the weird Win boot errors are related to XMP. I know XMP is supposed to make stuff easier, but it just always caused me headaches. I also never overclock. Overclocking means running something faster than it was designed to be run. Now, I know plenty of people who do it, but crikey… The shenanigans they go through to perfectly tweak their system are something I’m just not willing to spend time on. I’d rather get a faster processor and be done with it!
@Scottie
Thanks for your reply Scottie, Appreciate it.
Honestly all these motherboard manufacturers and Windows 10 keeps cramming in more “Features” that end up just causing more compatibility issues, bugs, etc. I honestly more or less feel like its just bloatware haha.
I believe you are right, it must’ve changed some kind of low power sleep state or something of that sort. I personally don’t know much about any of those, Not too good with computers just yet.
After I reflashed BIOS yeah I believe everything was set back to Auto, I made sure XMP was off.
I completely agree with you when it comes to overclocking as well. The only reason I turned on XMP was a temporary troubleshooting solution (turned out to not be the solution). I don’t touch anything in terms of overclocking, with high end components the difference is tiny I feel.
I just want a simple stable system that can run gaming and normal every day to day tasks without issues :/
Overclocking just means more heat, more possible bugs and compatibility issues and most of all it introduces system stability issues.
All huge no no’s for me.
@Scottie
I actually had another weird issue, I stopped trying to troubleshoot it after a while and just saw it as a Windows bug and left it be after a while.
It seemed like whenever I tried opening and using Microsoft Edge, Reliability history would show that it “Stopped working” Even though when I use it it functions perfectly fine, doesn’t crash or anything.
When I run windows app diagnostic it shows that my Windows Store Cache/ Licenses could be corrupt…
I tried letting the troubleshooter fix it, I tried Wsreset.exe, I tried making a new cache, I even tried reinstalling the OS a few times, didn’t fix it at all. Even brought it to the microsoft store for a format and a reinstall, they couldn’t figure it out either.
I can’t help but to feel like there’s some kind of underlying compatibility issue within my system, even though PCpartpicker showed all my components were compatible, and I don’t see any reason why my parts wouldn’t be.
I’m again not the best with computers so I haven’t been able to confirm this, but all my main components seem to be common parts. The motherboard I suppose is slightly less common and the Ram may be too (But I’ve seen tons of mentions of my ram in online reviews and benchmarks comparing high end ram).
Would you know of any way for me to confirm any underlying compatibility issues? I feel there’s just something not right with this system, I’ve already had a hardware diagnostics run and everything is fine.
Unless you’re seeing other actual problems, I’d chalk it up to Microsoft Edge. It’s definitely a “work in progress”…
@Scottie
Yeah I’m just ignoring it now. I can’t find a fix and It doesn’t seem to be affecting anything else.
I use Chrome without a problem, Internet explorer even works haha
Thanks for the assistance man 🙂
Hey I found this article having very similar issue with my PC not rebooting to Windows. Wasn’t even booting to BIOS. Thanks for this but still having issues 🙁
Specs:
MB: Asus H170 Pro gaming
RAM: Kingston Hyper X RAM 32G
CPU: i7 700 K 4.2GHZ
GPU: GTX 980 ti
OS: Windows 10
BIOS is up to date (BIOS 3016)
I installed new RAM and now my stem is booting to Windows.
What I’ve done to troubleshoot:
1. Cleared the CMOS by removing the battery.
2. Was able to reboot to this screen (http://imgur.com/3n0Uj8Q) and got into BIOS.
3. I Followed the steps above and set the CSM to AUTO.
4. Saved and exited.
5. Windows still not booting up 🙁
I’m a little confused on the boot drive order. See these pics for the options I’m seeing:
http://imgur.com/tzK4gPD
http://imgur.com/jb3EIeW
What are my next troubleshooting steps? Really am stuck here. Appreciate your help in advance.
TYPO:
***I installed new RAM and now my system IS NOT booting to Windows.
Ah yes… The joys of upgrading. Was it working fine before the RAM upgrade? If so, then I suppose it could be a RAM timing issue. I’ve seen that cause all kinds of crazy problems.
Also, does it work if you select the plain EVO 850 option as boot drive instead of the “Windows Boot Manager (EVO 850)”? I’m not sure why that option even shows up. I’ve only ever seen it on store-bought machines that have a hidden boot partition that lets you load recovery software and stuff like that. Do you have a dual-boot setup between Win and linux or something?
If that doesn’t work, you may need to change the Secure Boot option to NOT “Other OS”. I’ve never used Secure Boot, and I’m not even sure exactly how it works. But if you’re not using it, Secure Boot should = Other OS.
If that doesn’t work, then you need to know if Windows on your 850 EVO is using MBR or GPT. That might be kind of hard to figure out if you can’t boot Windows, though… If it’s MBR, then CSM = Auto should work best. If it’s GPT, then you could try forcing CSM to UEFI + Legacy and tinker with those settings a bit. Of course, CSM = Auto should deal with either case (MBR/Legacy or GPT/UEFI) just fine.
That’s about all I can think of…
Thank you Scottie this post helped a great deal. Had to call Asus to get me to the finish line but this was the impetus I needed. I have one more question please. During the Windows update a restore point was created. Would it be wise to go back to that point before updates were installed? My fear is that if something similar should reoccur I might not be able to recover since “other OS” is now selected and I may not have any more options.
Thank you very much.
From your description, I’m not exactly sure what happened… But if you have Other OS and CSM = Auto, and if Windows boots up okay, you should be fine for future updates.
Thanks Scottie and sorry I omitted what the problem was. Doing Windows update had two updates that failed – 1. March, 2017 Security Monthly Quality Rollup for Windows 7 for x64-based Systems (KB4012215). 2. HP printer. When the system tried to reboot received “unauthorized change” message with instructions to hit “N” which took me to the bios. I spent many hours searching for help and then I found you….thankfully 🙂 Following your screen shots the only thing I couldn’t locate was the secure boot option. That’s what ASUS helped me with.
So I got to wondering if such an event happened again would I be better positioned to recover if I went back and set the PC to where it was prior to the problem vs. leaving the bios set on CSM Auto and Other OS.
Everything is working well at the moment and I would like to keep it that way. The Bios is not where I like to be!
Hmm. That’s one I’ve never seen before! It should be fine though with the BIOS settings as you have them now. I’ve set up quite a few machines with both Win 7 and Win 10 with those settings, and all of them work perfectly.
Thanks Scottie…..I’ll relax about it now, much appreciated.g
Hi Scottie, I have another one for you:
ASUS Z170-WS – flashed to newest 3007 BIOS
Booting into Windows 7×64 on a Samsung 960EVO M2 drive
For weeks, it worked just fine. Then I shut it down for a week on vacation, and it won’t boot into Windows. I get the startup fail screen, where it gives me a 2 second time to select normal start or repair. Repair doesn’t help, and normal start gets me to the logo screen with the windows logo, then the screen goes blank with the cursor jumping back and forth from the top left corner to a spot slightly lower and more towards the middle. After a few seconds it drops to the BIOS screen.
I first suspected a display issue, but already removed all of the graphics cards, so those aren’t it.
Note – all other drives are disconnected, CSM set to either Auto, Legacy, or UEFI first all don’t work.
All drives are GPT including the M2 system drive.
Last night was able to get system back up, with just 1 graphics card, and slowly build it back to the full configuration and restart a few times without issues, then this morning, it again didn’t start.
I noticed that the EVGA SLI bridge light stopped working when this first happened. Not sure if that has anything to do with it.
The mobo shows codes for AD and AE when it fails to boot, suggesting a “ready to boot event” or “legacy boot event”.
Given that it took almost 4 days to get it running a couple months ago. I am ready to dump this mainboard. I am losing faith in ASUS. What used to be very stable is now a total mess.
Hope you can think of something. Thanks!
Hmm… A few thoughts: With SLI, I think it’s the second PCI-E slot that will share bandwidth with the M.2 slot. There are some settings for that stuff – maybe “auto” isn’t working as it should? But if you removed both graphics cards and used the integrated Intel graphics, and it still doesn’t work, that seems less likely.
How new is your power supply? This one also seems unlikely, but you never know… I once had a problem that I just couldn’t figure out, and the BIOS was reporting a nice voltage for each of the PS outputs. Turns out the PS had “died” in such a way that the voltage was fine, but I guess it couldn’t supply the necessary current. Swapped it out for a new one, and POOF! Everything worked fine again.
Um… If there’s a Secure Boot option, make sure it’s set to “Other OS”. Sometimes that causes problems, sometimes not.
Now, that really sounds like a graphics issue. I’ve seen it before. But if it still doesn’t work with the Intel graphics, em… That’s weird.
Just for good measure, I also usually run a RAM test first before anything else, since that will cause all kinds of hard-to-diagnose issues.
Well… Only other thing I can think of is the 960 drive. It’s pretty new. I have a 950 M.2, and it works perfectly – but I also only have 1 graphics card specifically because of the PCI-E / M.2 bandwidth-sharing thing. To me, that was like a nightmare waiting to happen.
The other reason I mention the 960 is because I have seen exactly this problem before… with an OCZ SSD (SATA) in an Intel 4000-series processor based system. Sometimes it would boot, sometimes not, and when it didn’t I got dumped to the BIOS screen.
Well, that was awhile ago, but it was another Asus board. The solutions was to get a Samsung EVO 840 SSD. For whatever reason, the mobo + OCZ just didn’t play well together. I should note that this was also a case of working fine for weeks, and then KABOOM. Pickled my brain!
That’s all I can think of. Personally, I’m still a “fan” of Asus mobos, but with certain conditions: Never the fanciest board, never the cheaper boards, and never super-performance configurations like SLI or overclocking either RAM or processor. That seems to give a stable, fast, and functional setup. And then I just upgrade machines more often.
Let me know if you get anywhere, and good luck!
Hey Scottie, can you take a look at this video of my computer booting and give me any tips? For the life of me I cannot figure out how to set the boot order right so it launches right into Windows. I have to go through this whole failure to boot and recovery each time to get into Windows.
I haven’t updated my BIOS yet, so that will be my next step probably. I’ve had this computer for about a year and started to get a lot of BSODs, so I did a clean install today and then ran into this problem.
Sorry, forgot to link the video! D’oh
Hmm, never had an ASRock motherboard before, but they should work the same as every other kind.
Do you remember the hex code the BSOD gave? Usually something like “STOP 0x00000008”. Googling that often gives an idea of what was actually crashing. Sometimes, it’ll basically tell you, “you’ve got bad RAM”. Could also have been a driver issue though, so it’s not always black and white.
I’ve seen several times where the mobo doesn’t like the SSD. Sometimes it boots, sometimes it dumps you to the BIOS screen. Of course, in those cases, usually the BIOS doesn’t detect the SSD at all, which might be a different problem then.
I always update my BIOS to the latest/greatest, but then I’m a little nuts like that. You could try that after writing down all the current BIOS settings.
But from your user manual, it looks like Boot Guard is being tripped, which means it fails to boot 3 times. So, I’d prolly go into the BIOS/UEFI settings, go to Boot menu, and check the boot order. Make you sure you can select your boot SSD. Although it looks like you have 1 SSD, which shows up as the SSD + Windows Boot Manager, so make sure WBM is the first option (at least that’s how it works on my UEFI laptop).
If you can’t, then the mobo doesn’t like the SSD for booting all of a sudden. Try updating BIOS! If you can select your boot drive, then you might try disabling Fast Boot. Sometimes that helps. I don’t get a super-fast boot time on my puter, but I don’t care cuz it’s still super-fast, and most importantly it’s stable.
Finally, check the CSM setting and make sure it’s on. If it is on, you could try turning it off. On Asus mobos, CSM = Auto seems to be the “magic trick”, but not necessarily for other boards. Your board seems to have Enable/Disable only. If you’re “full UEFI”, then CSM may have started interfering with things for some unknown reason.
The strange thing is that it worked fine for so long, and then this problem started… I suppose it might not be a BIOS issue, but rather a Windows boot issue. That seems unlikely though given you just reinstalled Windows. That should have fixed any boot issues on Windows’ side of the equation.
If you never boot from other devices, you could also turn off things like “Boot from Oboard LAN” if they are enabled. Basically, poke things until it works again. 🙂
You didn’t add or change any hardware since the problem began, right? If you did, definitely disable Fast Boot. It should be smart enough to detect the hardware change, but not always.
Well, that’s about all I can think of… Lemme know how it goes!
Thanks for the reply! I haven’t added new hardware, but I’m trying to track down the source of my BSODs which I’m guessing is either my originial SSD failing or my RAM was bad. I ran a MemTest86+ on the RAM, took a couple hours and came back clean. I couldn’t get any of the SSD utilities to scan my drives, so I couldn’t find out if I had any bad sections.
My old computer had a 128GB Kingston SSD (which I was booting from) a newer 240GB from a brand I forget, and a 1TB WD HDD. To see if it was my old SSD which was the problem, I removed it and the HDD from the computer, and installed Win10 on the 240GB SSD from a USB. It boots into Windows fine, it’s just this boot order problem now which I feel is more BIOS’s fault then Windows.
Will try to poke things with CSM and Fast Boot to see if that’s messing it up, and if not I’ll try updating BIOS.
Oh forgot to mention the hex code issue. It was different every time, I got a lot of IRQL_NOT_EQUAL_OR_LESS or something like that. I was keeping a log for a while and investigating my .dmp files but nothing really stood out as a root cause.
You are my new hero!!!
Happened to me on a new z270 Rog strix motherboard.
Only option I missed was secure boot, the rest works flawlessly!!!
Hi Scottie! I wanted to thank you, a lot, for this information. It was until I deactivated both csm and fast boot, that my new build started to behave normal. I had the worst experience ever with this build using Windows 10.
The bios would appear, disappear. Black screens for very long periods in between boot ups. I remember one time out of desperation I pushed all my keyboard keys whille booting, and the pc started to shut off and on itself quite fast non stop. Man I thank you forever for reminding me about the battery reset thing.
You were pretty much the only one explaining this issues.
It is so bizarre to me, that your information is from like two and a half years ago and these problems persist.
I’ll leave my build here , in case someone has something similar:
– GIGABYTE Z370 HD3
– i7-8700K
-Gigabyte GeForce GTX 1060 WINDFORCE OC 6G (GV-N1060WF2OC-6GD)
-HyperX FURY 2666MHz DDR4 4x4GB 16GB
-970 PRO 512GB (MZ-V7P512BW)
-EVGA SuperNOVA 750 G1+
So pretty much my best computer ever by far, and here I was with all the boxes and plastics long gone and completely desperated. Again, defenitely , I owe you a lot Scottie!
Many many thanks. Spent two days trying to fix erratic boot. Tried many other suggestions which didnt work.
I had been dreading Windows and programs reinstal.
Your Bios reset fixed it!
Setting CSM auto was solution for my pc. Thank you so much, it was a great help.
funny, I had the same issue when trying to install Linux on an ASUS notebook. Turned out I couldn’t, see http://marquix.net/product-review-asus-vivobook-laptop/. As I was dealing with a notebook I was not able to easily get to the battery thingie. Long story short, I dumped that sucker back onto Amazon (where I had bought it). Hey, that’s the only reason for me to buy from that shitty outfit anyway: reducing financial risk when I am sufficiently sure I need to return something. Their 30-day returns and refunds are great (most of the time, even though they intentionally let you wait for up to 1-2 months when item value is over $300 or so in order to improve their own short-term cash management; but that’s another story). When I am more certain that I’ll keep something, I only use Amazon for SEARCH and copy the item results over to Shopify or eBay in order to by it Amazon-free ! Always remember, Amazon A9 is a search engine, so let them have it :)))
Hi,
I have boot problem also after updating my Z170-A BIOS. Sometimes it won’t go to BIOS at all sometimes it can and sometimes I can get to Windows. But not before receive the dredded message: “Me FW – Downgrade – Request MeSpiLock Failed”. I’m stumped, already tried your trick and other tricks from the web with no avail…
Is the BIOS the latest version? There’s also an Intel MEUpdateTool you can run. ME is Intel’s Management Engine interface. You prolly don’t use it, but if you can update it, that may help. Might be some conflict between newer BIOS and older ME firmware. See here:
https://www.asus.com/us/Motherboards/Z170-A/HelpDesk_BIOS/
That usually does the trick!
Great write up. The CSM=Auto saved me a bunch of extra headaches. Thanks for posting.,