 Ubuntu server 18.04 LTS is a rather popular linux OS for servers.
Unfortunately, it doesn’t come without its problems. For example, the current version of stunnel – an SSL tunnel – is woefully outdated.
It seems that although Canonical is aware of the problem, they have no intention of fixing it!
Fortunately, there’s an easy workaround that’s much simpler than you might think…
The Stunnel Story
First of all, a short history: stunnel is a lovely piece of software that you can use to create a TLS/SSL tunnel for services that don’t have encryption.
For example, you can configure a POP3 mail server to listen (unencrypted) on port 110 as usual. Then, you block port 110 in your firewall, open port 995, and configure stunnel to:
- Listen on port 995 (TLS/SSL)
- Handle encryption for mail clients that connect to get their mail
- Pass the DEcrypted connection onto port 110
In other words, stunnel is a sort of “encryption wrapper”. It’s seriously handy, and can be used for all sorts of other nifty things.
The trouble comes when you find out that there is a bug in the older 4.x version of stunnel available via apt in Ubuntu 18.04 LTS.
In short, it’s possible for a hacker to send a certain “data packet” that causes stunnel to completely crash – as in, KAPUT!
You’ll see errors like:
Jun 12 19:12:15 mail stunnel: LOG2[254]: Double free attempt: ptr=0x7f0bd80076a0 alloc=../crypto/lhash/lhash.c:109 free#1=../crypto/lhash/lhash.c:144 free#2=ssl.c:117
Jun 12 19:12:15 mail stunnel: INTERNAL ERROR: Bad magic at ssl.c, line 117
Jun 12 19:12:15 mail systemd[1]: stunnel4.service: Main process exited, code=killed, status=6/ABRT
Jun 12 19:12:15 mail systemd[1]: stunnel4.service: Failed with result 'signal'.
This is obviously Very Bad Juju, because it allows hackers to create bots that essentially cause Denial of Service attacks against your server.
If anyone and their grandmother can send a few bits to my server’s stunnel on port 995 and crash stunnel, no one else can download their mail from my server until stunnel is restarted! Oops.
In short, this is not a small bug – it’s a high priority bug that should have been fixed last year.
And yet, this is what actually happened:
stunnel4: “INTERNAL ERROR: Bad magic at ssl.c, line 117” – DoS vulnerability
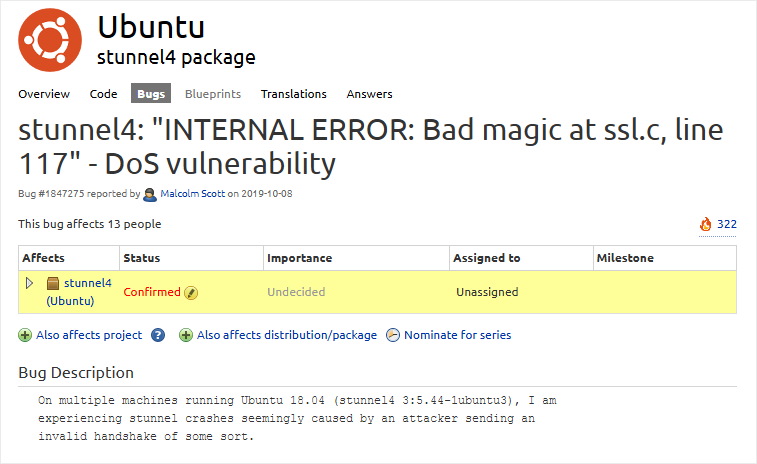
That’s the bug reported to Ubuntu way back in October 2019. Note that the bug is confirmed, but the importance is set to undecided and the bug has not been assigned to anyone.
IOW, in Ubuntu Server 18.04 LTS – the long-term support version – a DoS bug has been left unfixed by the Ubuntu gang for 8 months!
I can tell you for a fact that the bug affects WAY more than just “13 people”. The reason I know this is because hackers started banging away on 3 different servers I manage in 3 different locations beginning in January of this year.
The reason more people haven’t confirmed it is because it’s a royal PITA to find that bug description, and there is literally no information at all on The Great Internet about how to fix it.
Besides, it’s a DoS vulnerability… If only 3 people confirmed it, isn’t that enough? Even ONE person reporting it should have meant that the stunnel package got an update ASAP – especially in an LTS version of Ubuntu Server.
Geez, maybe I should just switch to Windows Server?! Bugs get fixed just as slowly in Microsoft Land. So much for linux being so much better and more secure…
stunnel5 snap: NOT the solution
Okay, so the Ubuntu gang isn’t gonna fix it. Great.
But I’m still left with a DoS vulnerability that I need to patch.
Enter snaps: the New Way to package software – invented by Canonical, creators of Ubuntu!
Well, heck! We’re saved, right?
No.
Go on, install the stunnel5 snap, which you can find here.
Next, tell me if you can figure out how the HELL to get the thing to accept connections.
Try as I might, I couldn’t figure out how to get the stunnel5 snap to actually bind to a port on my server. It has no interfaces.
Maybe it’s just this one snap I tried to use, because Snaps are a brilliant idea.
Instead of a package that needs to be bundled for different systems/package management systems/linux flavors, snaps are basically a compressed file.
That compressed file is sort of like it’s own bundled “linux image” with the single app you want to install. Snaps are sandboxed from your actual OS install.
So, snaps can run on any flavor of linux, kind of like a “universal app”.
It’s a fantastic idea, but getting around the sandboxing so that apps can actually do what you want them to do is often a total mystery.
In searching the net for help, I found more people complaining about how complicated snaps are – and how they rarely work – than I did actual help! SIGH…
And if I’m just an idiot, why didn’t someone from Canonical simply post to that bug and say, “Hey! No worries! Use this snap, and here’s a guide on how to config it: [link]” Is that so hard?
Okay, okay… How do I fix it already?!
Alright, rant over.
It’s easy! Just install stunnel5 from source.
Now, I know what you’re thinking: But, but, it’s HARD! Stuff won’t work! I’ll have to update manually!
Yes, you will have to manually update. But you can go to stunnel.org and sign up for their mailing list to notify you when updates are released. Piece of cake!
The latest version of stunnel can be downloaded here.
Without further ado, this is how to install and configure stunnel 5.56 from source on Ubuntu 18.04 LTS (run via sudo or as root):
- To ensure you can build stunnel, do this first:
apt install gcc g++ build-essential libreadline-dev zlib1g-dev linux-headers-generic - Then cd into a nice semi-temp directory. I like /opt
- wget https://www.stunnel.org/downloads/stunnel-5.66.tar.gz
- tar xzf stunnel-5.66.tar.gz
- cd stunnel-5.66
- ./configure
- make
- make install
- make cert (only if you need a self-signed SSL certificate)
- Edit config in: /usr/local/etc/stunnel/stunnel.conf (or copy from existing /etc/stunnel/stunnel.conf)
- Create unprivileged user: useradd -s /bin/false -r stunnel
- Create chroot dir: mkdir /var/lib/stunnel
- chown stunnel:stunnel /var/lib/stunnel
- Include in stunnel.conf:
; Cert MUST be in /etc/ssl/certs, or openssl will give error and stunnel5 won't run:
cert = /etc/ssl/certs/stunnel.pem
; It is recommended to drop root privileges if stunnel is started by root
setuid = stunnel
setgid = stunnel
; PID file is created inside the chroot jail (if enabled)
chroot = /var/lib/stunnel
pid = /stunnel.pid
- cp /usr/local/share/doc/stunnel/examples/stunnel.init /etc/init.d/stunnel5
- chmod 755 /etc/init.d/stunnel5
- cp /usr/local/share/doc/stunnel/examples/stunnel.service /etc/systemd/system/stunnel5.service
- systemctl stop stunnel4 (stop old stunnel 4 from Ubuntu)
- systemctl disable stunnel4 (disable old stunnel 4 from Ubuntu)
- systemctl start stunnel5
- systemctl enable stunnel5 (to run at boot)
- Run netstat -tlp to ensure that stunnel5 is listening on the port you configured
Aaand you’re done!
When a new version of stunnel5 is released, you can be notified by the stunnel-announce mailing list.
Then just repeat the above process to install the newer version. Specifically, you’ll need to do Steps: 3-8, and then run: systemctl restart stunnel5.
No more DoS attacks, and you’ll always have the latest-and-greatest version of stunnel.
Ta-DA!


Or you could run your servers on CentOS 8.2. Stunnel .rpm is 5.48. 😁
Yeah. I’m not sure why Ubuntu is SO SLOW sometimes to update a simple package…
/tmp/stunnel-5.57# make
Making all in src
make[1]: Entering directory ‘/tmp/stunnel-5.57/src’
make all-am
make[2]: Entering directory ‘/tmp/stunnel-5.57/src’
CCLD stunnel
stunnel-client.o: In function `print_tmp_key’:
/tmp/stunnel-5.57/src/client.c:656: undefined reference to `SSL_get_peer_tmp_key’
collect2: error: ld returned 1 exit status
Makefile:549: recipe for target ‘stunnel’ failed
make[2]: *** [stunnel] Error 1
make[2]: Leaving directory ‘/tmp/stunnel-5.57/src’
Makefile:412: recipe for target ‘all’ failed
make[1]: *** [all] Error 2
make[1]: Leaving directory ‘/tmp/stunnel-5.57/src’
Makefile:446: recipe for target ‘all-recursive’ failed
make: *** [all-recursive] Error 1
root@ip-172-31-15-93:/tmp/stunnel-5.57#
I m getting above error , how to fix this ?
My guess is you might need to update OpenSSL…
Since Ubuntu never has the latest versions, I use this:
apt install python-software-properties
add-apt-repository ppa:ondrej/php
apt update
apt upgrade
His repo contains PHP versions with more bugfixes, and it also happens to include newer versions of openssl.
Just a guess, tho!
This is just awful….still not fixed in 18.04. I’ll have to manually upgrade to 5.56 and luckily the prebuilt .deb package worked here.