 If you have a fuel or water tank that is either metal or colored plastic, you may have run into the same problem I had: How do you know when it’s empty?
Mechanical level gauges are nice, but not always practical or even possible. So, I went on the hunt for an ultrasonic level sensor for my fuel tank.
Alas, what’s available on the market is too expensive, not very reliable, and often goofy in terms of features. So I decided to build my own!
This ultrasound fuel gauge can be built for around $33 using a breadboard, Arduino Uno, and one of 2 different ultrasonic transceiver modules designed for use with Arduino or Raspberry Pi boards.
First, a lovely video intro to the project:
How exactly does it work?
It’s pretty simple, actually.
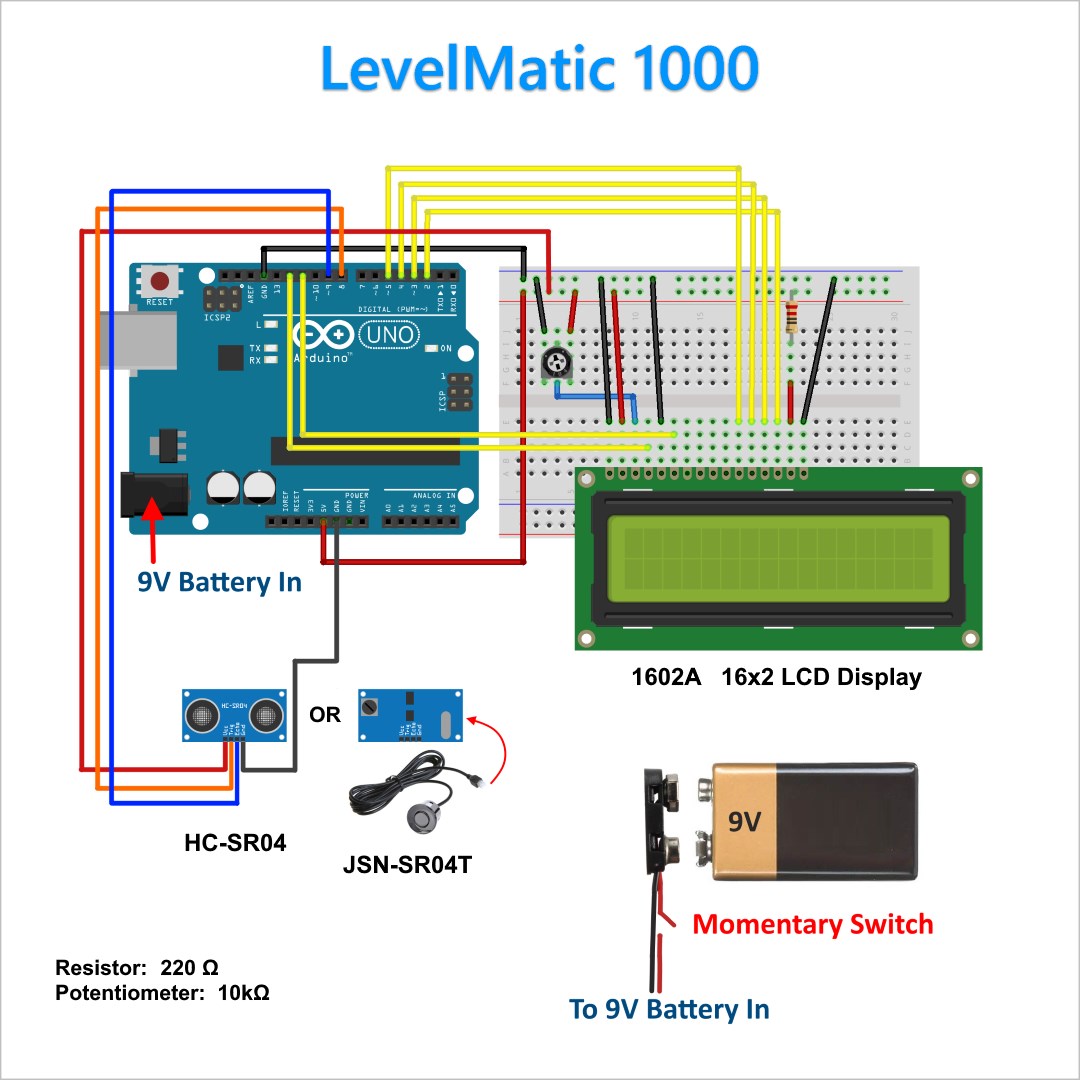
First, the schematic:
The ultrasonic transducer has some electronics onboard. You supply 5V DC, and there are two other pins: TRIG, and ECHO.
So, the Arduino simply has to do this:
- Set the TRIG pin high (5V) for at least 10 μs (microseconds)
- The ultrasound board then records a timestamp, and sends out a 40Khz sound pulse
- The ultrasound wave travels down to the liquid in the tank, and reflects off of it
- The ultrasound wave then travels back up to the transducer
- The ultrasound board then receives the reflected wave, and records another “end” timestamp
- Finally, the ultrasound board sets its ECHO pin high for the number of microseconds it took for the ultrasound wave to travel down and back again
The result on the ECHO pin can be converted quite simply as: 58 μs/cm
So, if the ECHO pin was high for 5800 μs (5.8 ms), then we know that the distance between the sensor and the liquid level in the tank is:
5800μs / 58μs/cm = 100cm = 1m
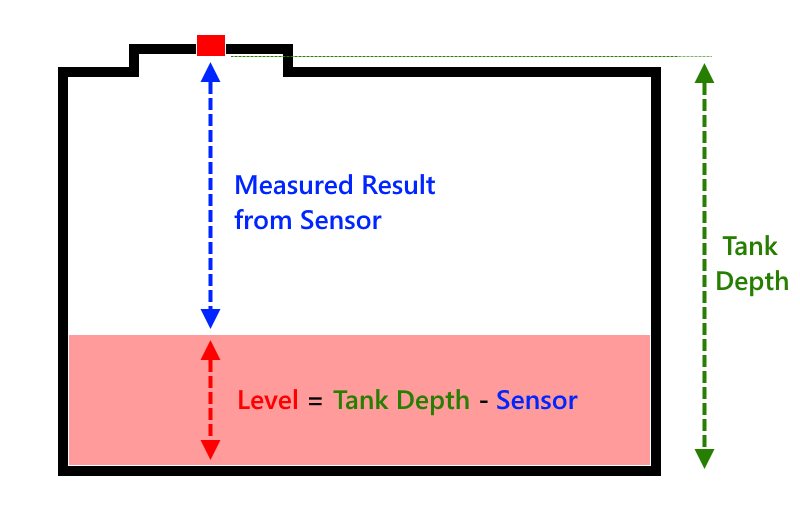
Note that this is the level of “empty space” in the tank, like so:
 Actually, it’s a bit more complicated than that…
In my code, there are two levels you must set:
- tankEmptyDepth = The level at which you want the sensor to show 0%
- tankFullDepth = The level at which you want the sensor to show 100%
The reason for tankEmptyDepth is obvious from the diagram above, but tankFullDepth might be a bit of a mystery.
If you look at the image above, you’ll notice that when the tank is full, the liquid level will still be below the sensor – maybe by about 15cm. So, tankFullDepth allows you to specify this distance between the sensor and the liquid when the tank is full.
Long story short, if you do the math, you’ll discover that with tankFullDepth incorporated into the calculation, you get a more accurate measurement!
Note also that you can set the tankEmptyDepth to less than your actual measurement (I used a heavy nut on a string). The idea here is that if you subtract, say, 10cm off this value, then the level measurement will show 0% when you still have 10cm of liquid left in your tank… sort of like an “emergency reserve”.
This is all re-explained in greater detail in the commented source code, which you can download below!
Other bits and bobs
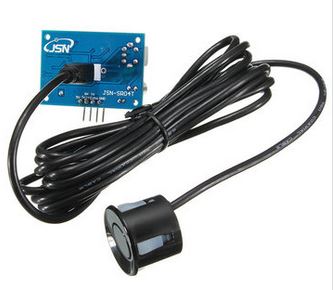 As I mentioned in the video above, you have your choice of any “Arduino-standard” ultrasonic module. If you want maximum accuracy but without the waterproofness, you can just use the very common HC-SR04 that comes in many Arduino starter kits.
Also keep in mind that if you use the JSN-SR04T as I did, your “tank full accuracy” will probably be very bad. This ultrasonic sensor module is “blind” below 25cm.
But I’m guessing that like me, you don’t much care about the level when the tank is full, since the whole reason to have a fuel gauge is to know when the tank is nearing empty! 😉
In my particular case, my fuel tank is 163cm deep, and the sensor will be about 15cm away from the fuel after the tank is filled. Since the JSN module is blind below 25cm, I will need to use 10cm of fuel before I get an accurate reading.
It’s a small price to pay IMO for the waterproof and easier-to-mount sensor!
The Goods
You can get the parts needed here:
From Banggood.com:
Or you can get the whole shebang more quickly (and more expensively) on Amazon:
Elegoo UNO Project Super Starter Kit with Tutorial for Arduino (with HC-SR04 transducer)
Once you’re done building, you’ll need some code to make it go!
You can either visit my GitHub repository, or download the .INO directly.
That reminds me…
 This was my first project using an Arduino, so I kept it rather simple.
There is a bit of a learning curve to figure out how to connect the Arduino to your puter, how to flash code, etc.
The following are some super-handy resources to get you going quickly if you’re also an Arduino Newbie:
- Paul McWhorter’s Arduino Lessons series of YT vids totally rule
- Arduino Support Page
- Download the software you need
- Learn the basics for your Arduino
- Arduino coding Language Reference Page
Like I said in my video, it looks daunting at first, but if you’ve ever done ANY programming at all, you will quickly find it’s far easier than you think!
Have fun!


Thanks,
I’m building one but it’s a couple of projects down the road but I just ordered the waterproof sensor. What I’m doing to compensate for the 25CM is to use a pipe above the oil tank input so the sensor sits higher above the tank. I’m also programming it in assembly using an Atmel TINY2313 chip.
Rob
Hi Rob, I’m thinking about building one of these for use on a boat, I’m confused though as to how it would be fitted to the diesel tank without causing damage to the equipment and without causing any leaks from the fuel tank, any advice on this would be great.
THANK YOU FOR YOUR SHARING. CAN U GIVE ME THE CODE FOR ARDUINO.
It’s here: https://github.com/Scottie35/LevelMatic1000/blob/master/levelmatic1000.ino
Hi
Thanks for all the info but in your schematic you have what I presume is a pot with a blue wire from the center pin what is the value of this pot ?
What is the value of the resistor ?
Is this the full instructions ? if so how do you make the adjustments to depth ??
scottiestech.info/2017/10/24/diy-ultrasonic-fuel-gauge-level-sensor
Kind regards
Julian
Resistor and potentiometer values are in the LevelMatic 1000 schematic image (see lower left-hand corner of image).
I also explain the depth adjustment in the article. You have to look at the code and adjust it accordingly.
Hi Scottie, I’m thinking about building one of these for use on a boat, I’m confused though as to how it would be fitted to the diesel tank without causing damage to the equipment and without causing any leaks from the fuel tank, any advice on this would be great.
That’s a very good question. In my case, I just put the sensor sitting on top of the fill cap for the heating oil tank. I didn’t have to worry about leaks since the tank is stationary and the opening was already there.
I’m not sure how one would go about doing it on a boat. Somehow, the sensor would have to be mounted in an air/fuel/water tight fitting in a hole in the top of the tank.
are you use an i2c lcd 16×2 please ?
great and very thinks for you
You CAN use the i2c interface on the 1602A LCD screen, but I’m not using it for this project.
Hi, is the tool that you can work on the palm oil tank?
I want to make a home project, can you give a suggestion ?
It should work for pretty much any liquid in a tank – as long as the tank is not pressurized and the empty space is just air.
Sir, what type of ultrasonic sensor can I used if I want to use this tutorial for pressurized propane tank
I just built this and it works great, I ran some telephone wire from the sensor to the display and mounted it upstairs but before I did this I tested it with a 100’ roll, I was worried it might affect the operation but it worked great. Thank you so much
GROOVY!!! Glad it’s working well for you.
I just used mine earlier today to check my heating oil level. Gonna need a refill soon! 😉
Hi. Thank you for sharing. i would like to know if can i use this sensor to measure tank of diesel on trucks, Its safe? thank you
Stelio langa
Yes, it should be fine. I’m using it for a “heating oil” tank, and heating oil where I live is literally diesel with red dye in it!
So does the heat not cause any changes in pressure and accuracy?
The actual fuel tank is far away from the boiler itself, so the diesel in the tank is close to the exterior ambient temp. The temperature outside changes, but not enough to make any real difference in the accuracy of the measurements.
Hi! good job. Can it work for my car fuel tank?
If it’s diesel, yes. If gasoline, well, never tried it. The trouble with gasoline is that it’s far easier to ignite then diesel if you get a stray spark because of some wiring mishap or a failed ultrasonic transducer. So, I can’t recommend it for use in a tank filled with gasoline.
I guess so too! Thanks so much.
Hi. Cool project!
– Would it be a matter of adjusts to use it to measure a kitchen gas tank (it will be pressurized, and the empty part will be gas state “propane” with the liquid part of it at the bottom.
What do you think. Speed of sound in the “empty” medium will vary, or will it vary so much to the point of make things difficult/impossible?
Best regards
Oh, no I realized reading again, that your sensor is in “direct” contact with the liquid. I was searching something that would work through the outside wall of the (metal) tank. But maybe it works, since there are these ultrasonic sensors already in the market.
That might do the trick! I’m not sure what to change regarding an external sensor. It has to work through the wall of the tank, and then through propane gas instead of air at atmospheric pressure. Seems like it would work, but I don’t know enough about the mechanical aspects to say anything intelligent. 😉
hi, may i use ultrasonic sensor for petrol tanks? plz guide…
As far as I know, the ultrasound won’t cause any problems with a petrol tank. BUT, you must be careful. A failed ultrasonic sensor that introduces an electric current in a tank filled with petrol + petrol vapor… well, that’s a good recipe for a KABOOM. So, I might pick a different sensor that is specifically designed for max safety. With diesel / heating oil, that’s not really a concern since diesels aren’t spark ignition, but compression ignition.
Is it possible to mount the ultrasonic sensor on the outer metal surface of tank/container to measure the level of the inside liquid?Will it penetrate the metal?
No, it has to be inside the tank walls.
Hi sir,
how could i protect the face of sensor from water vapors to accumulation.
Hmm, that’s a good question. I’m not sure!
Please send me code
why my bar graph when it is full showing full pixel with latter p inside?
Hmm… I dunno. Maybe the display is slightly different now, or it’s wiring or coding issue (assuming you modified my code at all, which works fine for me with my display). It’s a mystery!
Hi, Nice idea.
me searching for a sensor for measuring the diesel level in fishing boats.
Most of the sensors are very costlier.
Did you recommend this sensor?
Shall i try this sensor?
Are you still using it without any problem?
Will this sensor works for years without any problem?
Else can you recommend any new sensors.
Thanks
Binu
I’ve been using the JSN-SR04T sensor for over 2.5 years now, and it still works great. That one is WAY easier to use, although it is less accurate when the tank is full. I haven’t found any other better sensors yet.
Thanks, will give a try.
Will it work with water?
i want to try with diesel and water in fishing boat.
Yup, it should also work just fine with water.
Hi Scottie,
Great work. Just found this article from you and think its great. Have situation where to check fuel means shining a torch onto a dark recess to try and determine the fuel level from a small glass tube (not ideal and usually get an incorrect reading by sight with head upside down).
I like the idea of this ultrasonic sensor, but i do not want to be cutting a hole into the tank for the sensor.
Can you recommend, a sensor that can be placed on top of the steel tank to get a reading? acuuracy isnt what im after, and only really care about when it starting to get low. or can the sensor you have be good enought to read past 1-2mm thick steel ? my tank is no more than 60 cm x 50cm x 50 cm
appreciate the thoughts
Alas, I haven’t yet found a sensor that works through the wall of the tank. The ultrasonic ones have to emit directly into the air above the fuel inside the tank.
Hello bro i tried your circuit in thinker cad . The display is showing percentage but if I change the distance in ultrasonic sensor no change is occurred at display it still showing 0 percentage please give us solution to this.
your video really helped me understand things i was trying to do for one of my projects, can you help me with understanding what type of sensor or schematic is used here in these products here
https://www.amazon.com/AP-Products-1212-13-024-1000-Monitor/dp/B01C5RQI74?fbclid=IwAR0OBJxzObKHedUbY4UBYBenhAgkxqsMK1NRMsCTaA7d7lwXja28y2q1Ub4%29
https://teambmpro.com/products/smartconnect/
Hi Scottie,
I’m a bit of a novice at this but wondering if you could edit your software so when you get to say 25% full that arduino puts an output to switch on a warning light? i.e. maybe set it to check once a day and if the reading is less than say 25% it put and leave on an out put so you could connect a relay to trigger a light or buzzer?
Hi,
I installed the sensor in my tank and it 1st showed an accurate reading of 40 %. But after 30 seconds, it reads “ERROR: timeout”.
I checked the sensor (mounted in the 2″ fill cap), it is pointing down, straight and it is about 1/2″ from the end of the cap. Is 1/2″ too much? Or can I modify the Pulse statement or the “timeHIGH” statement to allow more time?.
The oil level is roughly 16″ below the sensor
What happens if you rotate the ultrasonic sensor 90 degrees at a time? For reasons I don’t quite understand, I have to do this with mine sometimes. When the level hits a certain point (about 40% full, actually) it can start doing weird things. So I rotate the sensor about 90 degrees, and POOF! It starts working perfectly again. I think it has something to do with the walls of the tank and maybe the sensor doesn’t fire waves perfectly vertically? I’ve been meaning to get a different sensor to try for years, but alas…
i am from india can it be used for measuring fuel in lpg gas cylinder pls reply asap
No, I’m afraid not.