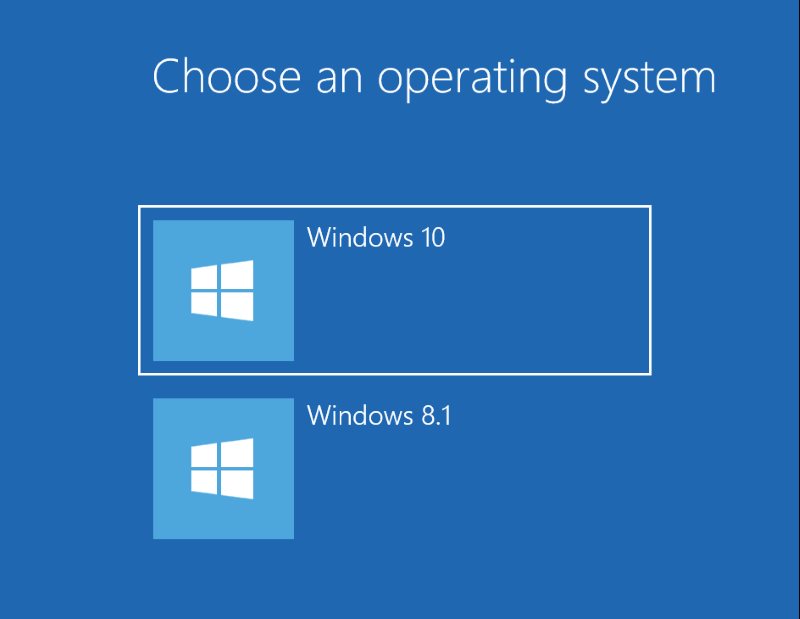
 Many of you have installed Windows 10 on your puters only to discover that every time you boot up, you get a screen that reads: Choose an operating system
Windows 10 will of course be at the top of the list, usually followed by either Windows 7 or Windows 8.1. If you pick Windows 10, it fires up and everything works normally.
Obviously, there is still something wrong: Why is Windows 10 asking if you want to boot your old version of Windows? After all, you upgraded, right?
Fear not! There’s a very easy trick to remove this boot menu – and it works for all flavors and versions of Windows all the way back to Vista at least…
What happens
When you boot your puter, you see a screen like this:
In older versions of Windows, you might see this screen instead:
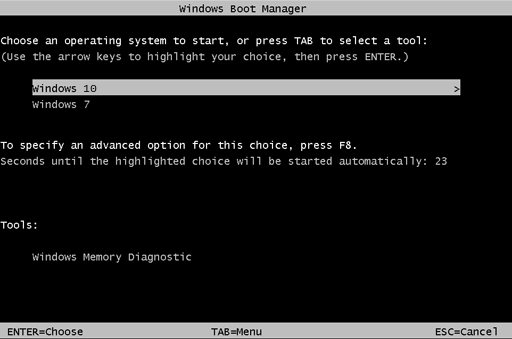
Either way, it’s annoying!
Why it happens
There are a variety of reasons why this little problem happens.
For example, maybe you have 2 hard drives, and there is an old Windows folder on the 2nd drive. Or, you have multiple partitions on 1 hard drive, there is an old Windows folder on one of those partitions.
The old Windows folder may not even have anything in it… On one puter where I saw this problem, there was a second hard drive with a Windows folder that only contained 146kB of files – obviously not a complete Windows installation!
Even though the Windows 10 upgrade should be smart enough to see what’s going on, sometimes it’s not. Thus, you end up with the “Choose an operating system” boot screen.
How to fix it
So, how do you fix it? Easy! Sort of…
First, you need to open a Command Prompt with Admin permissions.
For Windows 10:
- Right-click the Start button
- Choose Command Prompt (Admin)
For Windows 8 / 7:
- Click Start
- Type: command
- Right-click Command Prompt and choose Run as administrator
Okay, now you need to type the command: bcdedit (and then press the Enter key, of course).
BCDEdit is the Boot Configuration Data Editor. It may sound scary, but don’t worry.
So, the output of BCDEdit will look something like this:
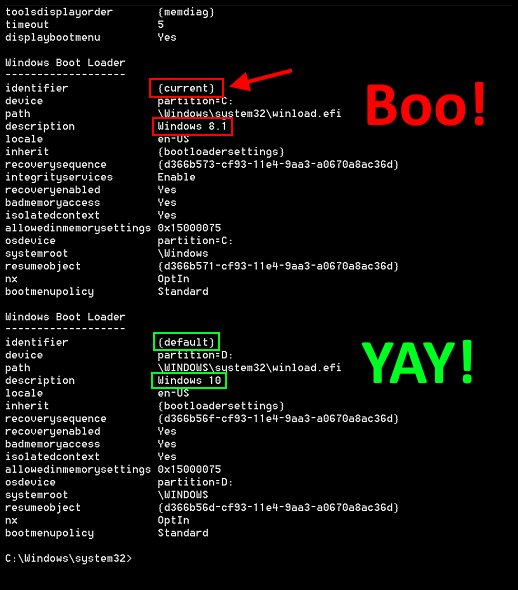
In this case, not that the bottom entry is correct: Windows 10, with identifier = {default} (marked in green).
The entry you want to delete is Windows 8.1, with identifier = {current} (marked in red).
Here’s another example:
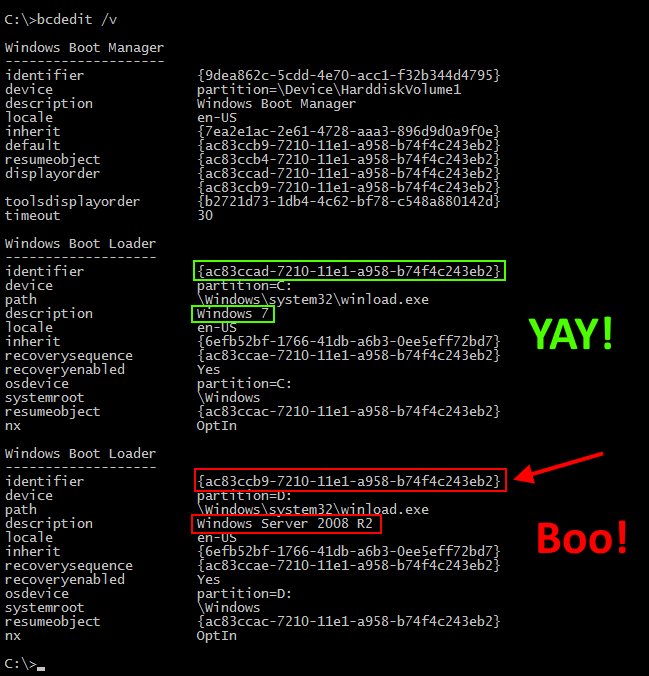
Here, you can see that you have Windows 7 and Windows Server 2008 R2 installed. Windows 7 is on C:, and Windows Server 2008 R2 is on D:
Most likely, you’ll want to remove Windows Server in this case. Note also that the identifier fields are crazy:
{ac83ccb9-7210-11e1-a958-b74f4c243eb2}
Usually, this is what the identifier field will look like. You’re going to need to copy/paste this identifier field for the OS you want to REMOVE from the boot menu.
Note that your actual current/default version of Windows will normally have an identifier of {current} or {default}.
If the Windows you want to keep is NOT on C: then you might want to live with the boot menu and request the help of a techie friend… See the Uh-oh section below!
So, carrying on:
Find the identifier for the version of Windows you want to remove from the boot menu. This will clearly be labeled as Windows 7, or Windows 8.1, or whatever in the description field.
For the entry you want to remove, the top row should be the identifier field. You need to copy this crazy text to the clipboard (if you don’t want to type it all manually below).
To select text in the Command Prompt window, do this:
- Right-click the Command Prompt window, and choose Mark
- Click and drag/highlight the identifier field data for the entry/OS you want to remove
- Once the identifier crazy text is highlighted in white, press the Enter key to copy it to the clipboard
Now the final magic occurs. Type the following command:
bcdedit /delete {ac83ccb9-7210-11e1-a958-b74f4c243eb2} /f
For the red identifier string, you’ll want to paste your copied text, which you can do by right-clicking the Command Prompt window and then choosing Paste.
In other words, don’t copy/paste the command above, because it won’t work. You need to paste or manually type in the specific identifier for the version of Windows you want to remove from the list of OSes. This magic identifier string is enclosed in squiggly brackets, like so: {xxxxxxxx-xxxx-xxxx-xxxx-xxxxxxxxxxxx}
Once the command completes successfully, you’re done! When you reboot, your Windows 10 will boot up without the pesky boot menu.
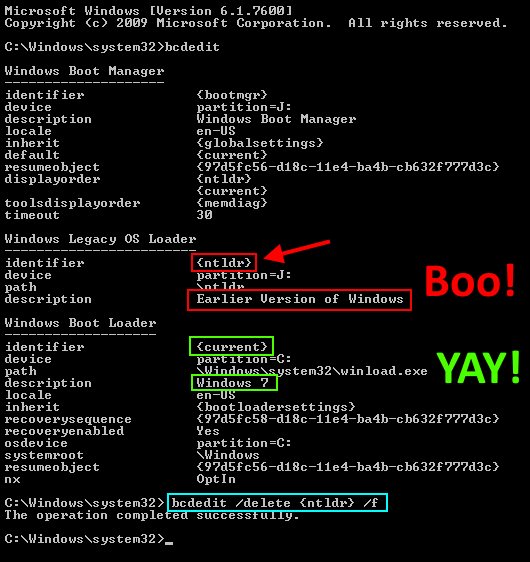
Here’s one final example, with the Good OS in green, the Bad OS in red, and the command to type in highlighted in bright blue:
Uh-oh
If your puter does not boot, then you may need to change your boot drive in your BIOS settings. This depends on your puter model, but usually you go into the BIOS/UEFI settings by pressing DEL or F2 when your puter is first powered on. Then just look for the Boot settings. Like I said, this depends on your puter make and model, so refer to your manual/support web site!
In most cases, the Windows you want to keep should be on C:, and the old Windows you don’t want will be on some other drive letter. In this case, you should be perfectly safe.
Should something totally squirrelly happen and your Windows install won’t boot, you can also use one of the following Boot Repair guides:
Well, this can get a little hairy, but don’t worry. The above Boot Repair repair guides should fix any issues 99% of the time – should you run into any trouble in the first place!


Thanks. Worked like a champ.
Thank you!
Worked like a boss thanks.
why do i have porn virus now
I dunno, but you certainly couldn’t get any virus from doing any of the above steps.
it worked! thanks
I have Kali Linux installed (which it asks in “Choose an OS”, but it is not visible in either msconfig and BCDEdit. Please HELP.
You probably won’t be able to see Kali in Windows. You’d need to install Kali + GRUB and then boot either Kali or Windows from the GRUB boot menu.
https://www.kali.org/docs/base-images/kali-linux-dual-boot-kali-with-windows/
Later, you can remove GRUB and restore the Windows boot manager if you want.
when I typed bcdedit, it said the boot configuration data store can not be opened, acces is denied
what should I do now
Hmm… I’ve never seen it not work. Are you sure you ran Command Prompt as an Administrator? That’s about all I can think of.