 Note: For resizing and posting or e-mailing many images at once, see: How to Easily Resize Images in Windows
There is another little problem I see a lot: How does one resize and/or crop an image to a specific custom pixel size in order to post it online somewhere, or to send in an e-mail, or whatever?
Of course, most online services and social networking sites will automagically resize and compress your images for you, and the they often even let you crop the image right there on their site.
But, sometimes you need to create an image of a specific size, like when creating a Facebook-friendly image.
Fortunately, it turns out that there is a fairly easy and completely free way to do it without any extra software!
As the title implies, I’m assuming you’re using Windows. If you are, then you have Microsoft’s Paint program installed by default, and that’s all you really need. Nothing to download, nothing to install and configure…
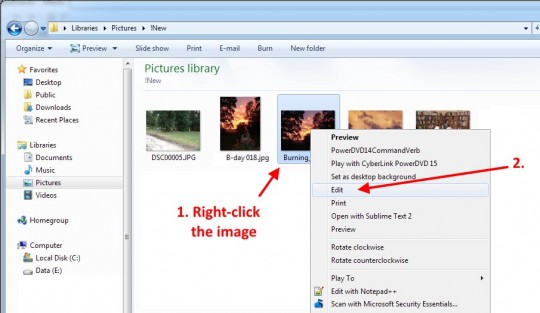
So, let’s get started. First, you’ll want to open Explorer (aka My Computer, aka Computer) and go find the image you want to resize. If the image you want to resize is on your desktop, you’re already there.
Next, right-click the image, and choose Edit in the popup menu.
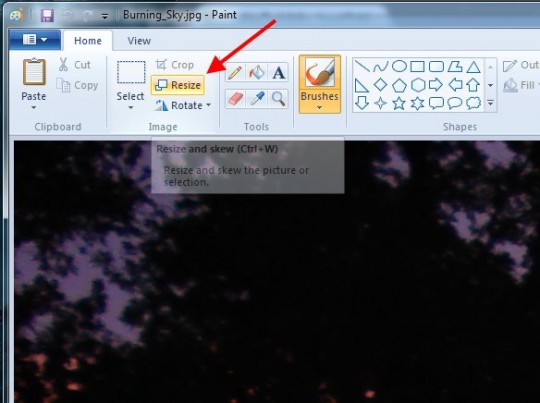
This will open the image in Paint. Next, click the Resize button:
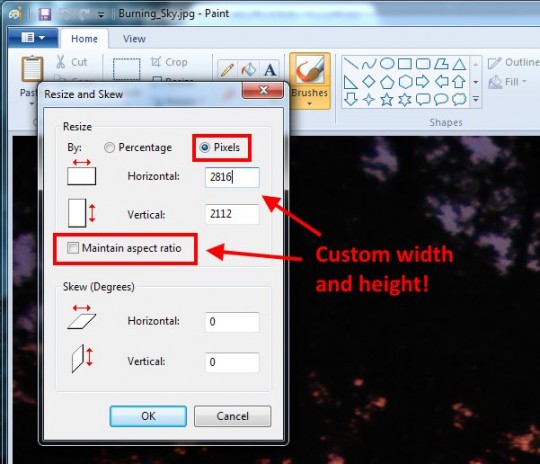
If you just want to resize the image, and you don’t care if it gets a bit stretched, then:
- Select Pixels
- UNcheck the Maintain aspect ratio checkbox
- Enter a width (Horizontal) and a height (Vertical) in pixels
- Click OK
If that looks okay, jump below to the Save As step.
If not, you’ll need to do a bit more work…
In the case where your image looks too stretched, you’ll need to resize and then crop the image. The easiest way to do this is to resize the image to the width you want, and then crop it to the height.
So, if your image is 2816 x 2112 pixels, and you want it to be 1200 x 630, you’d do this:
- Resize with Maintain aspect ratio to 1200 x ??? pixels
- Select 1200 x 630 pixels of the resulting image, and then Crop
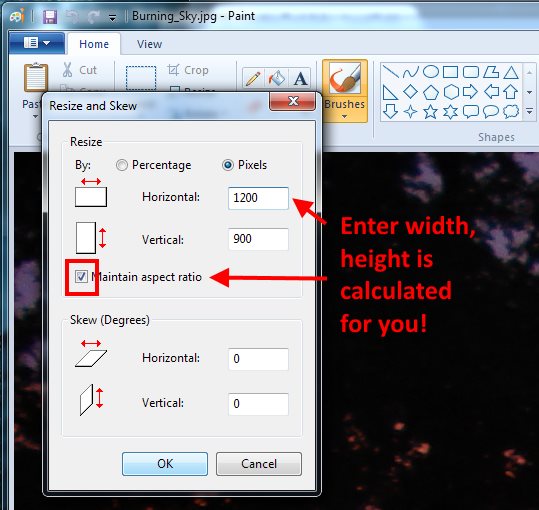
Don’t worry, it’s easier than it sounds. Back in the Resize dialog box, you’ll do this:
- Check the Maintain aspect ratio checkbox
- Enter a width (Horizontal), and Paint will automatically calculate the height (Vertical) to prevent the image from becoming stretched
- Click OK
Right, so now your image is 1200 x 900 pixels. That’s close, but not quite 1200 x 630 like you want. So, next you’ll click the Select button:
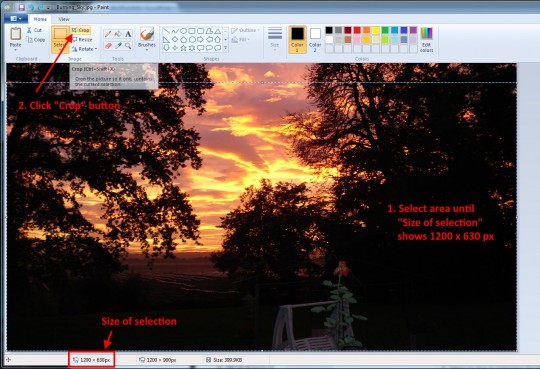
Now, you click and drag to draw a selection box on the image. Pay attention to the pixel size of the selection (lower-left corner of the Paint window). You’ll want to keep dragging until you hit exactly 1200 x 630px.
In the example below, I looked at the image and realized that I’d rather chop off the top of the image instead of the bottom. So, I started selecting at the bottom left, and dragged up to the top right until I hit 1200 x 630px. When done selecting, click the Crop button.
If you screw up the selection, just press the Esc key on your keyboard, and try again.
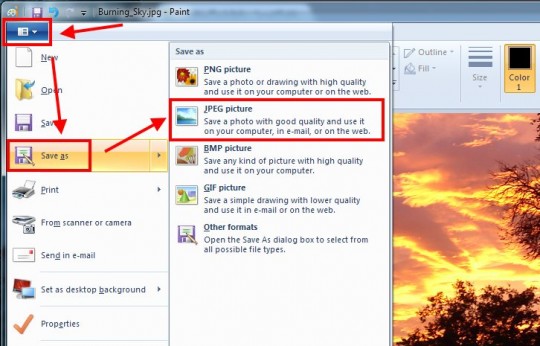
Now that your image is resized and cropped, you’ll want to Save As… in order to save a copy into a new file:
You’re done! Now you have a lovely, perfectly sized image to post on Facebook, or whatever…
Okay, so this wasn’t quite as a easy as you’d hoped… The cropping part can be a bit tedious. There are certainly other image processing software applications out there that make the task a bit easier. But, this method is free and built-in to Windows. After you’ve done it a few times, it becomes second nature.
If you just want to crop an image and you don’t care about specific dimensions in pixels, the Crop tool in Windows Photo Gallery is waaay easier to use. But, it doesn’t show you the size in pixels as you’re cropping, alas…
If you’re looking for a bit more fanciness in your image processing, though, check out Paint.net (which is also free). You can read Paint.NET: The Photoshop Alternative for the Rest of Us for more info.




https://en.inettools.net/app/image/index/3 free online tools for resize image
Νο good. There used to be a utility from the XP days that used to work all the way up to 7 (never used 8.x so can’t comment). It was called something like “Image Resizer Power Tool” or …can’t exactly remember. After installation it would add a “Resize” entry in the right-click entry which would work wonders with single or even a batch of images. It had wonderful features like resizing to a resolution for a predetermined usage (mobile, email, document, presentation, etc.) or to shrink/expand based on a given DPI/pixels, size or even percentage.
Now Windows 10 cames along and for free and it broke all that, cause that little nifty utility won’t work anymore. Still Micro$oft refuses to add a resize utility in the OS.
Way to go Bill …
Brice Lambson, a Microsoft engineer, created Image Resizer for Windows 10 — it’s excellent: https://www.bricelam.net/ImageResizer/
Oh! That’s handy… I didn’t even know it existed. Thanks!
I’ve been using Image Resizer so long that I couldn’t remember whether it’s part of Win10 or an add-on. Had to dig through my “installation originals” folder to find the .exe for it. It’s very robust and a must-have for anyone that uses photos. Guess that’s everyone! Glad I could return the favor! Your article saved me in a pinch last night!
PIXELS!!??? I just want to crop a photo to make a 4×6 print. Jeez. I guess I have to go get a ruler and hold it up to the laptop screen to see if my photo is in the 4 by 6 dimensions that it needs to be??? I hate Windows 10 so much.
Ah yes… Well, basically you want your photo to have as many pixels as possible. You can crop the image to a 4×6 ratio (in pixels) if you want. But, it’s probably easier to just take the full-size image, and print it without editing. If you use Windows Photo Viewer (or the Windows 10 Photos app) to open the image, you can print from there and it will give you the option to print a 4×6″ image (or 2) on 1 sheet of paper. No pixel-knowledge required! 😉
I was glad to find a place that resized photos and it’s so easy to do
Thanks a million, I’m a newbie to websites, the mud is slowly clearing!
(I used to think I was quite smart – windows 10 and websites are proofing otherwise.
Awesome !! You deserve an exceptional “Thank You” !!
THANK YOU!!! UGH…THAT TOOK ME WAY TOO LONG TO FIND THIS POST! YOU ROCK!
Really great post! I also love the KrojamSoft PhotoViewerPro program.
Here is another easy way http://www.paintshoppro.com/en/pages/resize-images/ in case you are sing PaintShop Pro and want to save the picture quality 🙂
You’ll want to keep dragging until you hit exactly 1200 x 630px <– Oh! so easy to do this : D
Buy a Mac: Option + or – That’s it.
That appears to only zoom in/out, not actually resize the image file. This is how I do it on a Mac: http://www.wikihow.com/Resize-Pictures-%28for-Macs%29
Grеat post.
How many pixels make a centimetre? I know the photo size I want, but only in cms, not pixels.
Depends on the DPI / PPI. When you create an image, you can usually pick the DPI or pixels/inch or pixels/cm. Then, your printer will also print at a certain dots-per-inch resolution as well. So, it gets complicated… I wrote about that here: PPI, DPI, and why that image doesn’t look right when you print it
This is an excellent lesson in sizing images for specific pixel height and width. A bit tedious, you’re right, but it works! Thanks for taking the time to publish this and for including step by step instructions. I needed it to help me size featured images for my WordPress site.