 You know the drill: You’ve got an image on your puter. You print it.
It’s either really small, or it’s big enough, but really blocky and nasty looking.
So what gives?
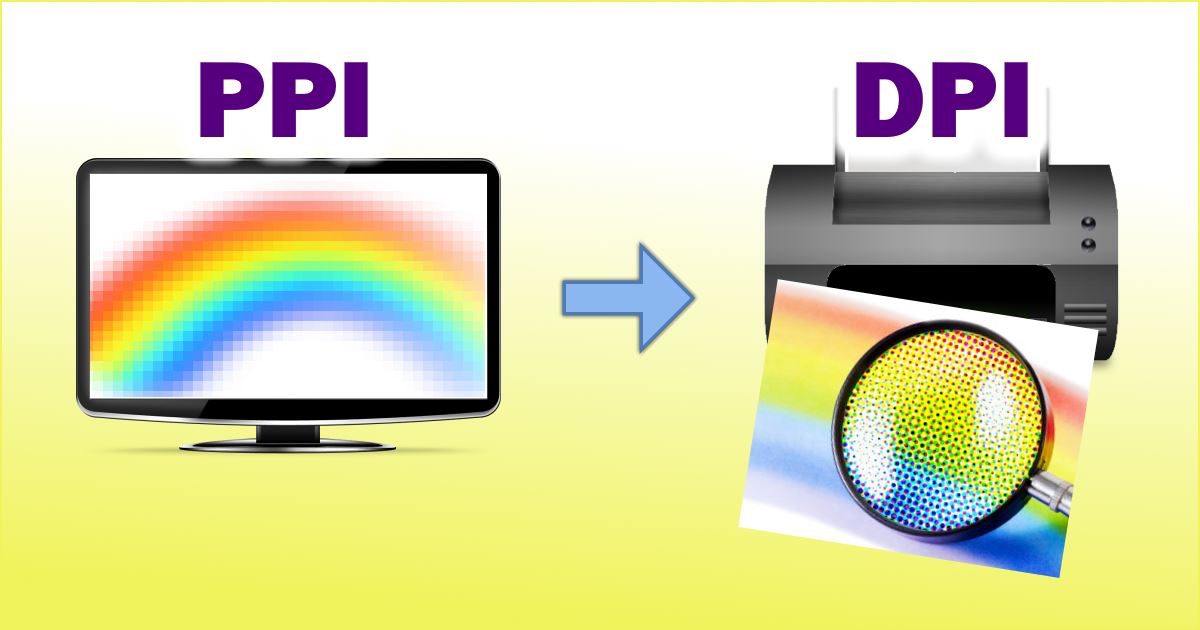
It’s all about PPI and DPI.
That’s Pixels Per Inch and Dots Per Inch. Don’t worry, it’ll all be clear in a few more paragraphs…
What is PPI?
PPI, or Pixels Per Inch, is all about the number of pixels crammed into one inch of space on your puter screen.
For more on this topic, see my earlier post: PPI, Retina displays, and what makes a screen ‘good’
What is DPI?
DPI, or Dots Per Inch, is all about the number of little teeny colored dots that your printer puts together to make an image.
Not surprisingly, 600 DPI means that there are 600 little colored dots crammed into one inch of space on your printout. More or less.
PPI vs. DPI
This is where it gets fun!
What we really care about when we print an image is:
- How large the image will be on the piece of paper
- What the quality of the printed image will be (blocky? sharp?)
So, the question you might ask yourself is: If I print my image on a Letter piece of paper (close to A4 for you non-US folks), will it take up the whole page? Half the page?
Well, that depends. For example, if you print an image using Windows Photo Viewer, you can actually “Fit” the image, or you can just print the image without stretching it in a standard photo size from the olden days, like 4″ x 6″:

Note in the image above that Windows Photo Viewer will show you how big the image will appear on your selected paper size. Pretty handy.
Windows does all the work for you, but you may notice that the result looks pretty crappy unless you print the image wallet-sized. But it looks good on your screen…
What’s the deal?
Piece of pie!
If you have a laser printer, it will typically print at 600 DPI. Well, that was easy.
But hold the phone: What is the PPI of your image?
As I mentioned in my earlier article on the PPI of LCD screens, a 22″ LCD computer screen with a resolution of 1920 x 1080 pixels (FullHD) is only 100 PPI.
Practically, you can just think of PPI = DPI, since they’re both “bits of color per inch”. But that means your printer can stuff 6 times as many teeny colored dots into one inch. Which means if you want a quality printout, you need a higher-resolution image.
Now, this could get uber-confusing, so let’s just keep it simple… er, simpler.
Printing Photos
First of all, print the original, NOT a resized photo.
If your camera is 12 Megapixels, that’s 12 million pixels. With so many pixels, you’d think you’d get a great printout no matter what physical paper size you pick (4 x 6″, 8 x 10″, whatever). Let’s see:
At 12 Mpix, you’ve got about 3000 x 4000 pixels (I’m simplifying the numbers here).
So, at 8 x 10″, that’s:
3000 / 8 = 375 PPI
4000 / 10 = 400 PPI
What about 4 x 6″?
3000 / 4 = 750 PPI
4000 / 6 = 667 PPI
BOOYAH! With a 12 Mpixel image from a camera, you can print at 4 x 6″ size, and the DPI will be higher than what your printer can handle (600 DPI). That’s okay, and it means that you can be pretty darn sure the image quality at 4 x 6″ will be rather nice.
At the 8 x 10″ size in our example above, the quality should still be pretty good (~375 PPI), but not as sharp as at 4 x 6″.
What about images I make, like with paint software?
The bigger in pixel dimensions, the better! Same as for printing photos…
Since I love Paint.net, I’ll use that free software for my example here.
Let’s say I want to make a new image that I’m going to print – this time at 8 x 10″. I click the New button, and I set the Print size to 8 x 10″:
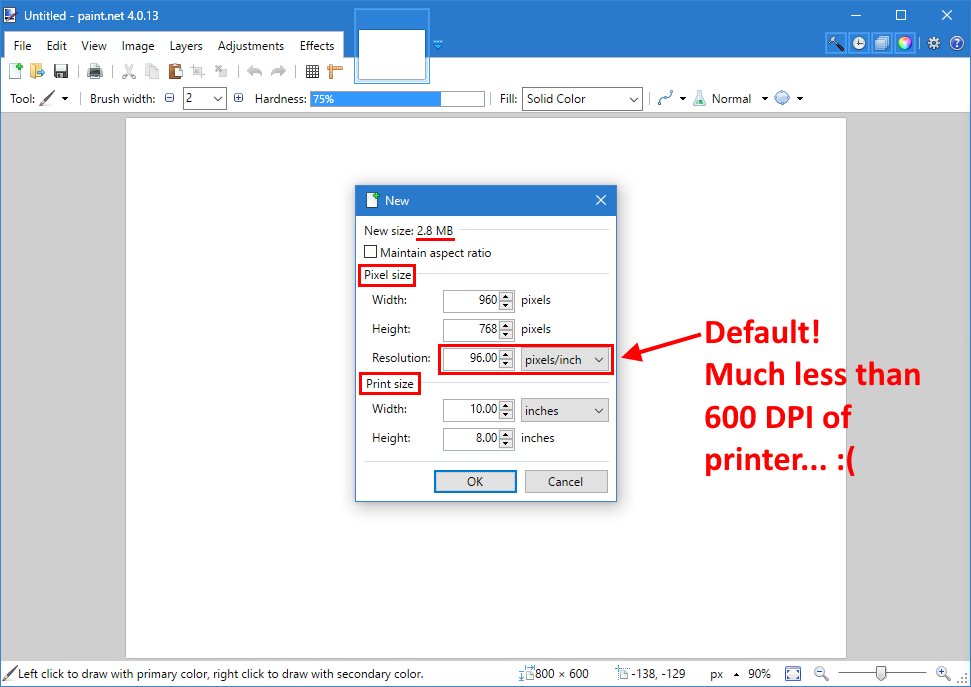
The new file’s size will be 2.8MB, and the Resolution is set to 96 PPI by default, which gives a Pixel size of only 960 x 768. Whoa!
Remember our 12 Mpix photo example above? It would only be “full quality” when printed at 600 DPI if the physical print size on paper was 4 x 6″… And that was for 3000 x 4000 pixels!
So, even though my new image in Paint.net might look good on my screen, it’s only 960 x 768 pixels. It’s gonna look like CRAP if I print it at 4 x 6″. The reason, as you might have guessed, is the default Resolution of 96 PPI. That’s waaaay lower than my printer’s 600 DPI!
So, let’s make some changes:
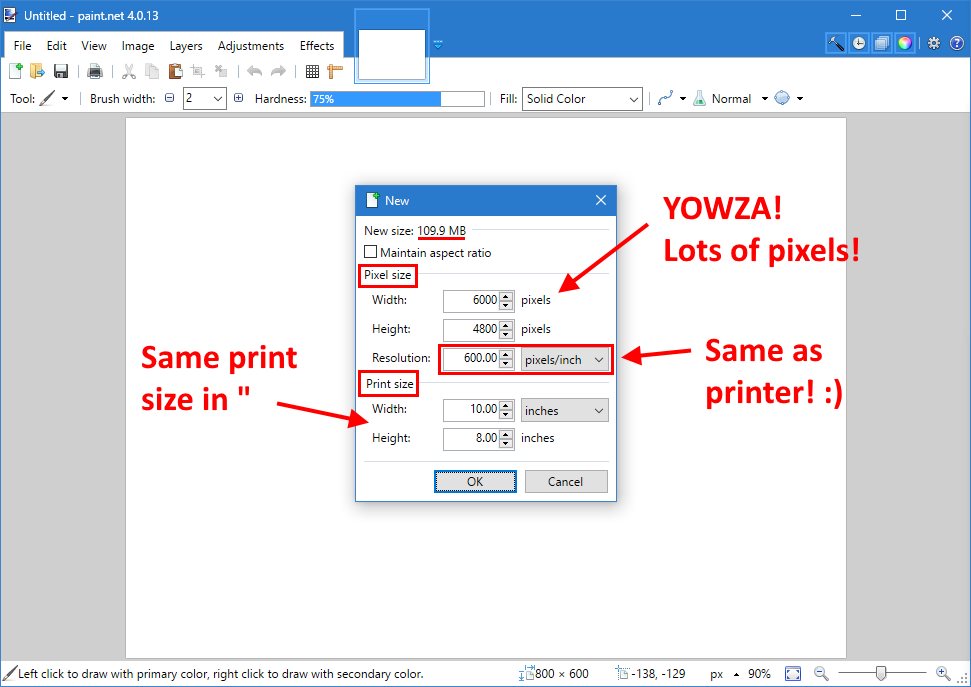
SWEET MOTHER OF PEARL!
At 600 PPI, which is the same as my printer, and with the same 8 x 10″ Print size, the Pixel size is now 6000 x 4800… And the file size will be 109.9 MB!!!
Of course, this makes perfect sense: For an 8 x 10″ image, with a 600 Dots Per Inch image, we would need:
8 x 600 = 4800 pixels
10 x 600 = 6000 pixels
And that’s exactly what the software calculated for us!
And so…
It’s really pretty straightforward.
Just remember that if you’re printing on a laser printer, it’s probably 600 DPI or higher.
If you’re using an inkjet, it’s probably 300 DPI or higher.
To get a quality print at a certain paper size, you can determine the required pixel dimensions of your .JPG image (or whatever) by simply multiplying the DPI of your printer by the width and length of your paper size in inches:
4 x 6″ at 300 DPI = 1200 x 1800 pixels
8 x 10″ at 300 DPI = 2400 x 3000 pixels
4 x 6″ at 600 DPI = 2400 x 3600 pixels
8 x 10″ at 600 DPI = 4800 x 6000 pixels
And now you understand why artists and book cover designers and the like always use HUGE image files: because it’s the only way to get a quality print!
If you have an image in pixels, just divide by the DPI of your printer to figure out the width and height in inches when printed. Easy!


Where is the discussion about color,and how it contributes to the overall size of a picture, and the difference between a raw photo and a ‘compressed’ photo, ie, .jpg? With 24 bit color, even a 6 MB photo, has a pretty small pixel count.
This article was in response to a specific (private) question from a reader. Didn’t wanna get into too much detail about color depth, compression, yada yada. I’ve learned (the hard way) that sometimes, when a person asks why the sky is blue, they just want to know why the dang sky is blue. Quantum physics should not enter into my response, even if I’d love to ramble on and on about all the wonderful details. LOL!