 My wife’s MSI GE75 Raider 10SE laptop recently had a quirky audio issue: the mic volume was really, really low.
It didn’t matter if she used the integrated mic, or an external one.
I set out to solve the problem, and determined that it wasn’t faulty hardware.
Instead, the issue is driver-related – and apparently also seen on many other makes and models of PC and laptop!!
MSI GE75 Lappy
This lappy is my old one – wifey gets my lappy when I get a new one, which happens like every 2 weeks because I’m an uber-nerd.
But anyway, it’s a GREAT machine… Or at least it was, until this mic issue cropped up.
I didn’t understand it… I never had that problem.
First thing’s first
Naturally, first I made sure all the drivers were up-to-date, re-installed Nahimic, and so on. If you’re wondering what Nahimic is:
Nahimic by SteelSeries audio software is a high-definition sound technology that boosts your MSI computer’s audio and voice performance. Enjoy an immersive virtual 7.1 sound through your standard stereo equipment!
Oh, that stuff… Well, it’s not really needed, so I tried removing it. I also tried installing and using Nahimic’s successor, but no dice.
How to fix the glitch
I also found a PDF guide on the MSI forum on fixing exactly this issue, but it didn’t work.
That guide, however, gave me an idea: forget everything else, and just install the default Microsoft High Definition Audio driver!
The reason for this is that installing any RealTek driver or MSI software tends to bork any customizations to drivers. Even disabling Windows’ automatic driver updating didn’t help.
What would happen is that I’d up/downgrade the driver, and suddenly the mic volume was perfect – until I rebooted, at which point Windows would re-install the newest RealTek driver it could find (aka the one that didn’t work).
Aaand I was back at square one, with a non-functioning mic again! Grr…
So, to end the madness, I did this:
1. Click the Start/Windows Logo button
2. Type: Device Manager
3. Click Device Manager to open it
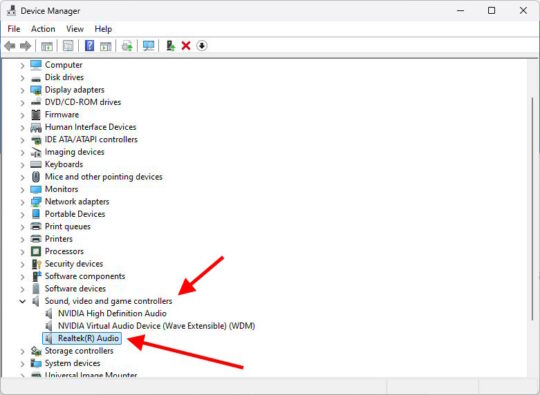
4. Expand Sound, video and game controllers
5. Right-click: Realtek(R) Audio
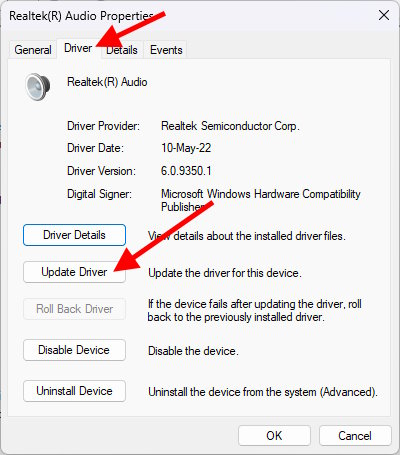
6. Click: Properties
7. Click the Driver tab, then click the Update Driver button
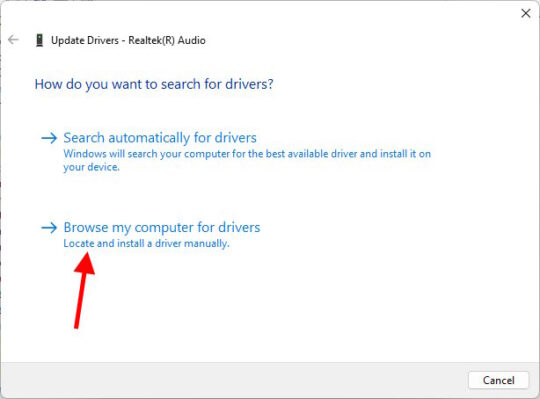
8. Click: Browse my computer for drivers
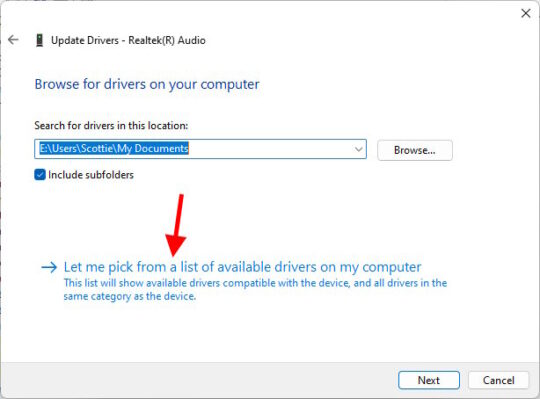
9. Click: Let me pick from a list of available drivers on my computer
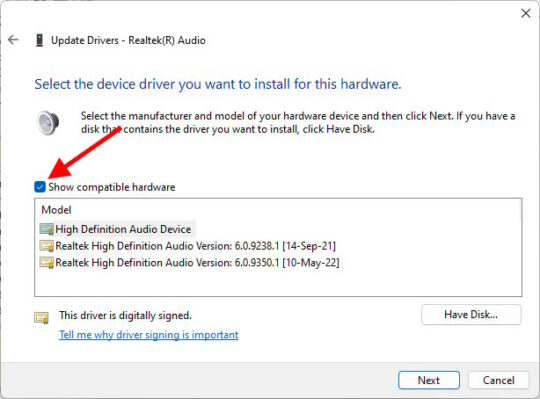
10. UNcheck Show compatible hardware
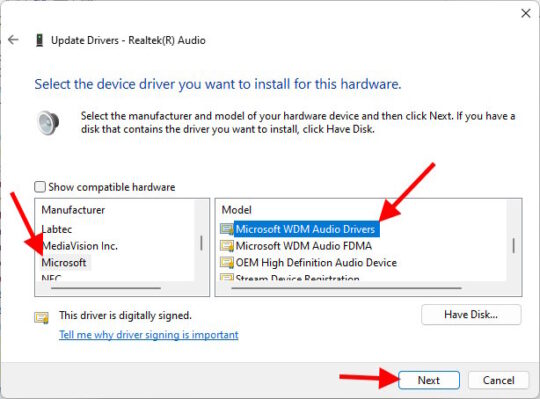
11. Click Microsoft in the left column, and in the right column, choose: Microsoft WDM Audio Drivers
12. Click Next and follow the remaining prompts to switch drivers…
If you get an error after choosing Microsoft WDM Audio Drivers, go back to Step 10, CHECK the Show compatible hardware box, and choose High Definition Audio Device instead. That should work.
13. Reboot!!
What you just did is to tell Windows to use the standard, plain vanilla HD audio drivers for your puter.
Why this works
Because you manually selected these drivers from a list, Windows won’t override your choice after a reboot.
If you try the built-in mic or an external one, you should find the volume is WAAAAAY higher than it used to be!
And all your other audio functions will work great.
Of course, you don’t get all the added spatial 75.1-channel audio nonsense that Nahimic provides, but at least your audio actually works properly again!!
And the even better news is: this same trick works for a number of other issues.
Sometimes, drivers and the latest version of Windows just don’t play nicely together; but the generic Windows drivers will almost always work.
So, bookmark this article and try it again next time you have what appears to be a “hardware issue” and the latest manufacturer drivers don’t work!!


Merci, Scottie. I wish I had these steps three years ago: the Realtek drivers I had displayed “Volume is too high – Are you sure?” type of popup when I increased the Windows volume too high and my jack was in use. It was mildly annoying because the jack was connected to a pre-amp, not headphones, and you couldn’t moved on without clicking ‘OK – I don’t mind destroying my ears’ 🙂. The workaround was to replace the Realtek drivers with the MS drivers, but for reasons I can’t remember I wasn’t successful. Anyway, that mini-PC died shortly after, so I moved on.
I searched for a solution for more than 2 years and had no avail, until I found this post. Now it’s working perfectly in my MSI GF75 Thin 10SER.
Thanks a lot!
This was an actual solution to my problem, i have an MSI GS65 Stealth Thin and both the in-built mic and one i purchased later on were extremely quiet no matter what settings i tried to change, but finally this guide fixed it, my mic volume sounds just fine now. Thanks a lot for making this tutorial.