 When the time comes to upgrade your puter, you may end up with a leftover hard drive or SSD.
Obviously, you’re going to need to recycle the drive…
But what about the data on it?
There are a million ways out there to erase a drive before sending it to the great bit bucket in the sky…
But which one is best?
Not all drives are created equal
First of all, you should probably know that good old fashioned mechanical hard disks store data very differently than solid state drives (SSDs).
Long story short, both types of drive have controllers on board.
In a mechanical hard drive, that controller is a bit simpler. If you write data to the drive, most if it will be written the way you think. Most – not all.
To erase a mechanical drive, you have to overwrite all the sectors on the drive that contain data, one at a time.
SSDs are quite a different animal since the flash storage medium they use is nowhere near the same as spinning magnetic disks.
With an SSD, “Secure Erase” usually involves changing a sort of “key” on the drive that renders the stored data unreadable.
Erasing is not always erasing
 Next up, you need to know that erasing a drive is a complex topic.
While SSDs can be “secure erased” relatively simply, the same is not true of mechanical drives.
For old fashioned hard disk drives (HDDs), you’ll need to somehow write a bunch of random data and/or a bunch of zeroes to the whole drive – thereby erasing its contents.
But wait, there’s more!
Mechanical drives also have controller chips like SSDs, but those chips work differently. They manage things like caching data in the drives cache memory, error correction, and so on.
So, when you write a bunch of zeroes to an HDD using software running in Windows or Linux (like with the dd command), you can’t always be certain that this data is reaching every nook and cranny of the disk – more or less.
Enter Secure Erase and Enhanced Secure Erase!
Now, you may have come across software called “Secure Erase”, but that’s not necessarily what we’re talking about here.
HDDs these days have 2 features built into the firmware of the drive itself: Secure Erase, and Enhanced Secure Erase.
The purpose of these two low-level commands is so that when instructed, the drive itself will write a bunch of random data and/or zeroes – in order to effectively erase itself – and no caching or error correction or anything else will get in the way.
Pretty much all modern HDDs have Secure Erase, and most also have Enhanced Secure Erase.
Secure Erase generally just writes all zeroes to the whole drive, while Enhanced Secure Erase depends on the manufacturer. Enhanced Secure Erase is supposed to write random data first over several passes, and then finish with a pass of zeroes.
Unfortunately, that isn’t always the case. Often times, Enhanced Secure Erase does exactly the same thing as Secure Erase – which is just fine for our purposes.
Great, so how do I Secure Erase my old drive?
Right. First of all, you can’t do this (easily) from within your operating system. Well, you can, but it’s kind of a pain and may involve fun steps like putting your computer to sleep and then waking it up again in order to “unfreeze” the drive.
So, my preferred option is to use Parted Magic. You can grab a copy for $11.
You’ll also need to use something like Rufus to burn the Parted Magic image to a USB stick so you can boot from it.
Next, you’ll need to connect your old SSD or HDD to your puter. You can either connect it internally to a power connector and SATA cable or my preferred option: an internal drive docking bay. This is my favorite one:

The Kingwin version is fabulous, and I have 2 of them (I copy a lot of drives). With 2 of them, you can copy 3.5″ to 3.5″, 3.5″ to 2.5″, or 2.5″ to 2.5″. The latched doors on this one are metal, and the metal mechanism both inserts and ejects the drives for you. Pretty nice!
There is also this one from ICY DOCK, but the ejection mechanisms are plastic and they tend not work very well for some drives. I mention these because I had 2 of them for 4 years. Otherwise, they’re quite reliable:

If you don’t have free SATA ports, grab a I/O CREST 4 Port SATA III PCI-e add-in card.
You cannot use an external USB drive dock as far as I know, since the drive to be erased must be connected directly to a SATA port on your motherboard.
If you do use these internal drive docks, make sure to go into your BIOS/UEFI and enable “hot swap” for the SATA ports that the dock(s) are connected to.
Parted Magic to the rescue
Okay, now connect the drive(s) to erase, power them on, stick your Parted Magic USB stick into your puter, and…
Reboot!
You’ll want to change the boot option so that you boot directly from the Parted Magic USB stick.
You’ll see a screen like this:
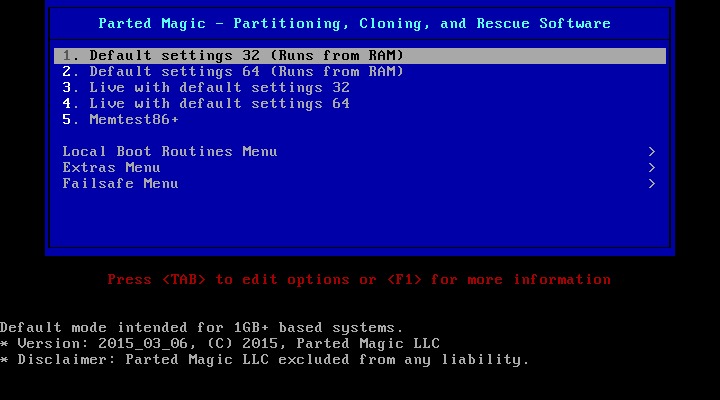
Choose the first option, and let ‘er rip.
Once Parted Magic is fired up, you’ll see this nice linux desktop:
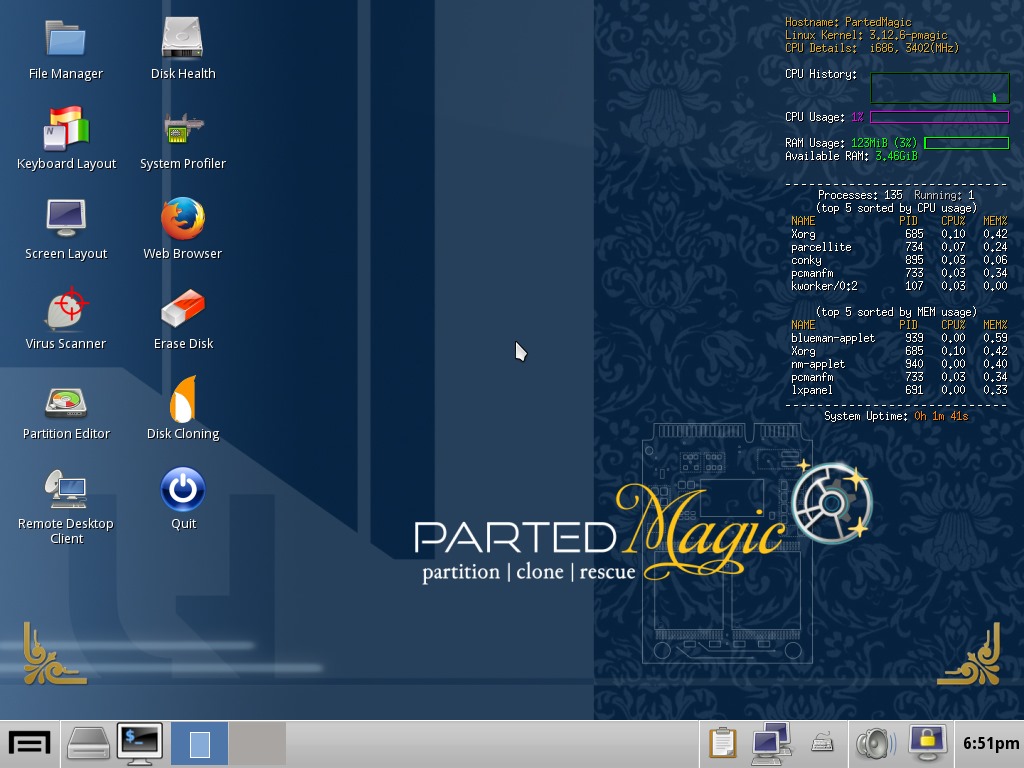
Just double-click the Erase Disk icon (looks like a red/white pencil eraser). That will load the Secure Erase screen, like so:

You will see both HDDs and SSDs – all the drives installed/connected to your puter.
Be sure not to erase the wrong disks!
All you need to do is check the boxes next to the rows that contains the drives you want to erase. Leave the Secure radio button selected, and then click the Continue button.
Confirm the operation on the next screen, and come back after the required amount of time has passed.
Typically, SSDs will be erased very quickly using the “key” method as described above.
HDDs will take a bit longer… like somewhere around 2 hours 40 minutes for a 1TB drive, or 5 hours 20 minutes for a 2TB drive.
That may seem like a long time, but try doing an erase using software like dd or fancy Windows-based “erase your disk” software, and see how long it takes. 24 hours or more is fairly common!
That’s the other benefit of using the drive’s Secure Erase command: it’s WAAAAAY faster! And it’s more secure.
One last step
 Got your drive(s) zeroed out using Parted Magic?
Great!
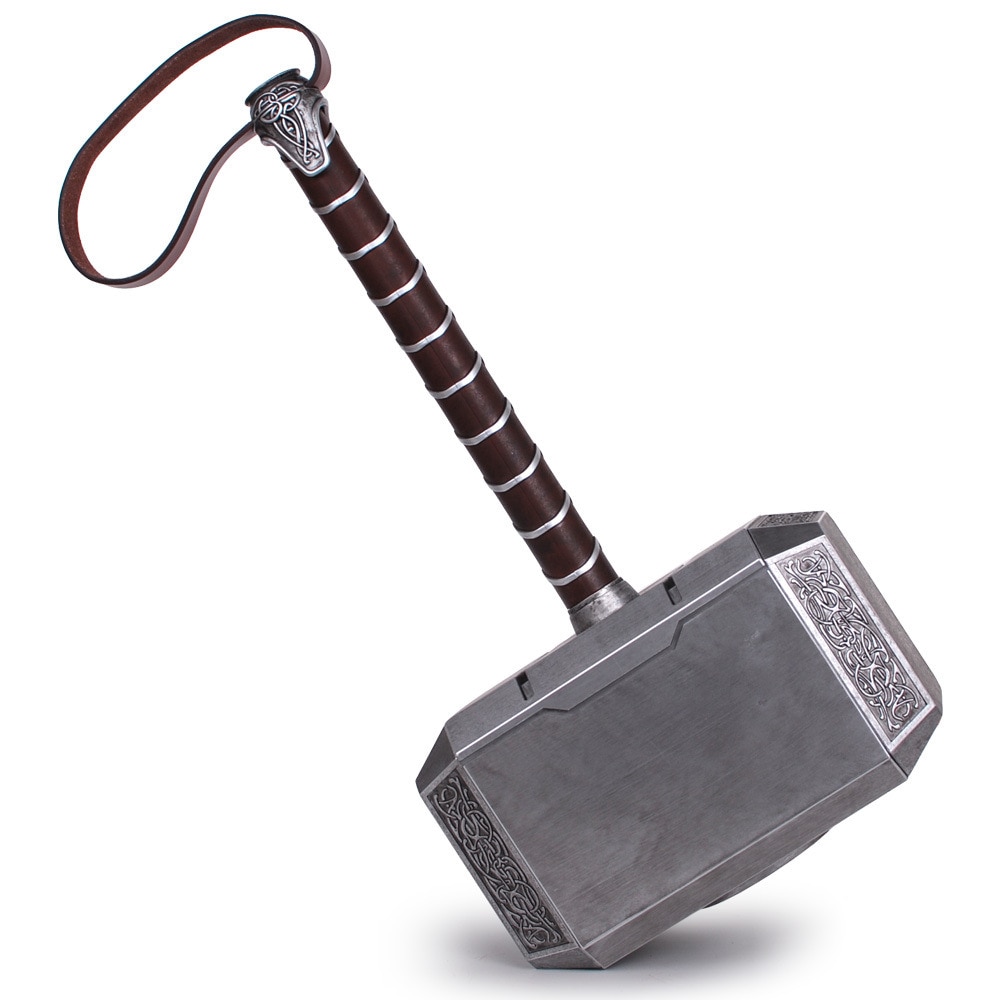
Now, take the drive outside, put it on a hard surface, and give it a couple of good whacks with a large hammer.
Although it’s unlikely that data could be (easily) retrieved from the drive at this point, better safe than sorry.
Hammer Time does 3 things:
- It breaks the hermetic seal of the drive and allows air, dust, and moisture in
- It mangles the data platter(s) inside the drive
- It most certainly busts the electronics board on the underside
You could also drill a hole through the drive (including through the platters inside), but who wants to dull a perfectly good drill bit?
Besides, the hammer method is highly satisfying – and good for stress relief. 😉
Then, recycle away!
My method is so much simpler – I use old hard drives for target practice with my shotgun or high-powered rifle. A few well-placed shots and there’s no worry about someone else lifting data off the drive.
Nice one Scottie! Good to read a thorough treatment of the secure erase process for hard drives. 👍👍