 If you haven’t seen Part 1, it’s here:
SSD: Why you need to upgrade your computer with a Solid State Hard Drive
With Part 1 out of the way, you’ve decided to take the plunge. Great!
How do you actually do the upgrade? Well, that can get a bit complicated.
There are a few things you’ll need to know before you even think of a DIY upgrade.
After covering those, I’ll discuss a few options for the different upgrade cases you might encounter.
What You Need to Know
So, if you have no idea how to open your computer, don’t try this at home. If you’ve never replaced a hard drive, or you don’t even know what one looks like, don’t try this at home. And if you screw stuff up, and you don’t know how to reinstall Windows, then don’t try this at home.
But, if you feel fairly confident that you know what you’re doing, then by all means, upgrade away!
A Few Different Cases
Desktop Computer:
You’ll need to find out if you have any free SATA ports, and also free drive bays in your computer. Most likely, you do.
In this case, you’ll probably want to set up the dual-drive dealio: You’ll run your OS and most programs from the SSD, and your old HDD will be used for storing your user profile, libraries, data folders and files, and so on. Also, I recommend reinstalling large apps like Adobe CS6 to your HDD. The core files will still be installed on the SSD, but some software is just too frickin’ big for an SSD – unless you like running out of space on your C: very quickly.
Laptop:
Ditto, except most likely you do NOT have an extra bay in your laptop for a 2nd hard drive. In this case, you’ll need to make sure that the data on your existing HDD (total space used by OS and everything) will fit on your new SSD – with space to spare. If you have a 750GB laptop HDD, and you’re using 300GB, then you won’t be able to upgrade to a 250GB SSD. The data won’t fit!
Don’t fret – you can always just buy an external HDD (preferably USB 3.0), plug it into your lappy, and then copy files you don’t use often over to the external HDD. Once you’re below the size of your new SSD (with a bare minimum of 20GB free space left over), you can carry on with the upgrade.
Also, for a laptop, you may need a USB dock or a SATA-USB interface kit
of some kind. If you want to copy the goods from your lappy’s HDD onto the new SSD, and only 1 drive can be connected to the laptop at a time, you’ll need to connect the SSD to the laptop via USB in order to perform the data transfer.
Mounting the SSD
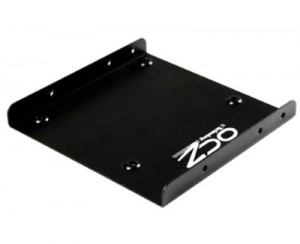
Most SSDs are the 2.5″ laptop drive form factor. So, in the case that your puter is a laptop, you can just install it easily. In the case that you have a desktop, you’ll probably need a 2.5″ to 3.5″ mounting bracket, like this:
 For other types, see: SSD Mounting Brackets
Flash the SSD Firmware
Next step: connect the SSD to your/a computer, and run the firmware upgrade software. Sometimes this is very easy to do, and sometimes not. For Samsung SSDs, for example, you simply install the included Samsung Magician software. Run the Magician software, and it will tell you if a firmware update is available, as well as walk you through the (very simple) update process.
The reason you want to ensure you have the latest firmware for your SSD is that there are frequently bug fixes, reliability updates, and performance enhancements released after an SSD makes it to market. If you flash the firmware before you even copy any data, you are sure to the have the latest-and-greatest in reliability and performance.
Do the Upgrade!
Finally, we’re here. Now, the question is: How do you get all that data from your HDD onto your SSD?
Well, again going with Samsung SSDs as our example, they come with software to transfer your data. I’ve never used it. It might be very good, but my preferred method is to use Paragon Hard Disk Manager Suite. You can buy it online, download it, and be up and running in no time.
Paragon’s HDM Suite is a very, very useful collection of utilities for creating, resizing, and copying disk partitions. It also comes with a lovely tool called Migrate OS to SSD. Paragon HDM Suite is for Windows, but it also handles Linux and Unix partitions without a problem. It’s been my HDD software tool of choice for years now.
The reason you’ll want to use a tool like Migrate OS to SSD is that it will automatically do some crazy mojo for you… Specifically, it will tell you if your HDD data will fit on your SSD, and then allow you to deselect certain files and folders if necessary before copying your old C: (HDD) to the new C: (SSD). It will also change some Windows settings and such that prevents certain headaches after the upgrade.
When you’re done, you can simply reboot, config your BIOS/UEFI to boot from your SSD, and voila! Everything will just work. In the case of a laptop with 1 drive bay, you’ll need to power down, swap in the SSD for the HDD, and then boot up again.
Details
Now, I mentioned above that Paragon’s Migrate OS to SSD will allow you to deselect certain files and folders. This permits you to, say, NOT copy your Pictures and Videos librairies over to the SSD, which might save 100GB of space. It also means that this data is not on your SSD, so Windows will go, “Uh, don’t see nothin!” and then you’ll go, “Uh, where’s my stuff??”
If you have a lappy with limited SSD space, or a desktop with a now dual-drive setup (SSD + HDD for data), you’ll want to make sure your HDD is connected and showing up in Explorer. It will be something like this:
Before: C: = 1TB HDD
After: C: = SSD, D: = 1TB HDD
Now, since your D: is actually your old C:, you could just reconnect your HDD as your primary boot drive, reboot, and everything will work as it did before – sans the performance boost of the SSD. This is your emergency escape pod if anything goes wrong!
But anyway, what we want is to tell Windows that those files in your libraries that used to be on C: are now on D:…
And this very topic is covered in my earlier post here:
Move Your Docs, Music, Pics, & Vids to a Different Drive or Folder in Windows 7
Using the above guide, you will be able to “fake out” Windows such that your Users\YourUsername\My BLAH directories will appear to contain all your data like they did before… only the actual folders with data will actually live on your HDD, now located at D:. This is a very handy feature in Windows, but not many know it even exists.
Last Steps
One last thing to check…
- Click Start
- Type: services
- Scroll down and double-click on Superfetch
- Click the Stop button
- Set “Startup type:” to Disabled
- Click OK, and close the Services window
This little trick turns off SuperFetch, which is a Windows feature that preloads programs into memory so they start up faster. With an SSD, it is generally recommended to turn SuperFetch OFF, as it doesn’t really do much good with the superduper read speeds that SSDs give you.
The End
Wow, that was a lot more complicated than I had planned. I guess this whole SSD upgrade thing is not as easy and straightforward as it seemed. But, if you’re willing to get your hands dirty, it’s a very worthwhile upgrade.
And if you’re afraid you’ll screw something up, print this guide and go have a chat with your favorite tech shop, and ask them to do the upgrade. You won’t be sorry!


Thanks, but after reading your guide I start to understand why some people prefer desctop to the laptos. I though today laptos have more advantages, but it seeems that desctop offer more possibilities for upgrade.
Very helpful, thanks! Enjoying the fast life of SSD.
Hey Scottie,
Thanks for the great article. I’ve just noticed in task manager that my HDD is almost always running at 100% which gives me a lot of lag.
Do you think it would be okay to get a second hand SSD?
Jonathan
If your HDD never stops running at 100%, even after booting and the puter is just idling, then something is definitely wrong. Could be software- or hardware-related.
As for second hand SSDs, I’d be careful. Before buying, I would definitely want to check the drive with the manufacturer’s software tool for reviewing SSD errors, number of writes, power cycles, estimated life remaining, etc. Personally, I’d rather live with a smaller, brand new SSD than a larger used one.
@Scottie
It didn’t idle at 100% but pretty much everything I did on the puter made it hit 100%. Before reading this article I was thinking I would have to replace my PC that I spent around £600 on 6 years ago, but I’ve added in an SSD as the primary boot drive and it’s now faster than when I first purchased it.
Big thank you Scottie. 🙂
I have a laptop and he a little bit old and works not good. So now I understand that I need to update him. Thanks, your article very useful for me.
Chromebook has lots of technical issues, even though it’s light weight with good configurations, it’s rivals are good compare with this mini computer! Thanks for sharing anyway!