
 Passkeys are the new passwords.
You’re probably wondering how to use passkeys, how to set it all up, and how to synchronize passkeys across all your devices.
Well, you could just use native passkeys on each device, but there’s a better way: KeePass!
In my earlier article, Two-Factor Authentication without SMS or a smartphone: PART TWO!, I showed how to set up 2FA in KeePass.
In this article, I’ll show you how to add passkeys for an all-in-one, multi-device solution that’s super-easy to use.
What is a passkey?
Short version: it’s a password without a password.
Long version: Actually, you’re already using passkeys – you just don’t realize it!
Every time you use your fingerprint or face unlock on a smartphone or tablet to log in to a banking app, Google, or whatever, you’re using a passkey. Surprise!
But first, we need to understand normal passwords…
Passwords work by storing a hash of your password. Hashes are mathematical functions that take short strings of text (like passwords) and generate a fixed-length “code” that can only be generated again with the proper input string (aka, your password). So when you set a password, the remote site hashes your password and stores that result in their database.
When it comes time to log in again, you type in your username and password. Your username is used to look up your particular account info, the password you typed in is hashed and then compared to the stored password in the remote database. If the 2 hashes match, you typed in the correct password. Poof! You’re logged in.
The benefit of hashing passwords is that should the remote database be compromised, the Bad Guys have your username… and a hash of your password. Theoretically, they still can’t log in as you because they’d still need to guess your password, hash it, and compare… over and over, until they finally guess correctly. Hashing passwords makes them like 5 bajillion times more secure.
But, there’s a better way: passkeys!
Passkeys work using public/private key cryptography. The idea is that instead of storing a hashed password, your system (phone, tablet, PC running Windows 11, etc) generates a public key and a private key – think secure encryption! The public key is stored by the remove site/service, and the matching private key is stored only on your device.
Your private keys are protected by your fingerprint, face scan, or a PIN code. When you use a passkey to connect, your system prompts you for your finger/face/PIN, which unlocks the private key generated for just that service. Your system then talks to the remote one, a cryptographic function is executed, and if the key pair “match” in a secure way, voila! You’re logged in.
“But hang on, Scottie” I hear you ask. “Isn’t it more secure to use a long, complicated password instead of securing my private passkeys with a simple PIN code?”
No! The PIN code (or fingerprint or face scan) are only used on your device. This “proves” it’s your device, and only you are using it. Knowing your PIN doesn’t give anyone access to anything, because they don’t have your device with your private keys. So, the security of the key unlocking method (even a PIN code) is actually way better than a password.
What’s more, since each passkey is a unique public/private key pair, by definition you always use a different “password” to connect to each site. This also greatly improves security.
Plus, there’s the simple fact of public/private key cryptography being WAY more secure than a simple hashing algorithm. As usual, it’s the details of the system that make it more secure by default.
Can’t I just use the native Passkey stuff on my device?
Sure, if you want! The problem comes when, say, Google tells you that you must switch over to a passkey on your Win 11 puter. You try, but it fails. That’s because you need something called Windows Hello, which you’re not using because you have a normal password login, no fingerprint reader, and no face unlock…
Then you have to set up another passkey with a different system on your Android phone… And then when you power on your iPad, oops! You have to set up a 3rd passkey – all for the same site.
You can do that, but you’re also relying on your device’s passkey implementation. IOW, Google’s passkey system for Android, iCloud’s passkey system for iOS, Windows Hello for Windows 11, and so on.
The biggest drawback of these systems, IMO, is that they often, “sync your passkeys across all devices”. I’ve heard that before, and I still don’t like it. I prefer a native 3rd party solution. That way, my private keys are safe on my device only, they are never synced over the cloud, and I have full control over which devices have which keys. And of course I keep multiple copies of my KeePass DB on multiple devices in various locations, so data loss isn’t an issue.
Plus, my solution relies on KeePass, which has been my go-to password manager for ages now!
How to set up Passkeys on KeePass
If you need to know how to install KeePass or add 2-factor authentication (2FA), see my earlier article Two-Factor Authentication without SMS or a smartphone: PART TWO!.
In the case of passkeys, it’s actually even easier to set up than the 2FA plugin mentioned in that article!
First, you need to turn on Windows Hello. This enables passkeys in Windows.
In order for Windows Hello to work, you cannot use a normal password login! Not to worry… what you’re going to do is enable Windows Hello, turn on PIN login, and use your existing normal password as a PIN code. Just do this:
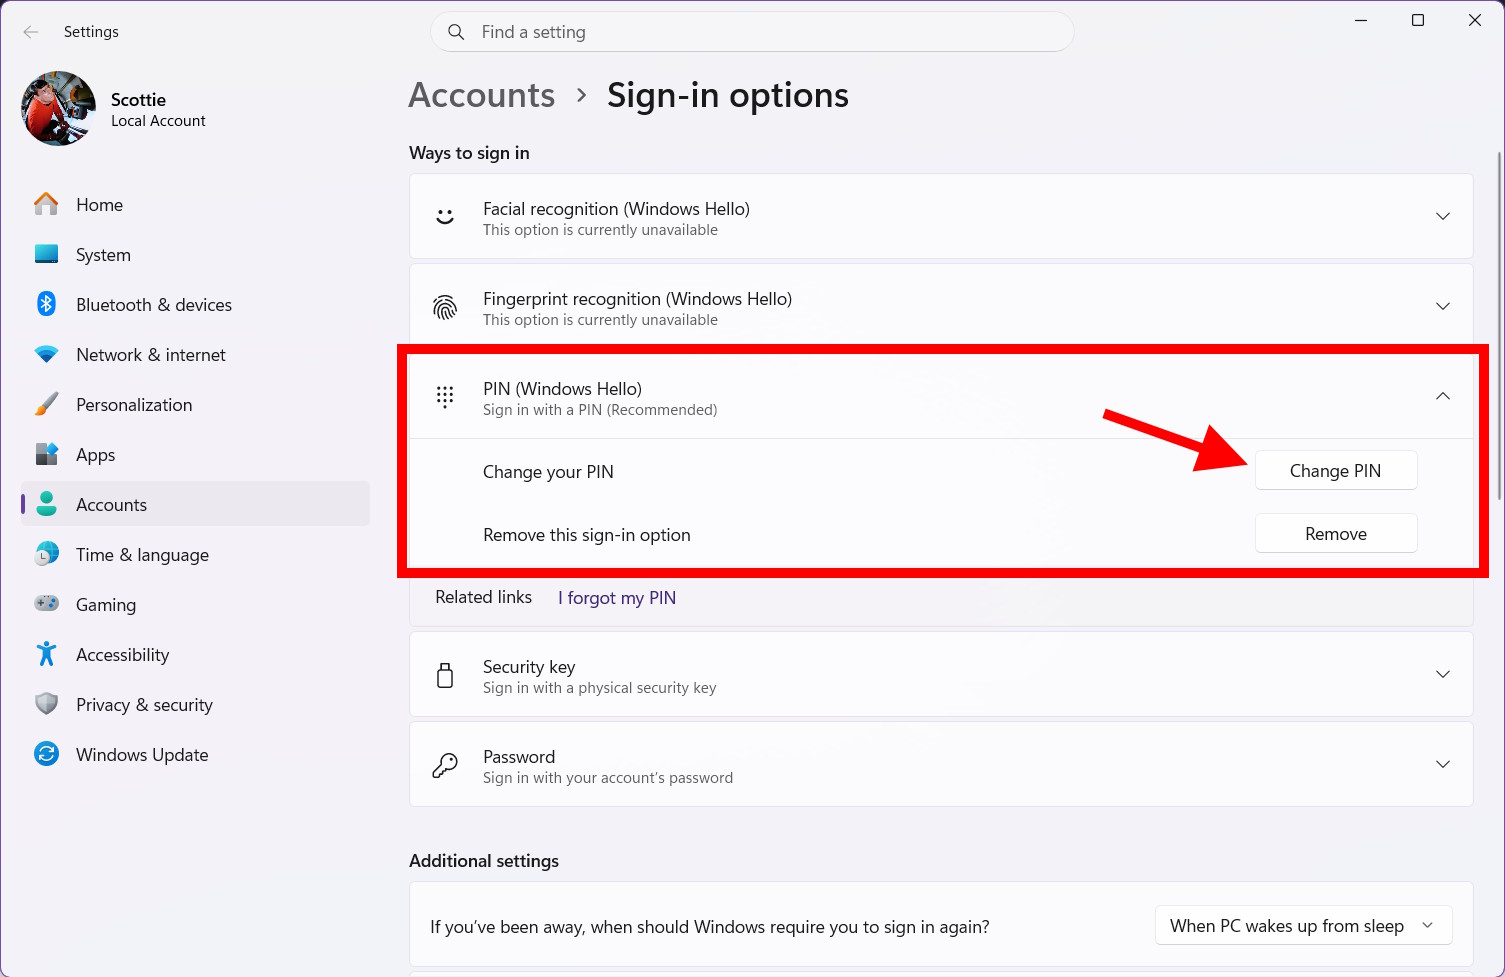
- Click the Start button / Windows logo
- Type: sign-in options, and click the Settings option of the same name
- Click PIN (Windows Hello) and add a PIN
- In the PIN popup, check the box Include letters and symbols. This lets you use your old password as a PIN!
Click OK, and now when you log in to Windows, you’ll get a PIN prompt instead of a password prompt. No big deal! Just type in your PIN/password, and you’re off and running.
Next, you need to install the KeePass plugin KeePassPasskey. The easiest way to this is to download KeePassPasskey from the Microsoft Store.
Just click the Download button, and then run the installer that it downloads. You’ll see this lovely screen:
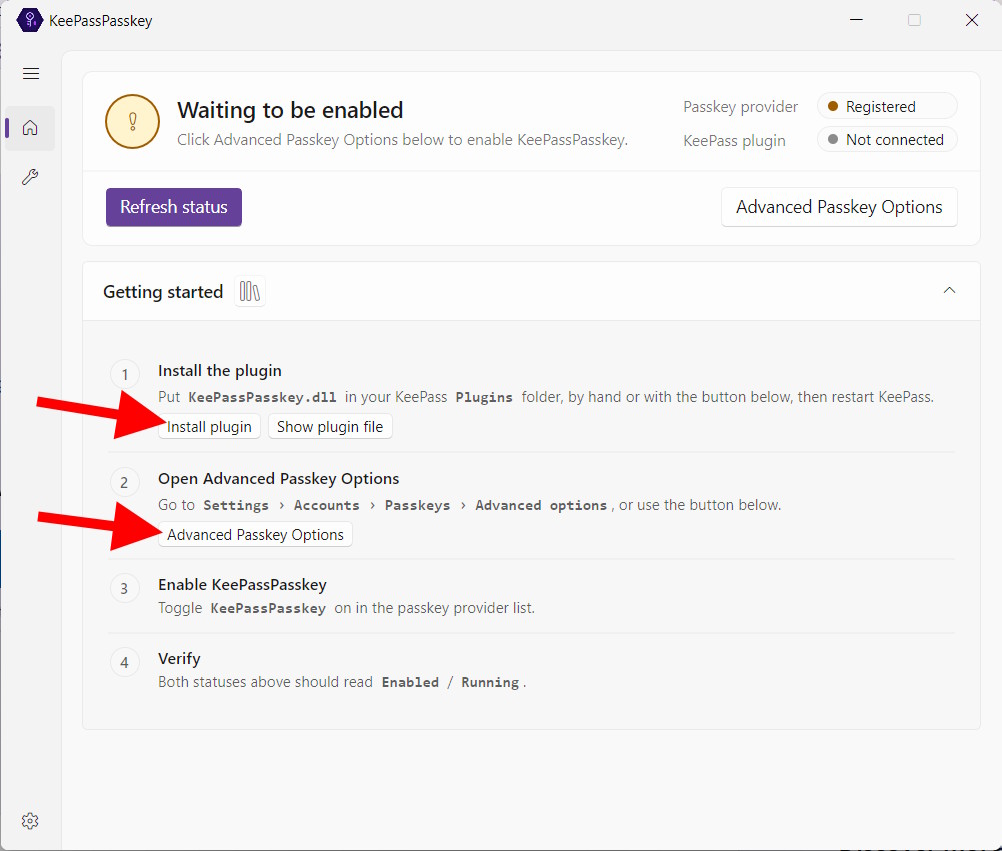
To install the KeePassPasskey plugin, click the Install plugin button. It should prompt you to confirm the location of your running KeePass installation, and add the plugin for you.
You should also see this:
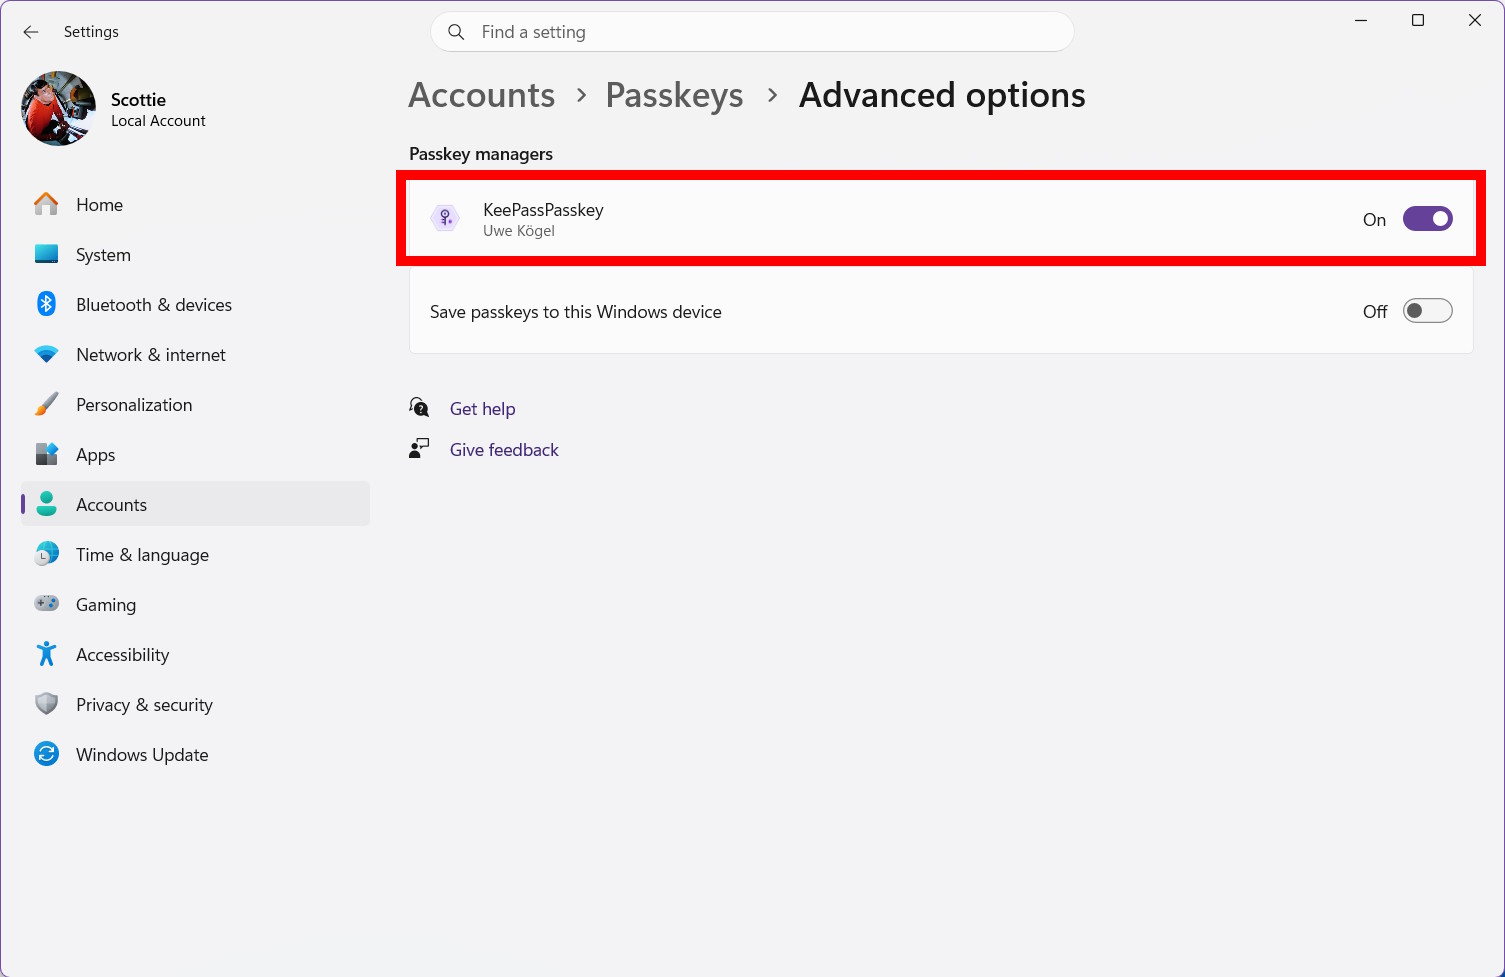
Make sure KeePassPasskey is selected as your official Passkey manager on Windows.
Then, click the Advanced Passkey Options button:
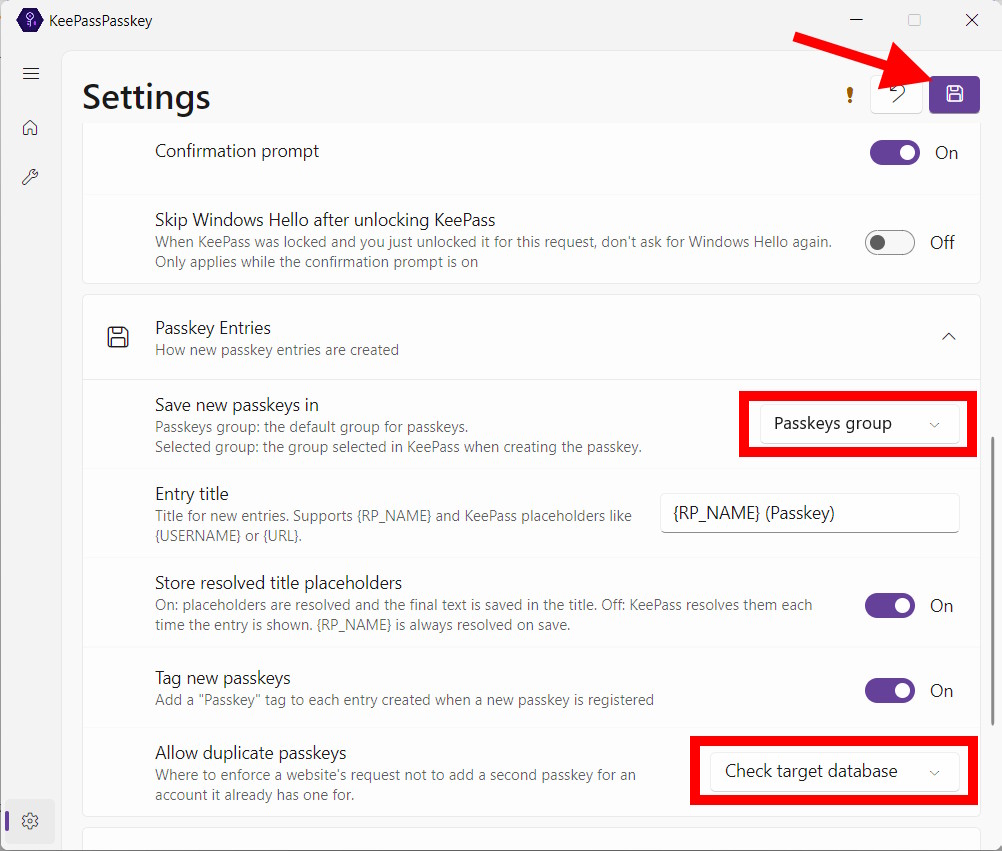
Just make sure the settings are as shown above, and click the save icon. You’re all set!
If you run the installer again, you should see 2 green indicators like so:
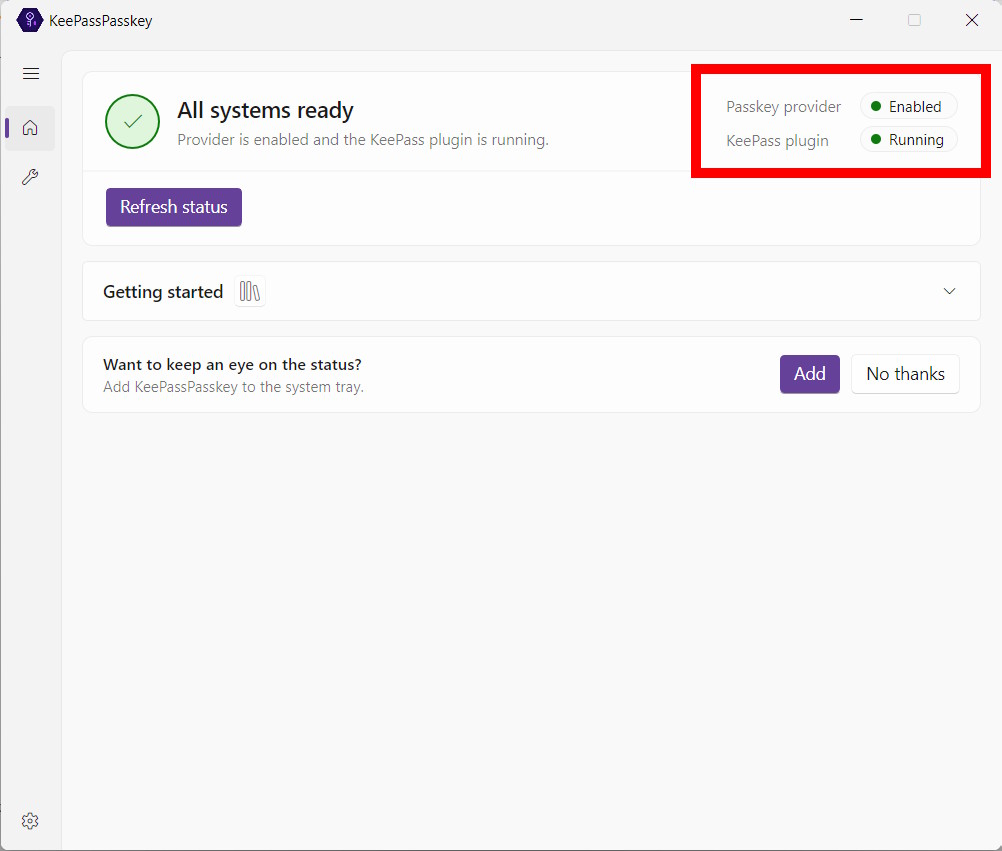
How to add a Passkey
First, ensure KeePass is actually running! Otherwise, you’ll get an error message. You don’t have to have KeePass unlocked, but it needs to be running minimized in the system tray.
Go to the site/service for which you want to add a passkey. When you try to create one, you should see this:
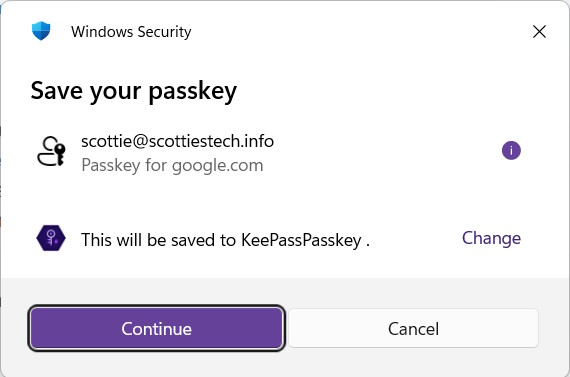
Click Continue, and you should be prompted for your KeePass database password to unlock it.
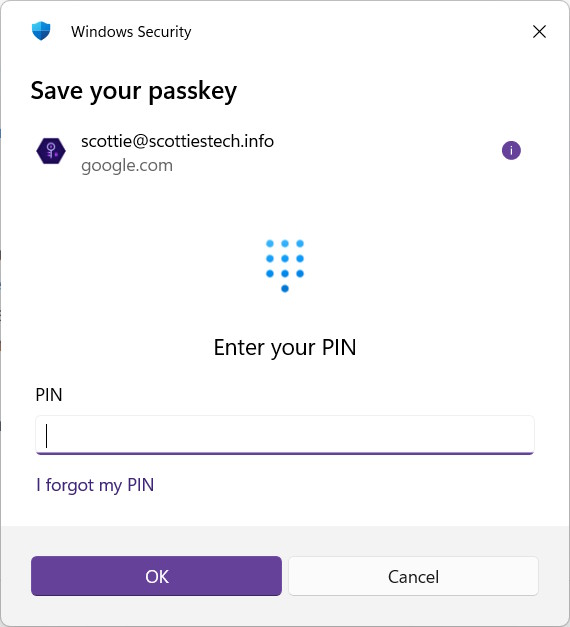
You’ll need to enter your PIN (password!) for Windows Hello as well.
That’s it! A new key pair should be generated by KeePassPasskey, but it’s stored in a new group called “Passkeys” in your KeePass database. DOHN!
Using a stored Passkey to log in
Again, first make sure KeePass is loaded!
Then, you’ll see this:
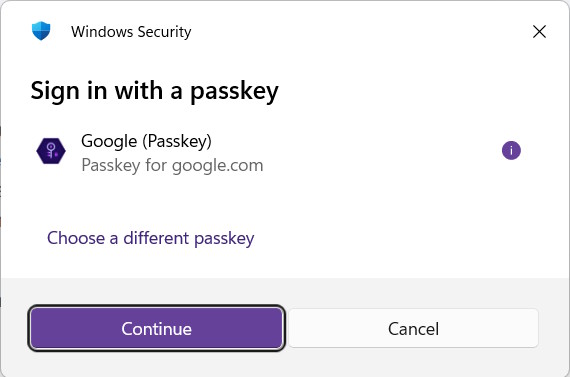
Type your password for your KeePass DB to unlock it…
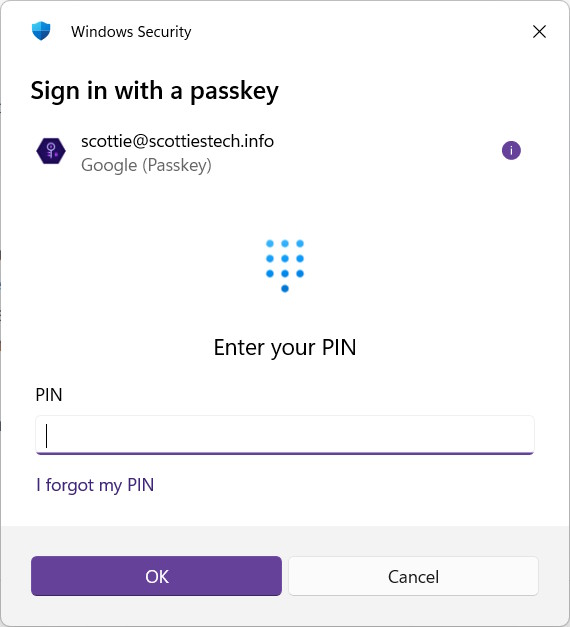
Enter Windows PIN/password…
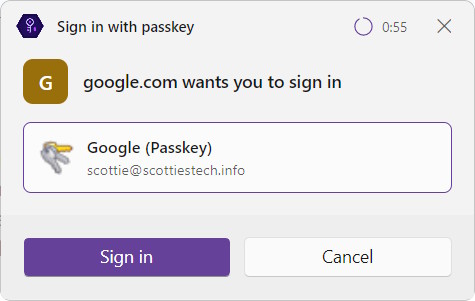
Choose the correct Passkey (which is taken from KeePass) and click Sign in.
That’s all there is to it!
What about KeePass on Android or iOS?
No problemo!
For Android, you can use KeePassDX, and Strongbox on iOS.
Both support passkeys, and all you have to do is sync/copy your .kdbx file from Windows to your mobile device.
Once installed, just search the settings of the device for “passkey” and make sure KeePassDX or Strongbox are selected for passkey storage.
You may also need to tweak a few other settings. For example, in Strongbox you also need to enable Autofill for your database inside Strongbox – then it works perfectly!
Aaand, you’re done.


What a rigmarole! Apparently a different passkey for every device – so you’ve got a password AND a passkey per device. AND then 2FA. More complication!
I think I will just stick to having a passwords!
I know, but… They’re starting to require passkeys on many sites. So, like 2FA, it’s probably going to hit all of us sooner or later whether we want it or not.