 If you’re one of those people who likes to build and upgrade your own computers, or if you have just decided to make your first attempt at upgrading an older system, there is one thing you may be wondering: Do I have to reinstall my OS?
Unfortunately, most people I talk to say one of two things:
- “I just always reinstall the OS.”
- “I upgraded once and I didn’t have to do anything to the OS, so that’s what I’m going to try this time.”
Well, Option #1 will certainly work all the time, no matter what. As for Option #2, whether or not the OS will boot depends on the hard disk controller driver. So, just because #2 worked for one upgrade doesn’t mean it will work for another.
Fortunately, whether you use Windows or Linux, there is a very easy way to prepare for a motherboard upgrade.
Now, I’m going to assume that if you think you can upgrade a motherboard, that means you kind of know what you are doing and you can find your away around Windows. If you don’t know how to get to Device Manager in Windows, well, stop right there and either get somebody to help you, or edumacate yourself right quick!
So, to start with, I will assume you are using Windows. For Linux users, see below.
Whether you have Windows XP, Vista, or Windows 7, the process for prepping your puter for a motherboard upgrade is exactly the same. What you need to do is to set the hard disk controller driver in Windows to the standard, plain vanilla Windows version. The reason for this is quite simple, and is illustrated in the following example:
- You have an AMD processor and VIA chipset in your current machine
- You want to upgrade to an Intel-based system
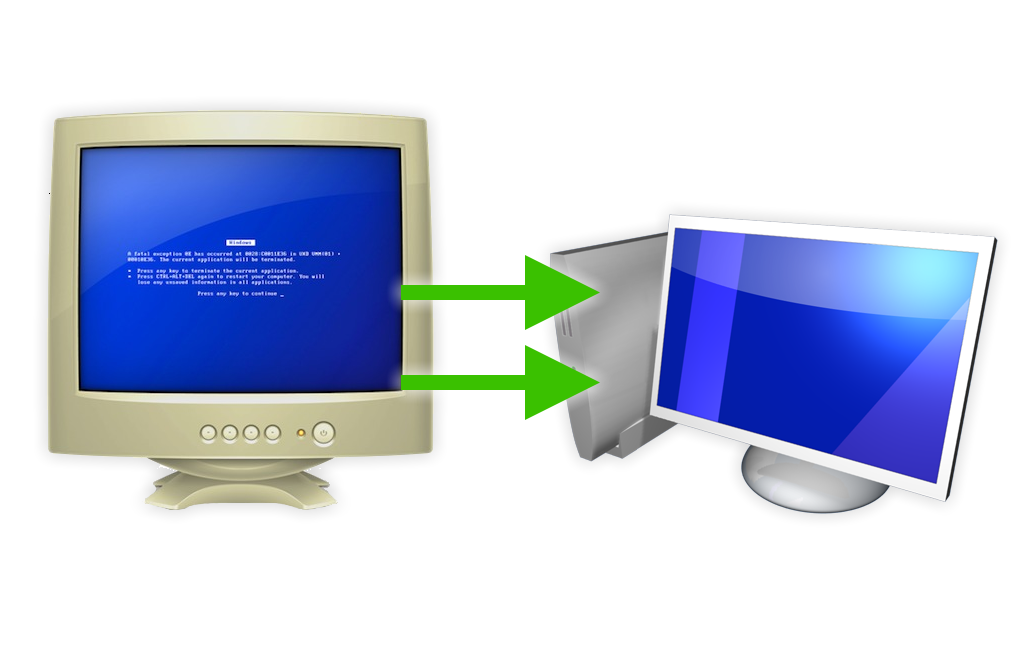
- When you swap out the hardware and try to boot, Windows will use the hard disk controller driver for your old chipset, and thus you will get a blue screen because it can’t load the OS. Oops.
The same can be true if you are moving from Intel to AMD, or even from AMD to AMD or Intel to Intel. It’s also possible that you are already using the default Windows hard disk controller, which means you don’t have to change anything. But just in case, do the following:
- Go to Device Manager
- Expand the “
IDE ATA/ATAPI controllers“ - If you have an entry like “
Standard AHCI 1.0 Serial ATA Controller” or “Standard Dual Channel PCI IDE Controller“, you’re all set. Just stop and upgrade your hardware, and you should be fine 99% of the time. If not, carry on to #4. - Right-click the non-standard disk controller entry and choose Properties -> Driver tab -> Update Driver. I’m talking controller entry here, not “
ATA Channel o“, “Primary IDE Channel“, etc. - Choose the “Browse your computer/Let me pick” options until you get a list of compatible drivers. Select the default “Standard” driver:
– For a SATA drive:Standard AHCI 1.0 Serial ATA Controller
– For an IDE drive:Standard Dual Channel PCI IDE Controller - Click OK, and don’t reboot – shut down your computer and perform your hardware upgrade. If you reboot before your upgrade, Windows may automatically replace the standard driver with the custom one that you just tried to replace!
Before firing up your upgraded puter, be sure to connect your primary boot drive up properly and configure the BIOS with that drive as the first boot hard disk. Normally, I try to connect all the drives in the computer and configure the BIOS boot order and such exactly as it all was in the old computer.
When you turn on your new monster, Windows should load and be able to access the boot hard drive just fine. It may take a bit longer than usual since Windows will be detecting your new hardware and trying to install drivers. Don’t freak out if everything doesn’t work at first – the important thing is to get the OS booted so you can install drivers and get the rest of your hardware configured and functioning properly.
That’s pretty much it. I have found this works 99% of the time. For the 1% of the time that it does NOT work for whatever reason, you can always throw the Windows disc into the optical drive, boot from it, and select a “Repair Install”. This will probably overwrite all your Windows files, and you’ll have to reapply all your Windows updates and such, but at least your data will remain intact. Just be sure not to accidentally wipe the drive. That would be bad, especially if you don’t have a backup. But, you DID make a backup first, right??
Now for Linux.
I recently had the opportunity to upgrade the hardware in a box running Ubuntu. The only thing that remained the same was the two hard drives. Everything else changed. I had read that linux just loves being upgraded, so I figured what the heck.
With my Ubuntu install, I didn’t have to set any hard disk controller drivers to a default or anything like that. I simply assembled the new machine, transplanted the hard drives to the new puter, configured the BIOS, and let ‘er rip! The machine booted without a hitch, and this was an “Ancient AMD to Modern Intel” type of upgrade. The only problem I had was that it didn’t want to detect the new ethernet controller. Rather than fighting with it by trying to install an ethernet driver without a net connection on the box, I just plopped an old ethernet card in a spare PCI slot, rebooted, et voila! The ethernet was autoconfigured and I was 100% up and running again.
Pretty easy, really.
So, whether you have Windows or Linux, you really shouldn’t have to reinstall your OS with every major hardware upgrade. If your OS installation is really old and bloated, it’s probably not a bad idea to start fresh on the new system. But if you keep your system lean and mean, why bother with a complete reinstall when you don’t have to?
Have fun!


After having looked at my motherboard specs, I think I will go for a CPU upgrade. I have a Biostar I945C motherboard with an LGA775 socket. I am currently using a Celeron 430 (1.8GHz). The motherboard supports Core 2 Duo processors up to 3.4GHz. So I am looking at a Core 2 Duo model E7500. That processor is not in the list of supported processors, although the E7200 is in the list. I THINK it is probably because the E7500 came out about a year after the motherboard was released. I have DDR2-667 ram so there shouldn’t be any problems with the FSB. Can anyone tellme why I should NOT go with the E7500? I have tried contacting Biostar tech support but get no response. Not too surprising. So any feedback would be helpful. By the way, if interested, here is a link to the motherboard info
http://www.biostar.com.tw/app/en/mb/introduction.php?S_ID=303#dl
Thanks ahead of time for any help.
Well, normally I’d update the BIOS to the latest version, and then try the CPU. If it didn’t even list the E7200, you might be in trouble, but it really depends on the BIOS/motherboard. The E7xxx series were released later after the E8xxx series, so if it says it supports the E7200, I reckon it’ll work with the E7500.
I’ve never updated the BIOS on a Biostar motherboard before, so I can’t really say if it’s safe or not – despite the warning on the their Download -> BIOS section.
You could just try plopping the E7500 in, and if you don’t even get the normal POST screen, stick the old processor back in, upgrade the BIOS, and try again.
If it were me, I’d go for it and see what happens. But then, I’m a bit crazy like that sometimes.
Scottie, Thanks for the feedback. I too am thinking that it SHOULD work. However, I finally received feedback from Biostar and they said that my board does not support CPUs with 45nm technology. Seems strange since the E7200 is 45nm. HMM! Might have to something to do with how certain features are implemented. I don’t know. Might be best to go with the E6700. It is not quite as fast but ought to still give me a significant boost in performance over the Celeron 430. As to upgrading the BIO, well I am not sure how well defined the process is with Biostar, and sure would not want to have the system inoperable. Sure appreciate your time. Once I do the upgrade I will post the results.
Hey Scottie, just looking at a few things with regard to the BIOS. First, apparently the BIOS has to be upgraded using a floppy drive, which I do not have. Second, there is an BIOS upgrade available to support 45nm technology. I think I will steer clear of updating the BIOS. For me, it is just too risky. I will post after installing the E6700.
Does this work with Windows 8?
I haven’t had the opportunity to try it yet, but I don’t see why it shouldn’t work. It works with Vista and Win 7, and Win 8 is pretty similar to Win 7.
I tried in Win 10, and works. thanks
@Scottie
Thanks! Will tell you the outcome when my parts come in!
Hey Scottie, I’m getting kind of nervous because I’m “upgrading” to an older CPU with a totally different socket than my current one. I’m trying to decide whether I should stick with this method or try this one: http://voices.yahoo.com/how-replace-motherboard-without-reinstalling-4569031.html?cat=15
Thoughts?
@Bobby
That’s basically the hard core variation of my suggestion. It is certainly more reliable, since there won’t be any unhappy drivers that may prevent booting with the new motherboard. This usually happens due to a poorly written driver IMO, because Windows shouldn’t have any problem seeing the new hardware, installing new drivers automatically as much as it can, and ignoring old drivers for hardware that no longer exists in the system.
So, if you want to be super-safe, go with the link above. I’ve never needed to do all that, but that doesn’t mean no one will ever have to!
Well Scottie, I decided I’d stick with your method, so I was going to. When the BIOS appeared, I found the button to enter the setup, but right before I pressed it, the screen went totally blank. I froze because I didn’t know what to do. I waited, and about 30 seconds later my computer started up just like usual! Now she’s up and running perfectly. Thanks Scottie! You’re a life saver.
This is a great guide. Thanks for posting it!
Hi there i’m going from a intel H61 chipset to a z77 chipset and have windows 8.1 and was wondering if this would work to do it? i know this is old but will i need to remove the old chipset or just do this and go for it.
@Tony
did not follow correctly redoing
It should work okay, as long as you set the SATA driver to the default Windows one.
ok thanks so much
I tried this, and well, for some odd reason it stuck on Windows 7 repair. I cannot seem to figure out what I did differently? When I boot to start normally the computer restarts again and again. I load again the old MB with the PC and its boots up just fine. Now I why it isn’t so smooth for me?
If you set the drive controller properly, then it might also be some other driver. For example, integrated graphics drivers, or some other onboard or add-in device has a driver that screws things up when the new mobo is installed. The one instance I can think of offhand when this happened to me, it was due to Nvidia drivers being loaded for integrated graphics on the old motherboard. I installed the old mobo, uninstalled the Nvidia drivers, and then tried the new mobo again. That worked! You may have a similar problem.
Hi Scottie, my “IDE ATA/ATAPI controllers” menu does have “Standard Dual Channel PCI IDE Controller” listed. But I’m just double checking and seeking confirmation on whether I’d be okay swapping my motherboard and CPU out, and keeping my Windows 7 Ultimate (32-bit) and all the data on my hard drive intact. The current hardware is as follows: Asus P5N-E SLI motherboard, 2gb ddr2 ram, Intel Core 2 duo (E6600), and one EVGA GeForce GTX 960. The hardware I want to put in, while keeping the NVIDIA GPU, is an ASUS M5A97 R2.0 AMD chipset motherboard, AMD FX-8350 black edition unlocked, and 4GB of PNY ddr3 ram.
You should be okay.
So if i have the“Standard Dual Channel PCI IDE Controlloer” I can just put my new motherboard in an boot up my pc dont have to go into bios or anything?
Yup.
On your new motherboard, if you’d like to use AHCI instead of the IDE mode, then if you just switch it in the BIOS/UEFI, Windows won’t boot. So, if you want to change from IDE -> AHCI, then after your upgrade is done (once Windows boots up okay and everything) you can do this: Switch from IDE to AHCI
Of course, you can also just config the new motherboard SATA ports in the BIOS to IDE Mode, and it should work just fine. But, AHCI offers a few performance enhancements. So, it’s worth the switch.
Anyone have experiencing doing this with Windows 10? I did the free upgrade from Windows 7, I’m hoping I won’t have issues with activation.
Not yet, but it seems from everything I’ve read that the worst case is you’ll have to call the automated phone activation hotline. It’s usually painless – unless they’ve changed something… I don’t know anyone who has done a big upgrade with Win 10, though. I’m actually curious to know how it goes since I’ll be upgrading a Win 10 machine shortly.
I’ve just tried this, and works, thanks
I’m planning on going to Win 10 in 2 steps. Build a new system and shake it down with a clean install of Win 7, then move the SSD over from the old system. Shake it down then do the Win10 upgrade. Thanks for the tips.
@Scottie I just upgraded my motherboard and CPU using this method on Windows 10. Only thing painful I had to do was contact Microsoft to get Windows 10 activated.
Do I even need to uninstall Processor drivers listed in the the device manager, before upgrading?
Nope. Everything else should be autodetected during the first boot with the new motherboard.
Thank you! I was getting really irratated with this and everything else I read said to just do a clean install, which I could not do since I have a ton of work programs, autoCAD, etc. loaded on this drive. One minor add in, the 1% may be due to the sata configuration. The old config was IDE and my new computer was not set to IDE. I changed this in the bios settings on the new computer and it worked.
Thanks again.
this is certainly the most comprehensive and detailed motherboard upgrade tutorial on the internet. i have searched far and wide, and your tutorial was the only one that mad common sense without the unreasonable comments i got from the others telling me to wipe and start over. this is 2016 and i sure do hope this works on windows 10
Just to clarify my IDE ATA/ATPAI Controllers has Intel(R) 7series/C12 chipset Family SATA AHCI Controller and I need to change this to Standard AHCI 1.0 Serial ATA Controller. Is this correct.
That is correct!
THANKS SOOO FREAKIN MUCH DUDE. Such a life and time saver. Keep up the good work.
Hi i am looking to upgrade my fx8320e to the lga 1151 with a 6700k.
Should i just plug in and see if it works thank you for your response!
For an AMD -> Intel upgrade, do the generic SATA driver trick first. Then, make sure there are no other drivers still installed related to the motherboard. Well, specifically, if the old board uses any kind of integrated graphics, uninstall those drivers before powering down and doing the swap. There was one case where I did an upgrade from AMD -> Intel, and the old AMD board had integrated graphics. I swapped everything out, but Windows was very unhappy with the new Intel board because the (probably crappy) AMD integrated graphics driver was still trying to load with the new Intel mobo. Now, this was many years ago, but better safe than sorry. USUALLY, all that’s needed is the generic SATA controller driver, and you should be off and running.
Hey thanks for the quick reply my board doesn’t have any Integrated graphics so I’ll just set it back to the standard driver!
Hopefully I can let you know how it turns out
@Scottie
How do I identify the integrated graphic drivers? would they be disabled if I had a 3rd party graphic card installed?
It would be under Display adapters in Device Manager. If you have a dedicated graphics card, usually the motherboard will disable the integrated graphics (or you will manually in the BIOS).
updating any drivers take too long to search…..what should i do?
Just go for it worked for but results may very windows 10 is creepily smart that way
So when I go to device manager and if I see this “Standard Dual Channel PCI IDE Controller” under IDE ATA/ATAPI controllers does that mean I should be 99% ok and I shouldn’t have to wipe my HDD?
Yup, that’s the ticket!
Have you had any reports of upgrading from an old Intel to new AMD motherboard not working with Windows 10? I’m planning to do this, but a bit worried it might cause problems….
Nope. Should be okay!
I’ve just swapped out an old Z77 intel mother board and cpu – to an AMD ryzen 2600x b450 combo in windows ten with no problems.
I didn’t need to do anything, the SAT was already standard – no reactivating of windows, no reinstalling of drivers – nothing. After being made paranoid by the horror stories and complications of swapping out a motherboard – this blog gave me the reassurance that my normal philosophy of ‘it’ll be reet’ would be ok – and it was 😉 ta.
I followed this great guide, many thanks for it. I replaced an old Intel motherboard with a new AMD Ryzen one.
But on first boot I got a blue screen, which Win10 reported as being due to “asio.sys”. Turns out this is an ASUS motherboard system driver. After 3 blue screens Win 10 offered several options, I chose to boot into Safe Mode, and then used SysInternal’s AutoRuns to find & disable all the stuff which mentioned ASUS (including asio.sys). Then it booted up fine! At this point I’d advise creating a System Restore point, so you have something to go back to if any further changes break Windows…
I then deleted the ASUS folder in Program Files, although I first had to kill a couple of ASUS tasks that were running in the background (some may find it easier to delete the folder in Safe Mode), and then used SysInternal’s AutoRuns to permanently deleted the previously-disabled items. Rebooted again to be sure all was OK.
Thanks for the great advice. Last night I replaced my old motherboard, memory and 1055t processor with ryzen 5 2600, msi 450 a pro MB and corsair 3200 ram. Everything powered up fine. Reaction of windows did not work at first, but entering my windows 10 product key did the trick.
Thanks again.
Cheers
Derek
Nice post. Help me a lot. Thank you
This was a good primer for me as i need to upgrade my motherboard to a not as old motherboard.
I hope you can comment and provide some hints for my unusual situation. Currently running lga775 that dual boots W10 or XP. XP is there to run legacy gamse circa W98SE. My ol trusty MB will not recognize any video cards in the slot, so i think it is time to say adios. Searching around for stuff that will run XP , I came across a guy selling his father system without the hard drive. Gigabyte GA z77 DS3H LGA 1155. So my upgrade involves the MB and a processor as well as the memory and peripherals he has in his box.
I am thinking of putting those peripherals in my current box (burner drive, floppy and whatever else i can move easily so Windows recognizes them. Then i need to prep my system for the switch to his box(all the stuff mentioned in your article)…move back the peripherals and install my hardrive…the issue there is its an old and slow 1 TB with 3 partitions, one for W10 on my upgrade from 7, one with lots of data-pictures and music and one with XP. I was thinking of going to mSata as the new board supports it and an SSD. This is a pretty complex set of moves and would appreciate anything that will make this easier…
Well, I’m not how to simplify that any more… But I can say that for copying the old hard drive to 1 or more new ones, I swear by Paragon Hard Disk Manager:
https://www.paragon-software.com/home/hdm-windows/
It’s easy to use, also has an Advanced Mode for doing crazy stuff, and it never lets me down. You can even download the bootable version so you don’t even need a running OS to copy partitions/drives.
Thanks for your very quick reply. I have bookmarked two of your articles on the upgrade issue for future reference. In the mean time i was looking at more info on the options am working with. I was under the impression mSata had an advantage over an SSD but couldnt really find anything definitive so maybe uncomplicate by skipping the mSata and Start by cloning the 2 OS partitions to an SSD? Been thinking the data partition ought to be on its own drive.
It is apparent that you did not see any complicating issue with rolling over 2 OSs to the new box of goodies. Am i thinking correctly by using the old box to get set up and then just move the hard drive to its new box as the easiest method. One thing i need to figure out is accessing the new MB bios and getting the new box preset for the hard drive swap.
Assuming I understand you correctly, that sounds like it will work best!
If you want to run XP (& even Win 7), my suggestion is to forget about mobo compatibility & run it under a virtual machine. That will probably be fine, unless you want to run 3D games, or connect obsolete peripherals. And as a bonus, no need to reboot to access XP.
Win 10 Pro comes with HyperV support built-in, or there are free versions of other virtual machines (which you may find easier to set-up anyway). Just make sure to enable virtualisation support in the ‘BIOS’ (which Intel & AMD have differents names for).
You touched on the issue with “obsolte peripherals”. Hardware. I sisnt mention that in my original post as it was about the upgrading, so i will add that detail now. W10 did away with things like support for gameports. In fact, for many folks sound cards are a thing of the past as well with the wounderful built in audio most MBs come with. I like having onboard audio and video as you have something to fall back to like when my PCIe slot went bad on me on my current MB- at least i am up and operating.
I have old W98se era driving games like Nascar Heat and GP3(and many more) as well as MS Flight Simulator 2k. I have old setup that converts from steering wheel with pedals and shifter to flight yoke and joystick. Not the greatest, but fun. I have a sound card that has W10 drivers, but when booted in XP the Gameport goes live with the XP drivers. I dont think VM is going to do that and i dont think it will be that same experience, but thanks for your thoughts.
I would not recommend a VM for 3D (racing) games, especially if you are wanting to use gaming peripherals… unless you’ve already tested it as
working.
HyperV is no use for 3D games, but it’s outside of my experience whether some other free VMs *might* handle that & your external controllers (seems a bit doubtful, but might be possible, and researching/testing it under a VM wouldn’t cost anything except your time…).