 Every now and then, you upgrade your puter.
Let’s say you add an SSD. You copy your old hard drive’s contents to your shiny new SSD, and use your old HDD as a data-only drive. You boot from the new SSD, and poof! You’re done.
Well, sort of…
Your new E: drive is now only a data drive, but alas, there is still an E:\Windows folder, and it’s taking up lots of space.
So, you try to delete E:\Windows… Access Denied, you need permissions, and so on…!
There are a million and one articles out there about how to delete an old, unneeded Windows folder, but they usually involve some piece of software or complicated shenanigans.
Well, forget that! This method is a piece of cake…
So, you might download and try a tool like IOBit’s Unlocker. Well, okay, but that’s kind of unnecessary. And such tools can take a LOOONG time to finish their job.
There are two steps needed to remove old “system” folders like your E:\Windows directory (or whatever drive letter it may have):
- Take ownership of the folder
- Change permissions so you can successfully delete the folder (and its contents) after you own it
Now, normally, this involves much wailing and gnashing of teeth – or special software.
It’s the first step – taking ownership of the old Windows dir – that’s the biggest headache.
Well, fear not!
Step 1 – Take ownership of the old Windows directory
In Windows 10, right-click the Start button, and select Command Prompt (Admin).
In older versions of Windows, click Start, type “cmd“, right-click Command Prompt, and then choose Run as Administrator.
You need to copy/paste this command into the Admin Command Prompt you just opened:
takeown /f "E:\Windows" /R && icacls "E:\Windows" /grant administrators:F /c /l
Note that “E:\Windows” should be changed (twice!) to match the Windows or other folder you wish to remove.
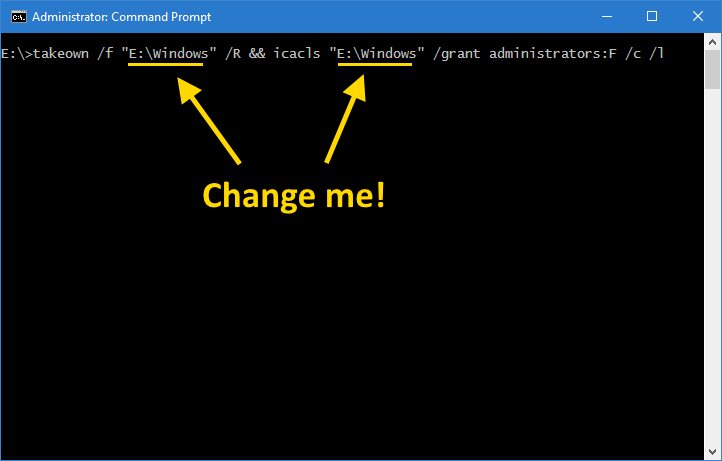
This step won’t delete anything yet. All it does is to recursively zoom through the folder you specify and give Administrator accounts on your puter (and therefore you!) control of the folder and all its contents.
Once it’s done running, you can close the Command Prompt window.
Step 2 – Set Permissions on the old Windows directory
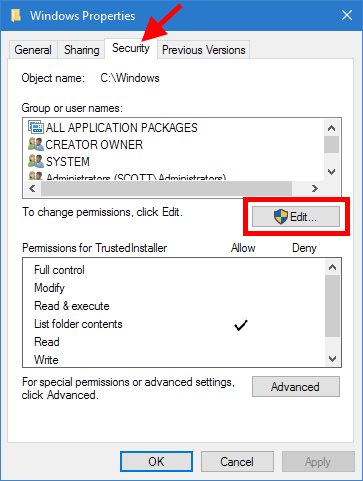
Here, you need to navigate to your old Windows folder in File Explorer (Win-E).
Right-click the old Windows folder, and choose Properties.
Click the Security tab, and the click the Edit button:
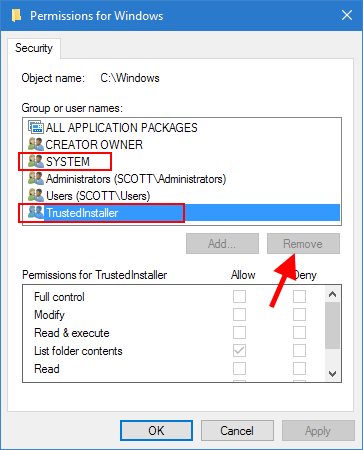
On the Permissions for Windows dialog that appears, you need to select SYSTEM and TrustedInstaller, and click the Remove button for each.
Click OK (twice) to back out of the Properties dialogs when done. If prompted, say yes to applying the changes to all folders, blah blah blah.
Note that if you haven’t done the first step yet, the Remove button will be greyed out. So, take ownership first!
Delete the old Windows folder
Now, just delete the old, now-accessible Windows folder in Explorer. DONE!
If you’d like to be a bit more hardcore, you can open another Admin Command Prompt (as described above), and run the following command:
rmdir /S E:\Windows
Make sure you type the correct drive letter and path!
You can use this same technique to quickly and easily “unlock” other Windows system folders that refuse to be deleted.
Wasn’t that fun?


Thanks for SYSTEM and TrustedInstaller trick! Never heard about ’em before 🙂
This doesn’t seem to work for me, followed all steps to the letter and deleting the folder using command prompt (admin) still gives me access is denied on every file.
It only works if you’re using an administrator account on your puter (which you probably are). In that case, try using IOBit’s Unlocker program. That has never failed me as a last resort, even if it is a bit pokey sometimes.
Thanks Scottie!
I posted my blog article linking to yours too soon. I followed your instructions to the “t” and am still getting access denied the whole way through. 🙁
I even tried IOBit’s Unlocker and still can’t delete.
Says I require permission from my computer’s name, which I have, to make changes to this folder.
I know I can boot from a different OS on a USB stick, but that’s not what my goal is here. My goal is to be able to do this from within Windows.
Thanks!
I ran this as is, and it kind of did & didn’t work, there were a lot of ‘don’t have permission’ issues.
I tried again adding’/SKIPSL’ to takeown and ‘/T’ to icacls and it worked.
The /SkipSL is to set permissions on the link file instead of target for links, and the /T tells icacls to recurse into child directories.
AHA! Good to know, thanks!
Greetings.
With all due respect, this article is non-sense. Changing ownership will not solve the problem.
In any case, this method does not work.
Here is the real “easy way” method:
Boot from a disk with UBANTU OS.
Delete the windows folder.
Finished.
Time required: 2 minutes.
Efficiency: 100%
Best wishes.
Of course it will solve the problem – it’s Windows. My method is exactly how I did it on my own puter! Besides, I highly doubt that most non-techie people have a disc with Ubuntu on it handy, and if they’re not familiar with Ubuntu then it’s even less likely they’d go that route.
I use this method and its stress-free!!!!, just a get a copy of any Linux distro and do the magic!!
This worked. Thanks
Thanks for the pointers.
The process as documented didn’t work for me, as it didn’t automatically replace the permissions on any sub-items in the windows folder.
I had to click on the “Advanced” button on the Security tab, and there was an option to replace the permission on all items in the folder there.
After that, I was able to delete the folder
You’re a genius, thank you!
Figured I’d give this another go, and still no luck. Still get access denied on every file in the command prompt or a Windows dialog box saying I need to grant permission.
For people who come to this much later. When using advanced tab, make sure the user you are using for ownership is the same as the one you use to apply permissions. I found that my user was not added automatically to this window and had to add it and then I could apply that user to all subfolders and files.
I managed to rename the folder to windows.old and then use windows cleanup/system folders to remove.
Vannerd is the hero we needed, this worked.
Is the correct answer
Oh my god!!! I was starting to trip over my nutsack after trying the above for at least an hour before I saw this. One click – rename to “Windows.old” and up in smoke it goes. Thanks man!
It was very helpful and 100% working.
thank you so much
This is really a pain, easy to delete an old Windows folder including sub folders is to rename the folder to “Windows.old” and use the disk cleanup utility for that drive and the system files option – it will see that folder as an old version of windows and BOOM – a few secs later its gone 😛
That only works if you are able to rename the folder because you are the owner, all the permissions are correct, and the stars are aligned!
It works. Make sure you run the command prompt as administrator every time you open it.
UPDATE: After removing trustedinstaller and system. Click the “Advanced” button in the same security tab of the file properties. Then tick the bottom box which says “Replace all child object permission entries with inheritable permission entries from this object”, then press okay and you’re done. Tadaa!
Or just random that folder to “windows.old” and run the disk clean up utility on that drive and tell it to delete old Windows installations…
not working ..for me.
You may have to delete the Creater/Owner group from the permisions in addition to System and Trusted Installer. I think the reason it works for some and not others is differences between Home vs Pro Windows 10.
Thanks a lot, I am really appreciate it.